Quantcast
Channel: Planet Qt
Viewing all 15410 articles
Browse latest View live

V-Play Engine: Release 2.15.1: New Firebase Features and New Live Code Reloading Apps | Upgrade to Qt 5.10.1 & Qt Creator 4.5.1

$
0
0

V-Play 2.15.1 adds support for Qt 5.10.1 and the latest Qt Creator 4.5.1. Qt 5.10.1 comes with over 300 fixes and improvements. Qt Creator 4.5.1 adds several fixes as well. This update also improves the V-Play Firebase components with easier configuration and callback functions.

V-Play 2.15.1 Improvements

V-Play is now compatible with Qt 5.10.1 and Qt Creator 4.5.1. See later parts of this post for the highlights. V-Play Release 2.15.1 also includes many engine improvements:

New Live Code Reloading Apps for Desktop, Android and iOS

V-Play 2.15.1 comes with an improved V-Play Live Client and Server. The updated Live Client supports all new features and components.

v-play-live-code-change-reload-windows-android-ios

Reworked UI for Live Reloading Android and iOS Apps

There’s also a new V-Play Live version available for you on Android and iOS. The UI received a complete rework.

live-client-app-ios-new-ui

Project Cache to Open Recent Projects

It includes a new project cache, that lets you view your recent projects. This allows you to open your projects on your mobile phone also when not connected to your desktop, to show it to friends, customers or to yourself.

live-client-app-ios-project-cache

Run Code Examples from Documentation and Blog with the V-Play Web Editor

The new live client app also improves using the V-Play Web Editor. With the V-Play Web Editor, you can run code examples on your Android or iOS phone, right from your desktop browser. It’s a Cloud IDE for editing, running and debugging QML Code. Here is an example that you can try right away:

import VPlayApps 1.0
import VPlay 2.0
import QtQuick 2.8

App {
  NavigationStack {
    Page {
      title: "My First App"

      AppButton {
        anchors.centerIn: parent
        text: "Celebrate"
        onClicked: {
          nativeUtils.displayAlertDialog("Yay", "That is so cool!")
        }
      }
    }
  }
}

You can read more about this feature in this blog post.

Download the Latest Apps for Android and iOS

The new apps include all the latest V-Play features, so make sure to get the updated app to be fully compatible with current version of V-Play Engine and the Live Server. You can download the app for iOS and Android here:

Google_Play_Badge-1App Store
ic_launcherV-Play & QML Live Scripting App
Search in App Stores for: “V-Play Live Scripting”

Use WebView with Live Reloading on Android and iOS

The new V-Play Live Client mobile apps support the QtWebView module. You can now use code reloading also for apps that include a WebView.

import VPlayApps 1.0
import QtWebView 1.1

App {
  id: app

  NavigationStack {

    Page {
      id: page
      title: "WebView"

      WebView {
        anchors.fill: parent
        url: "https://www.google.com"
      }
    }
  }
}

Note that the WebView module is not available on Windows desktop.

Test Firebase and Facebook Plugins with Live Reloading

With the new V-Play Live Client apps, you can test the Firebase and Facebook plugins, without any integration steps. Note that both plugins connect to public test accounts, so make sure not to store any sensitive data.

import VPlayApps 1.0
import VPlayPlugins 1.0

App {
  id: app

  NavigationStack {

    Page {
      id: page
      title: "Firebase Database"

      FirebaseDatabase {
        id: database
        onReadCompleted: {
          if(key == "teststring") button.text = value
        }
      }

      AppButton {
        id: button
        anchors.centerIn: parent
        text: "Read Value"
        onClicked: {
          // get value from database. the result is processed in onReadCompleted of FirebaseDatabase
          database.getValue("public/teststring")
        }
      }
    }
  }
}

Firebase Callback Functions

When reading and writing data to and from a FirebaseDatabase, you can now use callback functions in addition to the item’s signals FirebaseDatabase::readCompleted() and FirebaseDatabase::writeCompleted().

You can supply a function as third parameter to the methods FirebaseDatabase::getValue(), FirebaseDatabase::getUserValue(), FirebaseDatabase::setValue() and FirebaseDatabase::setUserValue(). Both the signal and the callback function will be called on completion.

This is the same example as above, using a callback function instead of the readCompleted signal:

import VPlayApps 1.0
import VPlayPlugins 1.0

App {
  id: app

  NavigationStack {

    Page {
      id: page
      title: "Firebase Database"

      FirebaseDatabase {
        id: database
      }

      AppButton {
        id: button
        anchors.centerIn: parent
        text: "Read Value"
        onClicked: {
          // get value from database. the result is processed in callback function 
          database.getValue("public/teststring", {}, function(success, key, value) {
            button.text = value
          })
        }
      }
    }
  }
}

Firebase Configuration from QML

It is now possible to specify your Firebase Plugin account configuration in QML code. You can override the default configuration of FirebaseDatabase and FirebaseAuth using the new type FirebaseConfig. This allows for using multiple Firebase accounts from within the same app. It also simplifies the Firebase configuration for you in general, because you do not need any google-services file, but can configure your Firebase app completely from QML instead.

import VPlayApps 1.0
import VPlayPlugins 1.0

App {
  id: app

  NavigationStack {

    Page {
      id: page
      title: "Firebase Database"

      FirebaseConfig {
        id: customConfig
        projectId: "v-play-live-client-test-db"
        databaseUrl: "https://v-play-live-client-test-db.firebaseio.com"
        apiKey: "AIzaSyCheT6ZNFI4mUwfrPRB098a08dVzlhZNME"
        applicationId: "1:40083798422:ios:ed7cffdd1548a7fa"
      }

      FirebaseDatabase {
        id: database
        // assign custom config values. overrides config from google-services.json / GoogleService-info.plist
        config: customConfig
      }

      AppButton {
        id: button
        anchors.centerIn: parent
        text: "Read Value"
        onClicked: {
          // get value from database. the result is processed in callback function 
          database.getValue("public/teststring", {}, function(success, key, value) {
            button.text = value
          })
        }
      }
    }
  }
}

Native DatePicker Dialog for Android, iOS and Desktop

You can now let the user select a date from a native date picker dialog with the new function NativeUtils::displayDatePicker().

datepicker-ios-android

import VPlay 2.0
import VPlayApps 1.0
import QtQuick 2.9

App {
  id: app

  NavigationStack {

    Page {
      id: page
      title: "Date Picker"

      AppButton {
        id: button
        anchors.centerIn: parent
        text: "Display Date Picker"
        onClicked: {
          nativeUtils.displayDatePicker()
        }
      }

      Connections {
        target: nativeUtils
        onDatePickerFinished: {
          if(accepted) button.text = date.toLocaleDateString()
        }
      }
    }
  }
}

Fix QML Import Issue in Qt Creator

After the last V-Play update with Qt Creator 4.5, some of you faced issues with import statements in QML. This did not affect building and running the application. Yet it caused error messages in Qt Creator and affected auto-completion and syntax highlighting.

With V-Play 2.15.1, this is now fixed.

More Improvements and Fixes

  • Improve rebound effect of list view in drawer used in Navigation (default on Android or if using navigationModeDrawer).
  • Improvements for VPlayMultiplayer matchmaking and error handling. Update to latest Photon version for multiplayer services.
  • Increased timeout between plugin trial notice dialogs.
  • Reduce duration of V-Play Splash screen during development for standard build & run from Qt Creator.
  • Documentation improvements in various components. (Special thanks to user Marcin for extensive contribution!)
  • Disable user location updates for AppMap if AppMap::showUserPosition and AppMap::enableUserPosition is false, to optimize battery usage on mobile devices.
  • Fixes an issue where games would be always started in fullscreen mode while developing, if previously an app was run in iOS theme.
  • Fix App::isOnline and GameWindow::isOnline property on macOS Sierra and iOS 10.
  • Fix user position and location circle for AppMap with MapBoxGL plugin.

For an overview of all changes, make sure to see the changelog here.

Qt 5.10.1 Improvements for App and Game Development

Bugfix Release

Qt 5.10.1 comes mainly as a bugfix release. It contains over 300 fixes and improvements, with close to 1400 changes over 5.10.0.

Fix iOS Font Rendering Issue

One major fix targets the font rendering issue on iOS. This issue caused texts with native font to appear in weird glyphs occasionally. With this update, fonts on iOS appear as beautiful as they are, all the time!

Qt Creator 4.5.1 Support

The new version fixes several issues and brings improvements to the Qt Creator UI. It fixes crashes when importing or switching projects, as well as the mouse cursor getting stuck in waiting state on Windows.

How to Update V-Play

Test out all these new features by following these steps:

  • Open the V-Play SDK Maintenance Tool in your V-Play SDK directory.
  • Choose “Update components” and finish the update process to get this release as described in the V-Play Update Guide.

V-Play Update in Maintenance Tool

If you haven’t installed V-Play yet, you can do so now with the latest installer from here. Now you can explore all of the new features included in this release!

For a complete list of the changes to V-Play with this update, please check out our change log!


More Posts Like This

how-to-test-online-code-examples-on-android-and-ios-with-live-code-reloading
Web Editor: Test Online Code Examples on Android and iOS with Live Code Reloading
v-play-2-14-2-how-to-use-vplay-plugins-with-live-reloading

Release 2.14.2: Live Code Reloading with Native Cross-Platform Plugins

v-play-live-reloading-windows-mac-linux-ios-android-qt
Release 2.14.0: Live Code Reloading for Desktop, iOS & Android

The post Release 2.15.1: New Firebase Features and New Live Code Reloading Apps | Upgrade to Qt 5.10.1 & Qt Creator 4.5.1 appeared first on V-Play Engine.
The Qt Company Blog: Qt Roadmap for 2018

$
0
0

Qt 5.9 LTS is a solid baseline, which continues to improve still during 2018. Qt 5.10 was released in December, but there is more cooking. We are currently finalizing the Qt 5.11 release for May and looking towards Qt 5.12 LTS in November. In addition to the Qt framework we are actively developing our tooling offering. Tune in for an overview what we have in the works for 2018.

This blog post is a continuation of roadmap posts I have written for 2016 and 2017. As always, there is more to tell than what reasonably fits in a blog post, but I will try to talk about the most interesting items. There will be many more blog posts, videos, webinars and of course product releases throughout 2018 to provide details of the numerous items we are developing. Just like in the earlier posts, I would like to thank each and every Qt developer for their contributions. Most of the functionality is created by The Qt Company, but we also have a great ecosystem with many contributors. They have provided multiple extremely valuable contributions throughout the years and continue to shape Qt also in the future. In addition to those contributing code, we have also a large number of people active in the Qt Project forums, on mailing lists, as well as reviewing code and testing the Qt development releases. Together we create Qt!

Timelines for Qt 5.11, Qt 5.12 LTS, a lot of great tools and more

For 2018 we are planning to have two Qt feature releases: Qt 5.11 in May and Qt 5.12 LTS (Long Term Support) in November. As usual, we offer pre-releases for testing the new features. We will also create patch releases for these to address issues reported by users. In addition, we continue to make Qt 5.9 LTS patch releases throughout 2018.

For Qt Creator we are planning to have three feature releases: Creator 4.6 in March, Creator 4.7 in July and Creator 4.8 in November, providing incremental improvements and new functionality for our awesome IDE. The latest addition to our tooling offering, Qt 3D Studio, is planned to release a major new version in June: Qt 3D Studio 2.0 with new runtime based on Qt 3D. During the second half of 2018, we are planning to release Qt 3D Studio 2.1 in September and Qt 3D Studio 2.2 in December.

For our industry offering we continue to develop Qt for Automation and Qt Automotive Suite further. A major new version, Qt Automotive Suite 2.0, is planned to be released soon, followed by incremental update releases. We are also introducing new Qt Safe Renderer 1.0 for use in safety critical applications of Qt.

So, a busy year ahead of us. Now, let’s dive a bit into the features and functionality included in these releases.

What is coming with Qt 5.11 and Qt 5.12 LTS

Qt 5.9 LTS has been a solid baseline with multiple patch releases providing bug fixes and other improvements. We have already fixed over one thousand user reported issues with the Qt 5.9.x patch releases and intent to continue these during 2018. Qt 5.9 LTS has recently entered the Strict phase, which means we will fix the most important bugs, but the less important fixes will be targeted to Qt 5.11 (and later 5.12 LTS). In addition to continuously improving the quality, we are actively focusing into performance of the key use cases. We are constantly measuring performance in order to identify commits that have caused a performance regression in some area – and we also improve performance whenever possible. With the focus in both fixing bugs and improving performance, new Qt releases run the existing applications faster and more reliably.

When it comes to new features, we have many things ongoing related to graphics, so I’ll start with that. One of the biggest things for 2018 is the unification of our 3D engines. Qt 3D Studio 1.x releases use the 3D engine contributed by NVIDIA. While it is a good and solid engine, the benefits for migrating on top of Qt 3D are clear: easier to use both pre-defined and programmatically created content in the same application, improved support for different operating systems and hardware, and of course also avoiding the need to develop and maintain two different 3D engines.

Activities for being able to run Qt 3D Studio applications on top of Qt 3D have been ongoing for a long time and there are quite many improvements also to Qt 3D itself done during the process. Some of these are the improvements done to Qt 3D performance and reducing memory consumption of Qt 3D needed to efficiently run complex Qt 3D Studio applications on top of it. A great example of the benefits of unification is that these performance improvements to Qt 3D benefit also the existing Qt 3D applications – in addition to the upcoming Qt 3D Studio 2.0 applications.

Another major item for graphics is asset conditioning, essential for being able to reach optimal performance on target hardware. Both for 2D and 3D graphics, the size of assets is often a significant part of the overall application size and especially runtime memory footprint. During 2018 we continue to improve the asset conditioning support in Qt by adding more supported texture compression and packaging formats and making it easier to handle the graphical assets in build system and tooling.

Basic support for ETC1, ETC2 and ETC2_EAC compression was added already with Qt 5.10. Qt 5.11 improves the texture compression implementation and adds support for the commonly used KTX (Khronos Texture) texture file format. Modern GPUs with OpenGL ES 3.x support can handle the compressed textures efficiently, leading into improved memory usage and performance with the new Qt versions. We aim to continuously improve the asset conditioning capabilities of Qt and are currently looking into texture atlassing and other possibilities in order to further improve the performance and memory usage of textures.

Other areas we are working within the graphics are improved support for Vulkan and introduction of initial Metal support with Qt 5.12. We have also been looking into support for hardware graphics layers especially when using Qt Wayland. This is still quite hardware specific, but we have already enabled it with some commonly used SoCs.

Completely renewed gesture handling a.k.a. Pointer Handlers as a new approach for mouse, touch and gesture event handling is a major area we have been working on for quite some time now. The main issue addressed with the new functionality is versatility especially in multi-touch and multi-monitor applications, which is an area where the previous functionality has not been enough to tackle all aspects. The new functionality enables implementing other kinds of control mechanisms in Qt applications, for example based on hand gestures detected by a camera or a proximity sensor.

Pointer Handlers provide lightweight declarative API for recognizing and handling the most common mouse, touch and multi-touch gestures (press-hold-release, drag, swipe, and pinch) from mouse and touchscreen, in parallel across the scene. You can interact with multiple Items simultaneously, across multiple screens when necessary. First introduced as a Qt Labs feature, this is planned to graduate to a fully supported feature with Qt 5.12. Pointer Handlers can be extended to handle more use cases and are intended to have a public C++ API in upcoming releases.

Qt Quick Controls 2 received the initial capability for image-based styles with Qt 5.10. We are looking forward to completing the offering in Qt 5.11 and new design templates, including a template for Inkscape (in addition to Sketch, Illustrator and Photoshop templates). We are also well in progress for a new, performance optimized, table view implementation for Qt Quick, aiming to land in Qt 5.12. The target is to offer the new table view as a patch to be tested on top of Qt 5.11 in order to get early feedback. The implementation is done from the ground up with performance in mind, and we believe it is now on a good level.

So, quite many new things for Qt Quick users, but not to worry – we have not forgotten users of Qt Widgets. On the contrary, already during the past year we have been increasingly addressing open bugs of Qt Widgets and intend to continue doing so during 2018 and beyond. Both Widgets and Qt Quick have their strong points and they complement each other nicely as fully supported parts of the Qt offering.

Qt WebEngine, our HTML5 engine based on Chromium, will get an update to Chromium version 65 with Qt 5.11. For Qt 5.12 LTS we are looking into possibilities for decoupling Qt WebEngine from Qt release schedules to allow more frequent updates of Qt WebEngine. This is still under research, but there seem to be quite tangible benefits from carving out Qt WebEngine to a separate item. Current thinking it that as a separate item we should be able to release Qt WebEngine every three months, following nicely the schedule of Chromium releases every six weeks. For Qt 5.12 LTS users this would mean the possibility to get not only the security updates, but a full new Chromium version supported on top of the long-term-supported release of Qt.

A big new thing we aim to release during 2018 is Qt for Python, i.e. bindings to Python programming language. Initially started as PySide, the work has continued for quite some time already. After a lot of work, we are reaching the point of being able to offer a technology preview to be used on top of Qt 5.11. For those not familiar with what Qt for Python is, it offers a set of bindings to enable Python applications to leverage Qt functionality. For example, Qt is a great framework to create the user interface of a Python application. Python is a powerful programming language with a large and growing user base. According to Stack Overflow, Python is the fastest growing programming language. Based on their analysis, the amount of Python developers exceeded the amount of C++ developers in 2012 and is currently over three times larger. Tiobe index ranks C++ to be still more popular than Python, but also based on their study Python is on a growth trajectory. Our hope is that many of the Python developers will find Qt valuable to use in their applications.

To complete the list of Qt framework items, let’s talk a bit about our ongoing research of Qt for WebAssembly. We have earlier looked into Qt for Native Client and emscripten and the current work for WebAssembly continues along the same path. Since 2017 the four leading browsers (Chrome, Edge, Firefox, and WebKit / Safari) have agreed upon the use of WebAssembly, so it is reaching to be a stable platform to run Qt on. We will blog more about running Qt applications on WebAssembly later, for now you can take a look at the code and build instructions.

Improved and new tooling for Qt development

In the tooling area, we have been working hard to create the new Qt 3D Studio based on the NVIDIA contribution we received a year ago. Qt 3D Studio is a great tool for creating interactive 3D user interfaces and applications. The editor is a cross-platform Qt application running on Windows, Mac, and Linux. Qt 3D Studio is not a tool for designing 3D models, these can be imported from commonly used tools such as AutoDesk Maya, MODO by the Foundry and even Adobe Photoshop, to mention some examples. Qt 3D Studio comes with a large set of materials and other assets to complement the models imported from other tools. The big thing for 2018 is the Qt 3D Studio 2.0 release where we switch the runtime to be based on Qt 3D. This allows deeper integration with other Qt functionality, improved portability, reduced maintenance effort and many other benefits.

While many of our Qt 3D Studio examples are geared towards Automotive and Digital Cockpit use cases, it is by far not just a tool for Automotive. Need for 3D user interfaces exists in multiple other industries such and automation, medical, entertainment, home appliances and more. Qt 3D and Qt 3D Studio are also fit for the creation of AR and VR applications – a raising technology area that has many benefits both for consumer and business needs. Automotive is an important area for Qt and we continue to develop Qt 3D Studio according to the needs of it, but not as the only industry to cater for.

In Qt 3D Studio 2.0 as well as the 2.x releases later in 2018 we focus especially into interoperability with other parts of Qt, for example, seamless integration with Qt Quick as well as improved integration with Qt Creator IDE. One of the upcoming key improvements in the editor is completely rewritten timeline component, providing greatly improved ergonomics and workflow. With 2.0 we also aim to provide the final and fully supported Behavior API and Data Node API. We also continue to improve examples and documentation in order to make the creation of 3D user interfaces with Qt efficient, easy and fun.

In addition to tooling for 3D UI creation, we are looking into ways to improve our tooling for 2D UI creation. In many cases, Qt Quick is all that is needed for the UI as it allows efficient creation of dynamic and interactive user interfaces. One of the areas we aim to improve is better support for importing assets from commonly used design tools. This has been possible before, but we want to make it better and easier also for people who are not experts in software development. Other key improvement areas include the functionality, ergonomics, and usability of the tooling – again also for people other than developers. The third key area to improve is the possibility to easily see the outcome of design changes in the target application, even in the target device. Ease of deployment to target device has always been a strong point of Qt Creator, but there is still room to improve. We are planning to have the improved 2D UI design offering ready for the first release during the latter part of 2018 – and will certainly provide more information of this during the year.

For Qt Creator, we have many incremental improvements planned to be done in the upcoming releases during 2018. Some of the main areas we are looking into are leveraging Clang code model, Python support, support for upcoming Qt target platforms (e.g. Qt for WebAssemby) and improved CMake support. Using Clang provides us with code-assistant functionality for modern (and future) C++ language standards. With Qt for Python, it is essential to offer Python support in Qt Creator, to allow convenient development and debugging of Python applications.

In addition to the high-profile features listed above, we continue to improve all the important areas of Qt Creator. For example, debugger support, code editor features (complementary to clang/qml code models) and releasing (improvements to the installation process, pre-releases via the online installer). Continuously improving CMake support in Qt Creator is needed to keep the growing CMake-using customer base satisfied. We also continue the development of QBS and maintenance of qmake, keeping also these as viable options for Qt applications. Just like with Qt in general, we are also continuously looking into the performance of Qt Creator and doing performance improvements.

A completely new component coming in 2018 is Qt Safe Renderer 1.0, which allows the creation of safety critical user interfaces much easier than before. It consists of two key items: integration to Qt Creator for the creation of safety critical user interface, and the renderer component for rendering the safety critical user interface. We are in the final steps to receive functional safety certification for the Qt Safe Renderer, including both the safety critical tooling and runtime parts.

Automation, Automotive, and other industries

In addition to improving the generic product offering according to feedback from customers and focused industries, we also have some items developed especially for the needs of certain industries. These are available for any industry but expected to be most relevant for the one they are named after. Prime examples of these are Qt for Automation and Qt Automotive Suite.

To learn more about Qt for Automation, check the blog post introducing it. The main items we have been cooking for 2018 are fully supported MQTT, KNX and OPC/UA implementations. Qt Mqtt and Qt Knx technology preview have been available since last year and both will be fully supported with the upcoming releases of Qt. Qt OpcUa is a new item, which we aim to first provide as a technology preview with Qt 5.11 and then finalize it for use with Qt 5.12 based on the feedback.

Qt Automotive Suite, available since 2016 is reaching 2.0 version soon. Based on Qt 5.9 LTS, Qt Automotive Suite 2.0 is a combination of automotive specific functionality from The Qt Company and our partners KDAB and Luxsoft. Version 2.0 bundles with the Qt Safe Renderer, Qt 3D Studio, and includes an overhaul of QtIVI with the ability to generate APIs from an QFace IDL, improvements and added features to the Neptune UI, Application Manager and the GammaRay runtime introspector.

Get involved

If you want to learn more about upcoming things for Qt, please stay tuned for new blog posts and webinars about the upcoming features, contact our sales teams or join the discussion in the Qt mailing lists and developer forums. We are always delighted to see new contributors in the Qt Project as well as feedback to the pre-releases of Qt via bugreports.


The post Qt Roadmap for 2018 appeared first on Qt Blog.

The Qt Company Blog: The Qt Project and Google Summer of Code 2018

$
0
0

This year, for the first time, the Qt Project will be participating in the Google Summer of Code initiative.
This is an awesome opportunity for students who are interested in or are already involved with Qt development, and who want to flip bits and not burgers during their summer break!
What this means in practice is that by submitting a strong project proposal to the initiative, you as a student have a good chance to get a nicely paid summer job working on new features or improvements to Qt!

How to participate

For students, the recommended approach to participate in this initiative with the Qt Project is to start off by reading up how the whole thing works. Then, come up with a project idea (or choose one of the suggested ideas in the Qt Project’s wiki page), and reach out to mentors as soon as possible in our dedicated channels (in #qt-gsoc IRC channel on the Freenode network, or through the development mailing list).

In these channels you can discuss your idea with mentors (and the community), then get started, with the help of the mentors, to write down your project proposal and finally submitting it. The deadline for the submission of your proposal is the 27th of March.

Hope this sounds like an interesting opportunity and we hope that you will participate in making Qt even better!

The post The Qt Project and Google Summer of Code 2018 appeared first on Qt Blog.

The Qt Company Blog: Qt Internationalization – Create Your UI Using Non-Latin Characters

$
0
0

People, ideas and data are moving all around the world nowadays, and so are your applications! Developing a UI in one language only, regardless of the platform is not an option anymore. Now if you are lucky enough to be using Qt, this is achievable with little effort, even when dealing with non-latin characters and “right to left” languages.

This tutorial will guide you towards this goal with your Qt Quick application and will hopefully give you some, useful tips!

Phase 1: Translation Files and Iupdate

1.1 Generate Your Translation File in Qt

The first thing to do is to translate your application. It means you have to take all the static strings in your application and replace them with the translated version at the right time.

In Qt, this is first done by declaring translations files and using translation methods (tr, qsTr, QT_TR_NOOP). Your application will require exactly one translation file per supported language.

This is how you have to modify your project file and QML files to enable extraction the strings to translate:

MyProject.pro

TRANSLATIONS += \
    translations/en-US.ts \
    translations/zh-CN.ts \
    translations/ar-MA.ts \

lupdate_only {
    SOURCES += \
         main.qml\
         MainPage.qml
}

main.qml
Windows {
    width: 800; height: 480
    title: qsTr ("My Application Title")
}

If you are wondering about the “en-US” notation, it corresponds to IETF language tags (https://en.wikipedia.org/wiki/IETF_language_tag). It is the juxtaposition of the language and country code and is often used to identify languages and locale.

Also, note we used ‘lupdate_only’ conditional in order to add our QML files to SOURCES only for the lupdate step. The SOURCES variables are used to compile your .cpp files, but they also happen to be used by lupdate to extract the translations.

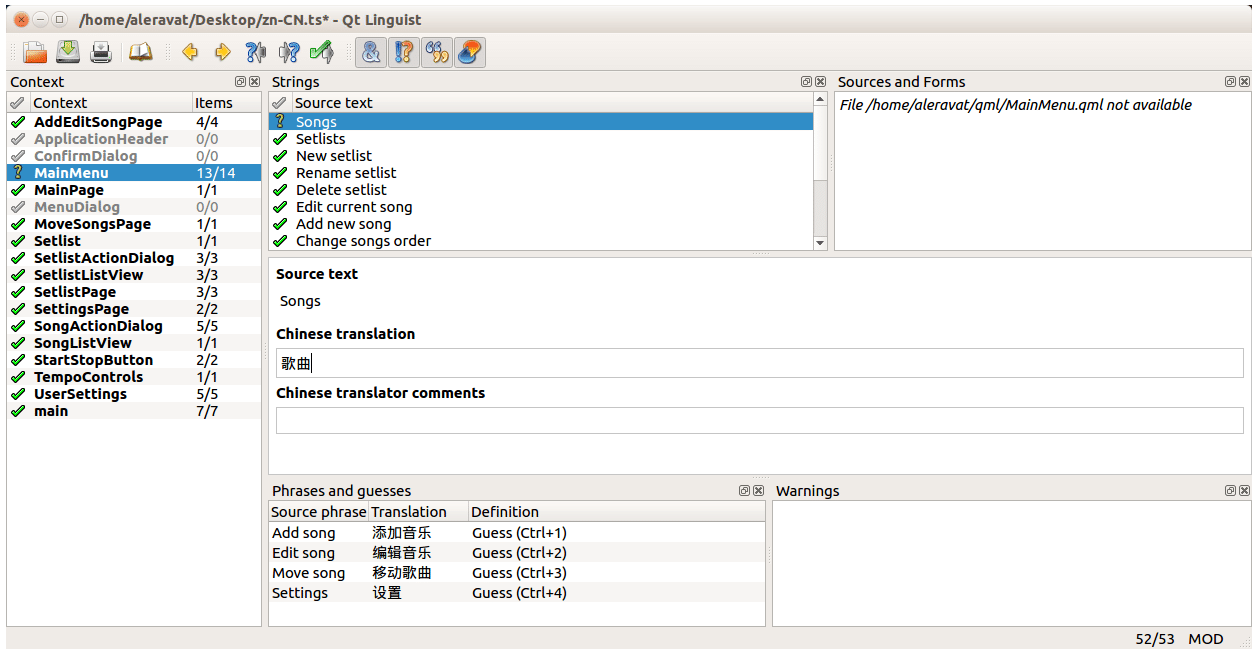
At this point you can manually generate the translation files in QtCreator using “Tools > External > Linguist > Update translations (linguist)”. This will regenerate .ts files after parsing all files from the SOURCE variable of your project. You will end up with three .ts files (XML format) in your project, containing your new untranslated string “My Application Title”, its context (i.e. file) and its line number.

1.2 Now Apply Your Translation

You can then apply a translation.

Instantiate a QTranslator class, and use the QCoreApplication::installTranslator() method.

QTranslator *arabicTranslator = new QTranslator (":/translation/ar-MA.ts");
qApp ->installTranslator (arabicTranslator);

More than one translator can be installed at the same time. Qt will translate your strings using the last applied translator, and sequentially the next ones until it succeeds… or not. If not your original string will be displayed as it is written in your code.

Window {
    width: 800; height: 480
    title: qsTr ("My Application Title")
}

Phase 2: Translation at Runtime

Another common request is to dynamically retranslate the user interface. Changing the translator at runtime is quite simple, but updating the strings to reflect that modification may be a bit more challenging.

Fortunately, Qt provides QEvent::LanguageChange event for that purpose.

It is generated when you apply a new translator. This is what you will use for Widget based applications, along with the retranslateUi method for Designer generated UIs.

However, this is not very convenient and I found there is another simple solution.

  • Expose an empty QString property, trTrigger in our case
  • Bind your texts with this property like ‘text:qsTr(“My text”) + app.trTrigger
  • Emit trTrigger “changed”signal every time the language changes

You will get the full expression being re-evaluated (hence retranslated) while keeping the text unaffected.

main.qml
Window {
     width: 800; height: 480
     title: qsTr ("My Application Title") + app.trTrigger
}

Phase 3: Supporting Chinese, Arabic, and Others

This is where font and text encoding become important. You may already have stumbled upon related issues when copy-pasting special characters from another document, only to discover they were replaced by unreadable ones. The two usual suspects are the Font and the Encoding of your document.

  • An incorrect encoding won’t be able to store or translate the characters correctly
  • An incorrect font won’t be able to render the characters

For example, Ask Comic sans MS to tell you “你好!”, and it will just fail. If this happens (and it probably will), it simply means your system or software uses a different or fallback font. This fallback font is used to render Chinese, despite the fact the original font does not support Chinese characters. And this is exactly what Qt will do when possible, saving you some work!

That’s why for the best visual outcome you will need to include fonts that are compatible with the language you want to support. If you then package these fontswith your application, you can easily install them dynamically using the QFontDatabase, or FontLoader on QML side.

On Linux platform, just make sure you have a fontloader library installed and available otherwise it won’t work. The encoding is less explicit than the font. It applies to files and variables storing your text. As long as you stick with QString for display and Qt translation mechanism you should be fine. But when you manipulate non-ascii characters you will have to take a few precautions:

  1. In files, make sure that encoding supports the characters you use (UTF-8 is a good default choice)
  2. In variables, make sure that it supports such characters (e.g. std::wstring vs std::string).

As for classic Qt translation, you will have to provide the corresponding .ts file to the person in charge of translations (e.g. “translations/zh-CN.ts”), as well as the linguist application from your Qt folder (e.g. “C:\Qt\5.8\mingw53_32\bin”).

Yes, I used a Windows path as an example, because I doubt that people working on your translations will be able to run linguist from your custom Linux distribution Linguist is a standalone application, so translators won’t need to install Qt, don’t worry.

This standalone application allows loading and saving .ts files, once the translations are done.

Witekio Qt Linguist Chinese

Now ask your translator to send you the .ts file modified: you’re done!

Phase 4: Don’t Forget that Right to Left Is Not Only a Text Thing

User interface composing is where the biggest difference compared to Left-to-Right languages lies.

In Arabic and Hebrew, you read and write from the right side to the left, and this has a significant impact not only on the text but on your whole application including:

  • Text alignment (right aligned by default!)
  • Menus and components position
  • Writing direction
  • Lists direction

In a way, this is like flipping your entire UI layout horizontally. Qt will locally help you change text alignment based on the character set used, but you will have to anticipate and implement the global strategy.

At the application level, you have the “setLayoutDirection” method. It is typically set from the application language, but you can also do it manually with:

qApp->setLayoutDirection (Qt::RightToLeft);

Qt Quick application then provides different ways to deal with layout direction. QML Layouts have the layoutDirection property, Images have the mirror, and all Items have the very powerful LayoutMirroring attached property.

”LayoutMirroring” is a fast way to change the direction of layouts, positioners (Row, Grid, …), anchors and text alignments, of the item and its children with only two lines:

Page {
     LayoutMirroring.enabled: (Qt.application.layoutDirection === Qt.RightToLeft)
     LayoutMirroring.childrenInherit: true
     Row {
         // Row will use right-to-left order when LayoutMirror.enabled = true
         Text {
              id: songNumber
              text: "1."
              horizontalAlignment: Text.AlignLeft // Alignment will adjust too. But don't fail to mention it         
                                                  // or the text won't change its alignment
         Text {
              id: artistItem
              text: "Some Artist"
              horizontalAlignment: Text.AlignLeft
              // Manually change elide side
              elide: (Qt.application.layoutDirection === Qt.LeftToRight) ? 
Text.ElideRight : Text.ElideLeft
         }
    }
}

LayoutMirroring.childrenInherit will apply the mirroring to all the children, making it a very efficient way to apply it. However be careful as it will very likely break some parts of your UI if you have not built it from the beginning with “Right-to-Left” and “Left-to-Right” in mind.

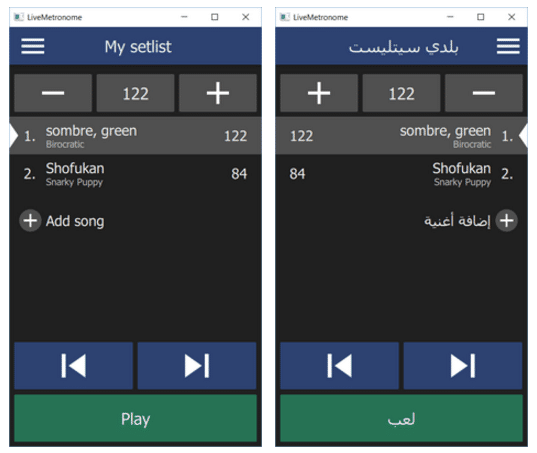
The example below shows the difference between standard English version and Arabic right-to-left version. Note that not only the text alignment is changed, but also the layout and the “+” and “-” buttons. This may look odd to some of you, but remember that right-to-left languages are not only about the text, but also the way eyes scan the content of the application.

Witekio | qt-application-english et qt-application-arabic-rtl


How Can You Make Chinese, Arabic, and Left-To-Right Integration as Easy as Possible? Wrap Up!

  • Use Qt Linguist and QTranslators for translations
  • Pack the fonts you want to use in your application for Chinese, Arabic, etc and install them with QFontDatabase or Fontloader
  • Do not use absolute positioning (the default “x:O” does count as such!)
  • Do use Layouts and positioners
  • Do use anchors and anchors margins
  • Do set Text.horizontal Alignment property

Qt provides you with a good start for integrating a lot of languages. With a bit of work and anticipation, your application will be understood all over the world. The key to an efficient integration of Right to Left languages is simply to plan and test it early during application development, to ensure it is fully compatible.

On embedded devices, don’t forget that Chinese, Russian and Arabic, only to name a few, need more than a simple keyboard layout, but also a way to “compose” different words based on what was typed. This is critical if you created your own virtual keyboard.

People will not be able to write in these languages simply with a different keyboard layout. Hopefully, the Qt Virtual Keyboard (Commercial or LGPLv3 license) does provide such specific input method, if you are not willing to redevelop it for yourself.

Another way is to use a carefully selected iconography. Symbols may not have exactly the same meaning in all countries, but if carefully picked up, they can help you keep your UI simple and clear.

And guess what? Resources (like images), paths and names can be translated too!

website: www.witekio.com – blog: www.witek.io

The post Qt Internationalization – Create Your UI Using Non-Latin Characters appeared first on Qt Blog.

Viking Software Blog: Keyboard navigation and the event system

$
0
0

Keyboard navigation in a GUI application might not be the most highlighted feature. Most devices use clickable or touchable controls in the user interface to change screens, open menus or activate buttons. Many developers don't even bother looking at the problem because the customers might not ask for it. But if said application is intended for a device that doesn't have other kind of input, or you have to satisfy some accessibility requirements, it's definitely something that will end up being the feature that blocks a release if it has some known bug. First we will cover some interesting details of Qt's event system, and then we will move to the details that you should know for providing your UI with a good keyboard navigation system.

Viking Software Blog: How to use QThread properly

$
0
0

There are basically two different ways of using QThread directly: Worker threads or subclassing. Those two are confusing to a lot of developers, and I will try to explain when you should use those. I will also explain how signals and slots work with threads and how they can help you or lead to problems.

Viking Software Blog: Serializing/deserializing a QObject tree

$
0
0

A while ago I wanted to implement save and load for an application. The application model was a QObject derived class, with a bunch of sub (-sub) classes. As the UI was QML, everything was accessible through properties. Instead of writing a save and load mechanism for every single class, I was able to write one generic save load mechanism. This can be done using QObject introspection/reflection. So the class name, properties and member functions can be queried.

The Qt Company Blog: Qt Visual Studio Tools 2.2.0 Released

$
0
0

We have released the Qt VS Tools version 2.2.0.
Important changes include:

For details of what is included in this version, please refer to the change log.

The installation package is available in the Visual Studio Marketplace and can be installed directly from within VS (through the ‘Tools > Extensions and Updates…’ menu). Alternatively, it can be downloaded from this page.

The post Qt Visual Studio Tools 2.2.0 Released appeared first on Qt Blog.


The Qt Company Blog: Introducing Qt Automotive Suite 2.0

$
0
0

We are excited to announce the Qt Automotive Suite 2.0, a great leap forward towards a unified HMI toolchain and framework for digital cockpit, available end of February 2018.

A few years back, we saw several challenges in the industry. One was that with increasing number of screens being present in the car, creating and maintaining a consistent digital UX across multiple displays with strong brand differentiation is unquestionably difficult. Why? Because a perfectly integrated digital UX for the digital cockpit does not end with the UI/UX design, it is only the beginning. When an OEM sends out the design specification, the supplier typically utilizes different software tools and technologies for developing the instrument cluster and center stack (aka. IVI or Infotainment) respectively. Somewhere down the line, there will be unavoidable HMI refinement needed to ensure the digital UX on different screens cooperate in a cohesive way.

Another challenge was that there was little reusability from one project to another, from one customer to another. The re-usability issue was particularly prominent on the center stack development. There was a lot of duplication of work when creating a new center stack HMI and it was just inefficient. Low re-usability made it difficult for the industry to rapidly innovate and differentiate on the HMI, and the development cycle was long and costly.

The third challenge we saw was that the center stack HMI has been traditionally monolithic, meaning all features (e.g. HVAC control, media player, radios) are packed into a single software instance. This approach not only created risks of introducing bugs, but more importantly, each feature may interfere with each other. If one feature crashes, the whole center stack needs to restart. This creates a lot of headache for developing and maintaining the HMI development – it is difficult to split the features into smaller sub projects for parallel development, and a pain to maintain a monolithic code base. Of course, if one feature needs update, the whole center stack needs to be rebuilt and reinstalled.

We solved these challenges, working with our strategic partners Luxoft and KDAB, announcing our first release of the Qt Automotive Suite 1.0 in 2016. We created the market’s first unified HMI toolchain and framework for digital cockpit development.

Today, we are happy to report that Qt Automotive Suite has been well received and are being adopted by some of the major OEMs in the world. An increasing number of customers are switching from the traditional specification writing and outsourcing, to owning the HMI design and development. We are glad to see the market is transitioning toward this direction that matches well with our vision with the Qt Automotive Suite proving to be the right solution. Above all, we are seeing millions of cars shipped with Qt Automotive Suite in the coming years.

So, what is in Qt Automotive Suite 2.0?
Let’s look at the diagram.

as20_solution-architecture

Figure 1: Qt Automotive Suite 2.0

Qt Automotive Suite 2.0 builds out a vision to provide easy-to-use tools that free designers and software engineers to rapidly create superior digital cockpits. Before we jump in to the key features, here is one digital cockpit reference that is built with Qt Automotive Suite.

Qt for Device Creation

As customers are adopting Qt Automotive Suite for production development, the feature set and stability must be carefully balanced. Now the Qt Automotive Suite 2.0 sits on top of Qt 5.9, bringing major performance improvement and feature set while receiving Long Term Support (LTS).

Qt 3D Studio 

We believe a truly unified HMI toolchain and framework should also ship with advanced UI authoring tool for the designers. With 3D becoming a more significant part of the HMI we saw the need for a design tool that facilitates rapid 3D UI/UX concepting and design. For that, we now included the Qt 3D Studio into the suite.

Qt Safe Renderer

Functional safety is a critical path that our customers must cross. Qt Automotive Suite 2.0 includes the Qt Safe Renderer, ensuring the rendering of safety critical telltales is reliable and certifiable by ISO 26262 part 6 ASIL-B specification.

Qt Application Manager

Qt Application Manager brings a modern multi-process GUI architecture to the IVI. By separating the HMI into different functional units (for example, HVAC could be one unit while Navigation could be another), Qt Application Manager enables independent teams to develop and test both separately and simultaneously, thereby reducing project risk and shortening development time. In addition, splitting the UI into smaller applications also makes it easier to do system updates; smaller pieces of code are touched, and the OTA updates are smaller.

Qt Application Manager is a headless, core component. Despite the application management tasks, Qt Application Manager powers the Reference UI which implements a system UI compositor and the home screen along with a selection of apps.

In Qt Automotive Suite 2.0, the user can now make a custom application executable based on Qt Application Manager internal libraries. This greatly improves flexibility and makes integration in customer specific system setups easier. The new and extended system monitoring APIs has been extended and now also allow monitoring of resources consumed by separate applications. During the startup, the new logs allow tracing and profiling of apps in much larger details. Another improvement to mention is further polishing of the single-process mode, which allows running QML-runtime application on single process setups in the same way as on multi-process ones.

There are lots of other improvements under the hood, be sure to check out the latest documentation.

Qt Application Manager Plugin for Qt Creator

Since Qt Application Manager controls the application life cycle, direct launching from Qt Creator is now possible. A special plugin is provided now which wraps the command line tools provided in Qt Application Manager and integrates all essential steps into Qt Creator IDE. In Qt Automotive Suite 2.0, the plug-in uses the Generic Linux device type as a base. In the future it will directly use Boot2Qt device types to unify the device setup.

Qt IVI

To tackle reusability, QtIVI brings a level of standardization within the Qt ecosystem for how to access and extend automotive-specific APIs. The applications developed in one generation of program can be reused on the next, even if the underlying platform is different. This is particularly important as OEMs are increasingly taking control of the car HMI development. Reducing duplication of work means significant cost saving and more focus on branded UX differentiation. Qt Automotive Suite 2.0 will integrate well with industry’s leading initiatives such as GENIVI and AGL, further increasing the re-usability on the platform level for the entire industry.

At its core, Qt IVI is built around a pattern based on the separation of API facing the application developer, so-called Feature, and the code implementing it, the Backend. There can be multiple backends per feature and the Core module provides support for finding the corresponding backend in an easy-to-use way.

Common use cases driving this separation are:

  • Early development, where the UI can rely on a feature with a very basic backend implementation.
  • Testing / simulation, where the backends can be tested separately from the app and the app can be tested using a specialized testing backend.
  • Targets with different hardware configurations, where certain parts of the system are represented by simulated backends while others use a real hardware integration.
  • Dynamically appearing services, when services are available sometimes, but not always, meaning that backends come and go over time.

The module provides an extendable set of reference APIs for automotive features. It can be used to develop automotive applications and to provide automotive features to Qt-based applications in a structured manner.

We added a way to describe interfaces using an IDL (interface definition language) and then generate Qt/QML API code based on this definition. We use QFace IDL and its libraries, which provide a generic auto-generation framework. In addition to the generic integration of a QFace-based auto-generation into QtIVI Core, we migrated the Climate and Vehicle Settings APIs to be based on IDL.

From the interface definition, the tooling generates the QML and C++ APIs, code that allows properties (i.e. values) to be inspected and overridden by other tools such as GammaRay and Squish, and the code for a simulator that will allow a developer to observe and control vehicle data values in the absence of a real vehicle to test on. This is useful not only for debugging but also for automated testing.

qtivi_architecture

Figure 2: Qt IVI auto generator architecture

The grey boxes are the only parts what the customer needs to implement. The visible part (to the end user) is the application that uses the vehicle data. The non-visible part is the communication with the vehicle data service which is typically an independent process that communicates via an IPC.

GammaRay

The Qt Automotive Suite deeply integrates GammaRay into the QtCreator which allows for runtime introspection, visualization and manipulation of internal structures such as scene graphs and state machines. This can provide an insight into the running system to diagnose those hard problems and understand where memory is being used.

In Automotive Suite 2.0, our partner KDAB has added new texture inspection capabilities, improved Qt Quick layout diagnostics, support for QML binding analysis, and many other improvements. In addition, GammaRay’s performance has been improved to reduce the analysis impact on the target application and increases the responsiveness of the remote views. Make sure you have a read on GammaRay.

as20_gammaray

Figure 3: GammaRay can identify resource waste and even suggest remedy

Reference UI: Neptune and soon Triton

Since the initial release of Qt Automotive Suite, Qt Quick Controls 2.0 were released providing significant improvements in performance and more flexible styling. The Neptune reference UI has been upgraded to use Qt Quick Controls 2.0. The UI initialization supports staged loading for better performance. There is a new Notification framework with a Notification Center, Application Expose allowing to stop apps. Check out the documentation.

After 2.0, we will provide a new UX design and implementation developed by our partner Luxoft . Its code name is Triton. Some of you might have seen it already at the CES or at the Embedded World shows this year.

as20_applicationmanager

Figure 4: Triton UI

The future System UI highlights Qt’s unique windows compositing capabilities. Take a look at the Phone, Maps, Player app widgets, they are run as separate apps and composited together on one screen managed by the System UI that acts as Application Launcher and HVAC control.

Comprehensive Documentation

Qt Automotive Suite 2.0 is now more mature, and one aspect is that we now have much better documentation for all the existing and new tools, components, and APIs.

SDK Creation

Let us reiterate this. Many times, parts of the system functionality will be delivered by second and third parties. Or third parties may want to develop apps specifically for your platform. The Qt Automotive Suite makes it easy to build a redistributable SDK that contains your specific HMI assets and added middleware together with the Qt tooling to allow 3rd parties to build and test their apps with minimal intervention.

Open Development Model

The Qt Automotive Suite will be developed in the same open manner as Qt itself. The code is available at http://code.qt.io/cgit/ and there is an automotive specific mailing list (http://lists.qt-project.org/mailman/listinfo/automotive) for discussions on engineering and product direction.

Summary

With Qt Automotive Suite 2.0, we now provide a truly end-to-end solution for the digital cockpit HMI development, bringing designers and developers to work under the Qt ecosystem, maximizing consistent digital UX for all screens while equipped with Functional Safety. With reduced design-development roundtrip and underlying cost, OEMs can now focus more on HMI innovation and brand differentiation, which is a win for the whole industry and consumers like you and us.

The post Introducing Qt Automotive Suite 2.0 appeared first on Qt Blog.

KDAB on Qt: emBO++, Bochum, Germany

$
0
0

KDAB is sponsoring this annual Embedded C++ conference and KDAB's Marc Mutz is speaking:
12-03 Midday, Views, views everywhere:

"There's a revolution coming.......`string_view` from C++17, `span` from the Guideline Support Library and `array_view` (targeted at C++2a) are just the beginning..."

Attend and find out more.

Check out KDAB Training for Modern C++ and much more.


KDAB is proud to be sponsoring emBO++, the only event in Europe dedicated to Embedded C++ users.continue reading

The post emBO++, Bochum, Germany appeared first on KDAB.

KDAB on Qt: Qt Automotive Suite 2.0 Released

$
0
0

We are happy to announce the release of Qt Automotive Suite 2.0, the Qt solution for digital cockpits. developed in collaboration between KDAB, The Qt Company and Luxoft.

The Qt Automotive Suite provides OEMs and Tier1s with powerful frameworks and tools to build a consistent user experience for both the instrument cluster and the center stack. Being built on top of an open platform, the Qt Automotive Suite makes it possible for the automakers to stay in complete control of the user’s brand experience.

The Qt Automotive suite seamlessly integrates KDAB's runtime introspection tool GammaRay in Qt Creator and with embedded device support of Qt for Device Creation. See the release blogs for GammaRay 2.8 and GammaRay 2.9 for a summary of the new features and improvements.

GammaRay texture inspector

Another focus area of KDAB has been a revamp of the Qt IVI module, providing a flexible framework to design create APIs to platform middleware. Using an IDL and code-generation as well as ready-made simulation backends enable work from day before the full hardware or software stack is available. Having tooling support built in makes your APIs runtime instrospectable out of the box, for easy debugging or automated testing. For more details, see KDAB engineer Mike Krus' presentation about the Qt IVI changes.

There are many more improvements in Qt Automotive Suite 2.0, make sure to check out the release blog.

See Qt Automotive Suite 2.0 in action, visit KDAB at the Qt stand in Hall 4-258 at Embedded World 2018. continue reading

The post Qt Automotive Suite 2.0 Released appeared first on KDAB.

Qt – basysKom Blog: OPC UA support in Qt 5.11

$
0
0

OPC UA is a central element of the Industry 4.0 story providing seamless communication between IT and industrial production systems. basysKom has initiated Qt OPC UA in 2015 with the goal of providing an out of the box Qt API for OPC UA. In 2017 basysKom, together with The Qt Company, has finished up a …Continue reading OPC UA support in Qt 5.11

The Qt Company Blog: Qt 5.11 Beta1 Released

$
0
0

I am pleased to announce that Qt 5.11 Beta 1 is released today. Convenient online binary installers are available for trying out features coming in Qt 5.11. We will follow similar Beta process as earlier and provide multiple Beta releases via the online installer. 

For new features coming in Qt 5.11, please check the New features in Qt 5.11 wiki page and the Qt Roadmap for 2018 blog post.

After the Qt 5.11 Beta 1 released today we will push out multiple new Beta N releases using the online installer. With this approach it is easy for users to test the new features and provide feedback. During the beta phase we expect to have new Beta N releases with 1-2 weeks intervals. When the maturity has increased sufficiently we will create a release candidate of Qt 5.11. These will be made available directly via the online installer, we are not planning publish separate blogs for the subsequent beta releases and release candidate(s). In addition to binaries, source packages of each beta release are of course also available for those who prefer to build themselves.

I hope many of you will install the Qt 5.11 Beta releases, test and provide us your feedback to complete Qt 5.11. For any issues you may find, please submit a detailed bug report to bugreports.qt.io (please remember to mention which beta you found the issue with, check for duplicates and known issues). You are also welcome to join the discussions in the Qt Project mailing listsdeveloper forums and to contribute to Qt.

If you do not yet have the Qt online installer, get it from the Qt Account or from the Qt Download page.

The post Qt 5.11 Beta1 Released appeared first on Qt Blog.

Qt – Life of a Developer: foss-north – the count down

$
0
0

We are approaching the count down to foss-north 2018– at least from an organizer perspective. This year we will be at Chalmers Conference Centre, in the centre of Gothenburg – the world’s most sociable, friendliest city. So, save the date –April 23– and make sure to drop by.

The reason why it feels like the count down has started is that it is just 10 more days left of the Call for Papers. With the help of our great sponsors we have the opportunity to transport you to our conference if you are selected to speak. Make sure to make your submission before March 11 and you are in the race.

When moving to Chalmers we ended up with a larger venue than last year so make sure to get your ticket– and bring your friends. The saying “the more the merrier” definitely applies to FOSS conferences!

Qt – Life of a Developer: foss-north – the count down

$
0
0

At this year’s foss-north event FSFE will revive the Nordic Free Software Award and the conference will host the prize ceremony. Get your tickets for a great opportunity to meet with the FOSS community, learn new things and visit Gothenburg.

It is just 9 more days left of the Call for Papers. With the help of our great sponsors we have the opportunity to transport you to our conference if you are selected to speak. Make sure to make your submission before March 11 and you are in the race.


The Qt Company Blog: Qt 3D Studio 1.1 Released

$
0
0

We are happy to announce that Qt 3D Studio 1.1 has now been released. This release introduces many improvements to the user interface and introduces an improved way to define data driven UI content.

Qt 3D Studio is a design tool for creating 3D user interfaces and adding 3D content into Qt based applications.  With Qt 3D Studio you can easily define the 3D content look & feel, animations and user interface states. Please refer to earlier blog posts for more details on Qt 3D Studio functionality.

Data Inputs

As we have been gaining more feedback from the Qt 3D Studio users we have clearly seen that the way how application passes data to the user interface created with the Qt 3D Studio can be improved. To address this issue, we have created a new feature called Data Inputs. In 1.1. release this feature is a technology preview and it supports creating two types of data inputs: ranged numbers and text. Ranged numbers are mainly meant for controlling animation timelines. Text inputs can be used to modify the user interface text elements and control slide changes. For more details on how to use data inputs please refer to documentation

Qt 3D Studio Data Input

Behavior Scripts

1.1 release also introduces a technology preview of the new Behavior Scripting API which enables interacting with the runtime using QML and JavaScript. Behavior scripts can expose properties which can be used to modify the script’s behaviour without changing the script itself. Furthermore scripts can also create events which trigger user interface changes e.g. UI state changes.

Behavior scripts can be used for example to create custom animations, generate simulation data or hook custom events (e.g. keyboard control) to the user interface.

Getting started with 1.1 release

Qt 3D Studio 1.1 is now available through Qt online installer under the Tools section. Qt online installer can be obtained from Qt Download page and commercial license holders can find the packages from Qt Account. Some example projects can be found under examples folder in the installation directory. Additional examples and demo applications can be found from https://git.qt.io/public-demos/qt3dstudio repository. If you encounter issues with using Qt 3D Studio or you would like to suggest new feature please use Qt3D Studio project in the bugreports.qt.io


The post Qt 3D Studio 1.1 Released appeared first on Qt Blog.

The Qt Company Blog: Boost your IoT Device with Qt

$
0
0

Here at guh GmbH, the creators of the IoT platform nymea, we have been using Qt since right from the start. You may think: it seems an odd choice to use Qt for a device with no UI requirements but just middleware components basically invisible to the user. Let me explain why this definitely isn’t the case. Essentially, there are three misconceptions in the previous statement.

nymea1

UI Framework: Yes, but so Much More

The first and biggest misconception is that Qt only focuses on UI projects. It is true that Qt started as a UI toolkit many, many years ago. But since then, Qt has evolved into a fully featured set of libraries and tools supporting the developer in every layer of the stack. Even if you don’t need graphical bells and whistles, Qt will increase your productivity by an order of magnitude. I’ll go a bit more in depth later on.

UI has Many Faces

Now, let me address the second misconception in the above statement: that no display equals no UI. Even when you’re building an embedded device without display, there’s hardly no user interface for it. In our example the user interface consists of a web interface running on the IoT box and a client app. The client application, running on mobile phones, PCs or just wall-mounted displays is mostly a thin UI layer, talking to the device. Here, Qt Quick can deliver a smooth, modern experience with a “write once, run everywhere” application. And the coolest part: since Qt 5.10, this very same client application can be re-used as the web interface on the device deploying the new Qt WebGL features.

No More Overhead: Deploy Only What You Need

Another comment I’ve often heard is that importing Qt into an embedded device would be a huge overhead. While in the early days, Qt was built of some few, rather big modules, this has changed a long time ago. At the very latest with Qt5, the modularization of Qt has facilitated fine-grained control of what parts of Qt are needed for a small footprint installation. However, in recent days this has been taken even further, and with Qt for devices it is now possible to strip down the required components to the real bare minimum, invalidating this point completely.

nymea3

How Qt has Increased Our Productivity Building nymea:

As mentioned above, I’d also like to address some of the features of Qt which have helped increase the productivity of nymea tremendously.
There are too many to list them all here, but the most important ones for our middleware stack are:

  • Plugin architecture: Qt’s plugin architecture is a perfect fit to load plugins, taking away all the complexity of finding and loading libraries. With nymea being built based on plugins, this constitutes a significant advantage. The core of the platform is a piece of software managing configurations and the “smartness” of things. All the actual hardware and online services, so called “things”, are enabled in the system via plugins.
  • Transport protocols: Just a few calls to the Qt APIs are all it takes. nymea’s middleware offers interfaces via sockets (TCP/IP or local sockets), WebSockets, REST and Bluetooth RFCOMM. All of those are simply at hand with Qt, using SSL encryption, providing certificates for secure communication.
  • JSONRPC based API: Qt offers support for JSON and allows easy conversion between internal data structures into JSON objects. This is a huge plus for us since nymea speaks a JSONRPC based protocol when interacting with clients.
  • Testing and debugging framework: Developers enjoy the advantages of a highly abstracted API. nymea’s codebase is studded with autotests using Qt Test. This turns writing test cases into an easy task and facilitates printing test reports and statistics in a variety of common formats (like UnitXML). Additionally, it enables integration with other existing frameworks for testing and debugging like coverty, Valgrind and all the other tools out there, as in the end, for those it’s just good old C++.
  • API documentation using QDoc: Qt offers an amazing documentation on doc.qt.io. QDoc enables doc generation directly out of the code through the CI setup and allows flexible custom styling while still preserving the clean look and feel of Qt docs. For nymea (https://doc.nymea.io/) as a platform which enables third-party developers to add their hardware/service such documentation is obviously essential.
  • A ton of small helpers all along the way: Qt offers an uncountable amount of features coming in handy while developing a headless application. From command-line argument parsing and log output filtering to online connectivity, various IPC mechanisms in the system (e.g. D-Bus) etc. Every feature is just ready to use with minimal effort.
  • All (or pretty much all) of this comes in a completely cross platform manner. While nymea is focused to run on Linux based devices, thanks to Qt it can be built for just about any platform. Of course, some platform integrated features like D-Bus APIs won’t work on all platforms, but those are very rare exceptions. Currently, nymea has a dpkg based repository for all supported Ubuntu and Debian distributions as well as snap packages for snap based systems. The client app is built for desktops and Android targets. Our team is also working on enabling iOS and the WebGL based version to have a fully Qt Quick based web interface for nymea, all out of a single codebase.

The gist of all this: Qt is an ideal framework whether your project includes a UI or not. Its high number of well-tested, high-quality APIs make every developer’s life that much easier, especially as those APIs are super easy to understand. Meanwhile, Qt still allows you to enjoy all the advantages of C++. So as you can see Qt is perfect for IoT.

guh-logo

About nymea: nymea makes your product smart. Fast, plannable, and hassle-free. Our M2M stack guarantees effortless API integrations. We believe in the strength of integrated edge solutions.

Meet us at Embedded World 27th Feb – 1st March 2018. Get your free ticket here: https://www.qt.io/ew-2018

The post Boost your IoT Device with Qt appeared first on Qt Blog.

The Qt Company Blog: Introducing Qt Automotive Suite 2.0

$
0
0

We are excited to announce the Qt Automotive Suite 2.0, a great leap forward towards a unified HMI toolchain and framework for digital cockpit, available end of February 2018.

A few years back, we saw several challenges in the industry. One was that with increasing number of screens being present in the car, creating and maintaining a consistent digital UX across multiple displays with strong brand differentiation is unquestionably difficult. Why? Because a perfectly integrated digital UX for the digital cockpit does not end with the UI/UX design, it is only the beginning. When an OEM sends out the design specification, the supplier typically utilizes different software tools and technologies for developing the instrument cluster and center stack (aka. IVI or Infotainment) respectively. Somewhere down the line, there will be unavoidable HMI refinement needed to ensure the digital UX on different screens cooperate in a cohesive way.

Another challenge was that there was little reusability from one project to another, from one customer to another. The re-usability issue was particularly prominent on the center stack development. There was a lot of duplication of work when creating a new center stack HMI and it was just inefficient. Low re-usability made it difficult for the industry to rapidly innovate and differentiate on the HMI, and the development cycle was long and costly.

The third challenge we saw was that the center stack HMI has been traditionally monolithic, meaning all features (e.g. HVAC control, media player, radios) are packed into a single software instance. This approach not only created risks of introducing bugs, but more importantly, each feature may interfere with each other. If one feature crashes, the whole center stack needs to restart. This creates a lot of headache for developing and maintaining the HMI development – it is difficult to split the features into smaller sub projects for parallel development, and a pain to maintain a monolithic code base. Of course, if one feature needs update, the whole center stack needs to be rebuilt and reinstalled.

We solved these challenges, working with our strategic partners Luxoft and KDAB, announcing our first release of the Qt Automotive Suite 1.0 in 2016. We created the market’s first unified HMI toolchain and framework for digital cockpit development.

Today, we are happy to report that Qt Automotive Suite has been well received and are being adopted by some of the major OEMs in the world. An increasing number of customers are switching from the traditional specification writing and outsourcing, to owning the HMI design and development. We are glad to see the market is transitioning toward this direction that matches well with our vision, and the Qt Automotive Suite proves to be the right solution. Above all, we are seeing millions of cars shipped with Qt Automotive Suite in the coming years.

So, what is in Qt Automotive Suite 2.0?
Let’s look at the diagram.

as20_solution-architecture

Figure 1: Qt Automotive Suite 2.0

Qt Automotive Suite 2.0 builds out a vision to provide easy-to-use tools that free designers and software engineers to rapidly create superior digital cockpits. Before we jump in to the key features, here is one digital cockpit reference that is built with Qt Automotive Suite.

Qt for Device Creation

As customers are adopting Qt Automotive Suite for production development, the feature set and stability must be carefully balanced. Now the Qt Automotive Suite 2.0 sits on top of Qt 5.9, bringing major performance improvement and feature set while receiving Long Term Support (LTS).

Qt 3D Studio 

We believe a truly unified HMI toolchain and framework should also ship with advanced UI authoring tool for the designers. With 3D becoming a more significant part of the HMI we saw the need for a design tool that facilitates rapid 3D UI/UX concepting and design. For that, we now included the Qt 3D Studio into the suite.

Qt Safe Renderer

Functional safety is a critical path that our customers must cross. Qt Automotive Suite 2.0 includes the Qt Safe Renderer, ensuring the rendering of safety critical telltales is reliable and certifiable by ISO 26262 part 6 ASIL-B specification.

Qt Application Manager

Qt Application Manager brings a modern multi-process GUI architecture to the IVI. By separating the HMI into different functional units (for example, HVAC could be one unit while Navigation could be another), Qt Application Manager enables independent teams to develop and test both separately and simultaneously, thereby reducing project risk and shortening development time. In addition, splitting the UI into smaller applications also makes it easier to do system updates; smaller pieces of code are touched, and the OTA updates are smaller.

Qt Application Manager is a headless, core component. Despite the application management tasks, Qt Application Manager powers the Reference UI which implements a system UI compositor and the home screen along with a selection of apps.

In Qt Automotive Suite 2.0, the user can now make a custom application executable based on Qt Application Manager internal libraries. This greatly improves flexibility and makes integration in customer specific system setups easier. The new and extended system monitoring APIs has been extended and now also allow monitoring of resources consumed by separate applications. During the startup, the new logs allow tracing and profiling of apps in much larger details. Another improvement to mention is further polishing of the single-process mode, which allows running QML-runtime application on single process setups in the same way as on multi-process ones.

There are lots of other improvements under the hood, be sure to check out the latest documentation.

Qt Application Manager Plugin for Qt Creator

Since Qt Application Manager controls the application life cycle, direct launching from Qt Creator is now possible. A special plugin is provided now which wraps the command line tools provided in Qt Application Manager and integrates all essential steps into Qt Creator IDE. In Qt Automotive Suite 2.0, the plug-in uses the Generic Linux device type as a base. In the future it will directly use Boot2Qt device types to unify the device setup.

Qt IVI

To tackle reusability, QtIVI brings a level of standardization within the Qt ecosystem for how to access and extend automotive-specific APIs. The applications developed in one generation of program can be reused on the next, even if the underlying platform is different. This is particularly important as OEMs are increasingly taking control of the car HMI development. Reducing duplication of work means significant cost saving and more focus on branded UX differentiation. Qt Automotive Suite 2.0 will integrate well with industry’s leading initiatives such as GENIVI and AGL, further increasing the re-usability on the platform level for the entire industry.

At its core, Qt IVI is built around a pattern based on the separation of API facing the application developer, so-called Feature, and the code implementing it, the Backend. There can be multiple backends per feature and the Core module provides support for finding the corresponding backend in an easy-to-use way.

Common use cases driving this separation are:

  • Early development, where the UI can rely on a feature with a very basic backend implementation.
  • Testing / simulation, where the backends can be tested separately from the app and the app can be tested using a specialized testing backend.
  • Targets with different hardware configurations, where certain parts of the system are represented by simulated backends while others use a real hardware integration.
  • Dynamically appearing services, when services are available sometimes, but not always, meaning that backends come and go over time.

The module provides an extendable set of reference APIs for automotive features. It can be used to develop automotive applications and to provide automotive features to Qt-based applications in a structured manner.

We added a way to describe interfaces using an IDL (interface definition language) and then generate Qt/QML API code based on this definition. We use QFace IDL and its libraries, which provide a generic auto-generation framework. In addition to the generic integration of a QFace-based auto-generation into QtIVI Core, we migrated the Climate and Vehicle Settings APIs to be based on IDL.

From the interface definition, the tooling generates the QML and C++ APIs, code that allows properties (i.e. values) to be inspected and overridden by other tools such as GammaRay and Squish, and the code for a simulator that will allow a developer to observe and control vehicle data values in the absence of a real vehicle to test on. This is useful not only for debugging but also for automated testing.

qtivi_architecture

Figure 2: Qt IVI auto generator architecture

The grey boxes are the only parts what the customer needs to implement. The visible part (to the end user) is the application that uses the vehicle data. The non-visible part is the communication with the vehicle data service which is typically an independent process that communicates via an IPC.

GammaRay

The Qt Automotive Suite deeply integrates GammaRay into the QtCreator which allows for runtime introspection, visualization and manipulation of internal structures such as scene graphs and state machines. This can provide an insight into the running system to diagnose those hard problems and understand where memory is being used.

In Automotive Suite 2.0, our partner KDAB has added new texture inspection capabilities, improved Qt Quick layout diagnostics, support for QML binding analysis, and many other improvements. In addition, GammaRay’s performance has been improved to reduce the analysis impact on the target application and increases the responsiveness of the remote views. Make sure you have a read on GammaRay.

as20_gammaray

Figure 3: GammaRay can identify resource waste and even suggest remedy

Reference UI: Neptune

Since the initial release of Qt Automotive Suite, Qt Quick Controls 2.0 were released providing significant improvements in performance and more flexible styling. The Neptune reference UI has been upgraded to use Qt Quick Controls 2.0. The UI initialization supports staged loading for better performance. There is a new Notification framework with a Notification Center, Application Expose allowing to stop apps. Check out the documentation.

After 2.0, we will provide a new UX design and implementation developed by our partner Luxoft. Some of you might have seen it already at the CES or at the Embedded World shows this year.

as20_applicationmanager

Figure 4: New Neptune UI

The future System UI highlights Qt’s unique windows compositing capabilities. Take a look at the Phone, Maps, Player app widgets, they are run as separate apps and composited together on one screen managed by the System UI that acts as Application Launcher and HVAC control.

Comprehensive Documentation

Qt Automotive Suite 2.0 is now more mature, and one aspect is that we now have much better documentation for all the existing and new tools, components, and APIs.

SDK Creation

Let us reiterate this. Many times, parts of the system functionality will be delivered by second and third parties. Or third parties may want to develop apps specifically for your platform. The Qt Automotive Suite makes it easy to build a redistributable SDK that contains your specific HMI assets and added middleware together with the Qt tooling to allow 3rd parties to build and test their apps with minimal intervention.

Open Development Model

The Qt Automotive Suite will be developed in the same open manner as Qt itself. The code is available at http://code.qt.io/cgit/ and there is an automotive specific mailing list (http://lists.qt-project.org/mailman/listinfo/automotive) for discussions on engineering and product direction.

Summary

With Qt Automotive Suite 2.0, we now provide a truly end-to-end solution for the digital cockpit HMI development, bringing designers and developers to work under the Qt ecosystem, maximizing consistent digital UX for all screens while equipped with Functional Safety. With reduced design-development roundtrip and underlying cost, OEMs can now focus more on HMI innovation and brand differentiation, which is a win for the whole industry and consumers like you and us.

The post Introducing Qt Automotive Suite 2.0 appeared first on Qt Blog.

The Qt Company Blog: Qt Customer Survey 2017

$
0
0

Towards the end of every year, we ask you to participate in the Qt Customer Survey. We do this to get a better understanding of your Qt use, satisfaction, and engagement.

Every year you give us helpful insights – insights we need to make better decisions. By learning more about how you use Qt and how you interact with Qt, it allows us to improve on both the product itself and how we provide customer service. We strive to better understand your likes and dislikes and identify areas where we need to make improvements – we would like to sincerely thank you for taking part in that. We are especially thankful to see a lot of valuable input to our RnD via feedback in the comment sections.

As we were analyzing and digesting your feedback, we thought it’d be interesting to share some findings with you already.

What industries are you in?

This was not an easy one to analyze – you’re using Qt for developing desktop and mobile applications, embedded systems and headless devices used on Earth and beyond, in more than 70 industries. Your use cases span from software development kits (SDK), enterprise applications, game development tools, robotics, smart homes and factories, test and measurement systems, consumer goods, automotive, healthcare lab equipment, security systems, digital TVs, and much more. In short – we’re excited to see you put Qt to such a wide use!

What is your biggest win with Qt? (Brag alert!)

‘’Ability to target multiple platforms from the same codebase – blows customers minds every time.’’

’’I feel like I hired a whole department of programming teams working for me.’’

’’Big automotive manufacturer was really happy with the results and expressed: “Is this done with Qt“. Several projects delivered quickly and with appealing results.’’

’’Our biggest win was the ability to migrate our 20+ years old C++ codebase from MFC to something _really_ modern in a continuous and quite straightforward way, improving also the development process as an additional benefit.’’

’’Impressing the bosses with a nice product that is pretty snappy and has great graphics compared to what is on the market.’’

’’With Qt, I have the flexibility to work as I need to. Qt does not lock me into anything and plays well with the “rest of the world”. I just wish it were the other way around as well.’’

’’Being able to give customers access to a full-fledged webbrowser/HTML5 experience within our product’’

’’Simultaneous Win/Mac product releases.  Modern browser js frontend talking to Qt backend.’’

’’Clean, simple API and it’s fun to work with!’’

Support for highly tailored use cases

Seems like you find some development goals more difficult to achieve than others. We provide support for several operating systems and hardware configurations, but many of you like to push the limits further. We get it, we love to play as well! Share your goals with us, chances are we’ve cleared your roadblocks many times before. We’ll get out shovels, put our backs into it and get you right back on track.

What about learning resources?

We’re happy to learn that our documentation continues to be the trusted source of information for you. However, seems like we still have some work to do on helping you use all the best practices with Qt. We’ve taken your point, and there’s something already in preparation – stay tuned for more tutorials, live and on-demand webinars and the local Qt events and meetups!

What about Qt Widgets?

A lot of you have asked us about the development of Qt Widgets. Since August 2017, the maintainership of Widgets has been transferred back to The Qt Company. This is a signal that we plan to put more resources on widgets going forward, and increase the activity level around the module in general. Rather than seeking to implement new features, the focus will be to access the already large database of bug reports and suggestions in Jira, and get the bug count down. This includes both writing patches internally, but also being more active accepting and reviewing patches from the community. With good help from the latter, we already managed to close around 250 tasks since last summer.

Showing gratitude

To show our appreciation for taking time to help us become better, we’ve had a small raffle with a few gadgets thrown in for you to pick. The winners are now informed, and the items are on their way! Hope you will enjoy your Bose QC35 headphones and Polar A370 fitness watches!

The post Qt Customer Survey 2017 appeared first on Qt Blog.

The Qt Company Blog: Slate: A Basic Pixel Art Editor Built with Qt Quick

$
0
0

I loved video games as a kid. Pokémon Blue and Wario Land on GameBoy. On the SNES I played SimCity, The Lost Vikings, Cannon Fodder, Super Mario World, Axelay… probably more that I can’t remember. Then there were the old Windows 95 games on PC, PlayStation, Xbox… ah, good times. Video games were the reason I started learning how to program: I wanted to make my own games. To this day (at least a decade later) I’m still working on games in my spare time, hoping to one day release a game that others will enjoy as much as I enjoy the games I play.

The current one I’m working on is a 2D isometric turn-based RPG. The artwork is all pixel art, as it’s easy to create, and, as a bonus, I don’t have to worry about scaling/high DPI! While working on the game, I decided that I should find a tool for creating tilesets. None of the tools I looked at had what I was after, so I thought: “how hard could it be to create my own?”

As it turns out, it wasn’t that hard, and it was also really fun and rewarding. It has also branched out beyond just creating tilesets, and is now a more general editor that has support for editing images directly and using layers. Here’s a GIF of it in action (apologies in advance for the compression in the colour picker):

slate-in-action

It’s still in alpha, but it’s at a stage where I’ve been happily using it to create the artwork for my game, so I consider it usable.

Taken from its GitHub page:

“Slate was built for pixel art, and its goal is to simplify the creation of sprites and tilesets by offering a user-friendly, customisable interface.”

Being a desktop application built with Qt Quick Controls 2, I figured that it might be an interesting example for others to read about. In this post, I’m going to briefly discuss how I implemented Slate’s user interface and auto tests.

Visual Structure

Slate is simple. My goal when creating it was to have something that was fun to work on and easy to maintain.

To that end, each instance of Slate can only have one image open at a time. The canvas for the image takes up the most of the screen:

slate

Panels

slate-panels

Currently, all of the panels are collapsible, but fixed to the right side of the window. I know some people like dockable windows, but in the spirit of keeping it simple, I went with this approach. Each panel is represented by Panel.qml:

import QtQuick 2.6
import QtQuick.Layouts 1.1
import QtQuick.Controls 2.0

import App 1.0

import "." as Ui

Page {
    id: root
    objectName: "panel"
    background: Rectangle {
        color: Ui.CanvasColours.panelColour
    }

    property bool expanded: true
    property Popup settingsPopup: null

    header: RowLayout {
        spacing: 0

        Label {
            text: root.title
            font.bold: true

            Layout.leftMargin: 16
        }

        Item {
            Layout.fillWidth: true
        }

        ToolButton {
            objectName: root.objectName + "SettingsToolButton"
            text: "\uf013"
            font.family: "FontAwesome"
            focusPolicy: Qt.NoFocus
            visible: settingsPopup

            Layout.preferredWidth: implicitHeight

            onClicked: settingsPopup.open()
        }

        ToolButton {
            objectName: root.objectName + "HideShowToolButton"
            text: expanded ? "\uf146" : "\uf0fe"
            font.family: "FontAwesome"
            focusPolicy: Qt.NoFocus

            Layout.leftMargin: -8
            Layout.preferredWidth: implicitHeight

            onClicked: expanded = !expanded
        }
    }
}

Panel itself is a Page. I chose this type because it allows me to conveniently specify a header that contains the title of the panel and its buttons. Each panel can be collapsed, and can also provide some panel-specific settings that are modified through a popup.

Menus

slate-menus

Common tools and operations are in the toolbar at the top of the window, with the complete set being available in the menu bar:

import Qt.labs.platform 1.0 as Platform

import App 1.0

Platform.MenuBar {
    property ImageCanvas canvas
    property ProjectManager projectManager
    property Project project: projectManager.project
    property int projectType: project ? project.type : 0
    readonly property bool isImageProjectType: projectType === Project.ImageType || projectType === Project.LayeredImageType

    property var canvasSizePopup
    property var imageSizePopup

    // ...

    Platform.Menu {
        id: editMenu
        objectName: "editMenu"
        title: qsTr("Edit")

        Platform.MenuItem {
            objectName: "undoMenuButton"
            text: qsTr("Undo")
            onTriggered: project.undoStack.undo()
            enabled: project && project.undoStack.canUndo
        }

        Platform.MenuItem {
            objectName: "redoMenuButton"
            text: qsTr("Redo")
            onTriggered: project.undoStack.redo()
            enabled: project && project.undoStack.canRedo
        }

        Platform.MenuSeparator {}

        Platform.MenuItem {
            objectName: "copyMenuButton"
            text: qsTr("Copy")
            onTriggered: canvas.copySelection()
            enabled: isImageProjectType && canvas && canvas.hasSelection
        }

        Platform.MenuItem {
            objectName: "pasteMenuButton"
            text: qsTr("Paste")
            onTriggered: canvas.paste()
            enabled: isImageProjectType && canvas
        }

        // ...
    }
    // ...
}

As Slate has been developed against the latest Qt Quick Controls 2 versions, it recently started using native menu bars on all platforms. However, it was previously using non-native menus on Windows until the support was added. I mention this because I feel like it could be a useful example; not only for how to have native controls on some platforms, and non-native controls on others, but also to demonstrate how to use file selectors for situations like this in general. To learn more, see the repo as of this commit; specifically, this version of MenuBar.qml is native, and this one is a non-native alternative for Windows.

ToolBars

slate-toolbar

The ToolBar is based on the ToolBar control:

import QtQuick 2.6
import QtQuick.Controls 2.1

import App 1.0

import "." as Ui

ToolBar {
    id: root
    objectName: "iconToolBar"

    // ...

    Row {
        id: toolbarRow
        enabled: canvas
        anchors.fill: parent
        // Make sure that we don't end up on a sub-pixel position.
        anchors.leftMargin: Math.round(toolSeparator.implicitWidth / 2)

        ToolButton {
            id: canvasSizeButton
            objectName: "canvasSizeButton"
            enabled: project && project.loaded
            hoverEnabled: true
            focusPolicy: Qt.NoFocus

            icon.source: "qrc:/images/change-canvas-size.png"

            ToolTip.text: qsTr("Change the size of the canvas")
            ToolTip.visible: hovered && !canvasSizePopup.visible

            onClicked: canvasSizePopup.open()
        }

        ToolButton {
            id: imageSizeButton
            objectName: "imageSizeButton"
            enabled: project && project.loaded && !isTilesetProject
            hoverEnabled: true
            focusPolicy: Qt.NoFocus

            icon.source: "qrc:/images/change-image-size.png"

            ToolTip.text: qsTr("Change the size of the image")
            ToolTip.visible: hovered && !imageSizePopup.visible

            onClicked: imageSizePopup.open()
        }

        ToolSeparator {}

        Row {
            spacing: 5

            Ui.IconToolButton {
                objectName: "undoButton"
                text: "\uf0e2"
                enabled: project && project.undoStack.canUndo
                hoverEnabled: true

                ToolTip.text: qsTr("Undo the last canvas operation")
                ToolTip.visible: hovered

                onClicked: project.undoStack.undo()
            }

            Ui.IconToolButton {
                objectName: "redoButton"
                text: "\uf01e"
                enabled: project && project.undoStack.canRedo
                hoverEnabled: true

                ToolTip.text: qsTr("Redo the last undone canvas operation")
                ToolTip.visible: hovered

                onClicked: project.undoStack.redo()
            }

            ToolSeparator {}
        }
        // ...
    }
}

It is a mix of ToolButtons using images for icons and a custom IconToolButton that is simply a ToolButton that sets FontAwesome as its font family for convenience.

Shortcuts

All of the shortcuts are defined in Shortcuts.qml:

import QtQuick 2.6

import App 1.0

Item {
    objectName: "shortcuts"

    // ...

    Shortcut {
        objectName: "redoShortcut"
        sequence: settings.redoShortcut
        onActivated: project.undoStack.redo()
        enabled: canvasHasActiveFocus && project && project.undoStack.canRedo
    }

    Shortcut {
        objectName: "copyShortcut"
        sequence: StandardKey.Copy
        onActivated: canvas.copySelection()
        enabled: isImageProjectType && canvasHasActiveFocus && canvas.hasSelection
    }

    Shortcut {
        objectName: "pasteShortcut"
        sequence: StandardKey.Paste
        onActivated: canvas.paste()
        enabled: isImageProjectType && canvasHasActiveFocus
    }

    // ...
}

I started writing Slate before Action was introduced, and haven’t bothered to clean this up yet. Ideally, each of these shortcuts would be an action in MenuBar.qml, instead of being defined in both Shortcuts.qml and MenuBar.qml.

Each shortcut’s key sequence is stored in ApplicationSettings, as they are configurable. Below is a screenshot of the shortcuts tab of OptionsDialog:

slate-options

Each shortcut there is represented by a ShortcutRow item. KeySequenceEditor takes care of the actual key editing.

Style

To match its name, Slate uses the Material style‘s dark theme. I find dark themes more gentle on the eyes, and, in my opinion, the Material style is the best looking style in Qt Quick Controls 2.

In some places I’ve experimented with supporting other styles, such as the Universal style. I did so using file selectors.

When adding custom UI elements, such as the current layer indicator in the Layer panel, I’ve made sure to use the accent colour from the active style:

slate-layers

To do this, I use a CanvasColours singleton. The default implementation is for the default style (again, just experimenting), with other styles having their own implementation of the singleton in their specific file selector directories. The Material style implementation is here. Notice that it uses Material.accent.

Testing

I take comfort in auto tests. They’re a great reassurance that I haven’t screwed everything up. I try to add tests for every new feature. Sometimes I get lazy, but in general I think the coverage is pretty good.

Gritty Details

My goal with the auto tests is to try as much as possible to emulate the workflow that a user would employ. This means clicking buttons instead of just calling the C++ function that the button would have called.

The test case itself inherits from TestHelper, which provides helper functions for common tasks. Here’s an example of a test:

void tst_App::disableToolsWhenLayerHidden()
{
    QVERIFY2(createNewLayeredImageProject(), failureMessage);

    // The cursor should be normal.
    setCursorPosInScenePixels(0, 0);
    QTest::mouseMove(window, cursorWindowPos);
    QCOMPARE(window->cursor().shape(), Qt::BlankCursor);

    QQuickItem *layer1Delegate = nullptr;
    QVERIFY2(verifyLayerName("Layer 1", &layer1Delegate), failureMessage);
    QQuickItem *layer1VisibilityCheckBox = layer1Delegate->findChild("layerVisibilityCheckBox");
    QVERIFY(layer1VisibilityCheckBox);

    const QVector tools {
        ImageCanvas::PenTool,
        ImageCanvas::EyeDropperTool,
        ImageCanvas::EraserTool,
        ImageCanvas::FillTool,
        ImageCanvas::SelectionTool/*,
        ImageCanvas::CropTool TODO: not implemented yet*/
    };

    foreach (ImageCanvas::Tool tool, tools) {
        // Hide the layer.
        mouseEventOnCentre(layer1VisibilityCheckBox, MouseClick);
        QCOMPARE(layeredImageProject->currentLayer()->isVisible(), false);

        // Switch tool.
        QVERIFY2(switchTool(tool), failureMessage);

        // The cursor should be disabled for each tool.
        setCursorPosInScenePixels(0, 0);
        QTest::mouseMove(window, cursorWindowPos);
        if (window->cursor().shape() != Qt::ForbiddenCursor) {
            QString message;
            QDebug debug(&message);
            debug.nospace() << "Expected Qt::ForbiddenCursor for tool " << tool << ", but got " << window->cursor().shape();
            QFAIL(qPrintable(message));
        }

        // Make the layer visible again.
        mouseEventOnCentre(layer1VisibilityCheckBox, MouseClick);
        QCOMPARE(layeredImageProject->currentLayer()->isVisible(), true);

        // The cursor should not be ForbiddenCursor now.
        QVERIFY(window->cursor().shape() != Qt::ForbiddenCursor);
    }

    // Hide the layer.
    mouseEventOnCentre(layer1VisibilityCheckBox, MouseClick);
    QCOMPARE(layeredImageProject->currentLayer()->isVisible(), false);

    // Ensure that we can't actually do anything when the cursor is disabled.
    QVERIFY2(switchTool(ImageCanvas::PenTool), failureMessage);
    setCursorPosInScenePixels(10, 10);
    QTest::mouseMove(window, cursorWindowPos);
    QTest::mouseClick(window, Qt::LeftButton, Qt::NoModifier, cursorWindowPos);
    QCOMPARE(layeredImageProject->currentLayer()->image()->pixelColor(10, 10), QColor(Qt::white));
}

One important thing that I think is worth mentioning is the approach to verifying the success of helper functions. QVERIFY and friends do not work outside of test functions. What you’ll see if you try to cause a failure outside of a test function invoked by the test framework is that the failure is printed in the test’s output, but does not prevent further execution of the test (it can’t, because the macros just return early, which would bring control back to the test function itself). This is a subtle issue that I think deserves some attention.

To get around this, I’ve copied the macros and removed their “Q” prefixes. As an example, here’s VERIFY:

#define VERIFY(statement) \
do { \
    if (!static_cast(statement)) { \
        failureMessage = #statement; \
        return false; \
    } \
} while (false)

All helper functions must use these macros. It’s not as good as having the code within the test functions themselves, because I don’t get useful line numbers (the failure points to the invocation of the function, not the position of the failure in the helper function). However, I can make up for this by providing better failure messages in the helper functions, and I’d rather this than having to duplicate the code. Using the first line of the test above as an example:

QVERIFY2(createNewLayeredImageProject(), failureMessage);

If a failure were to occur on this line in the createNewLayeredImageProject() helper:

VERIFY(nameTextField->property("text").toString() == QLatin1String("Layer 1"));

I would receive this failure message:

FAIL! : tst_App::disableToolsWhenLayerHidden() 'createNewLayeredImageProject()' returned FALSE. (nameTextField->property("text").toString() == QLatin1String("Layer 1"))
..\..\slate\tests\tst_app.cpp(3203) : failure location

As mentioned in the bug report, QCOMPARE can’t be easily duplicated, so I also can’t see what the actual value is, just the expected value.

If the QVERIFY2 above fails, execution eventually returns to cleanup(), where the failure message is cleared in preparation for the next test.

Project Structure

I took the lazy man’s approach to the project structure for the auto tests. Everything needed to build the application is in app.pri. That way, app.pro and tests.pro just need to include it.

… which means that all of the C++ files and resources (QML, images, etc.) are built twice! I would not recommend this, especially for larger projects (Slate is not that big, so it hasn’t bothered me yet). The standard, proper, non-lazy way of structuring a project like this is to move the application’s C++ and resources into a library, and then use that in the application and tests. One day I’ll do it the proper way, but so far I’ve been much more interested in adding cool features to my application than build systems. 🙂

Summary

Writing this application has been fun. It was also nice to dogfood Qt Quick Controls 2 in the process, as it’s helpful to be able to think like a user of the API.

In terms of things I have learned in the process, the first one that comes to mind is the undo framework.

I hope that this article was interesting. Feel free to explore the code in Slate and use it in your applications. 🙂

The post Slate: A Basic Pixel Art Editor Built with Qt Quick appeared first on Qt Blog.

Viewing all 15410 articles
Browse latest View live