Quantcast
Channel: Planet Qt
Viewing all 15410 articles
Browse latest View live

The Qt Company Blog: Qt Premium Support: Learning and Experiences

$
0
0

The Qt Company Support Team works hand-in-hand with Qt R&D developers, and we are 100% committed to ensuring your success. It’s now been a bit over half a year since we launched the new Premium Support service. We felt that now would be a good time to recapture its essence and the experiences of our teams and customers. We will be sharing lots of troubleshooting tips and best practices on March 6th, in our Qt Support – Tips and Tricks webinar – make sure to join and tell us about your project! In the meantime, here’s a brief recap of what we’ve been working on.

Qt Support Services

Standard Support is included with all new commercial Qt licenses (apart from start-up licenses). This guarantees that we respond to your request within 48 business hours and prioritize your reported Qt errors. However, many of our customers require more personal and quicker support service. This is where Premium Support comes in. It offers a dedicated support representative close to your time zone who will respond to you within 10 business hours on average. This means that if we get your request in the morning you can see our response before you leave work.

When we try to reproduce any issues you may have, we can also use your complete applications instead of minimal test versions to analyze issues and fix bugs. Premium Support reported Qt bugs also get high priority and will get handled quickly.

You can find the SLA terms on our webpage.

Experiences from Premium Support

We’ve resolved oodles of bug fix requests for our Premium Support customers. With Premium Support it doesn’t really matter whether the issue lies in your code or in the Qt libraries. We will investigate and find the solution no matter what. Typically bugs can be difficult to resolve in Standard Support since a minimal test application is required and some of the issues are really hard to reproduce with anything else than customer application. Being able to use customer application really speeds up resolving bugs!

We have also been providing a lot of guidance on best practices on particular use cases for our customers. This includes ideal usage of Qt APIs and what can be done within the customer application, algorithm guidance, architecture design and optimizing performance.

Another type of project we are often involved in is the migration from obsolete Qt version to a newer Qt5 version. Although almost everything works out-of-the-box when upgrading Qt, there are cases that require changes to the code. If you have a large codebase, it’s tedious to check whether some functionality has changed in a newer Qt version. Other times an upgrade comes with new features that make it easier to implement certain user application functionalities. This is where we can help you a lot since we know all the details of Qt and changes between versions.

Even though we can’t guarantee that all reported bugs will get fixed in a specific way, we have been able to find a usable workaround. That way you will never be stuck with your issues for long.

The Feedback from our Customers

Our customers have been genuinely happy with our service and gave us lots of great feedback on how we resolved their issues and clarified any doubts they might have had on certain topics.

We chose Qt Commercial because, firstly – we needed support. Time to market was critical for us, and to be able to ensure that we have timely responses to any important technical questions that came up was very important to maintain the pace of development. ’

– James Patterson, Technical Director, Co-Founder, Eykona Technologies

“We purchased an enterprise contract with The Qt Company because Qt gives us the expressiveness and the speed of a native UI framework with a very low maintenance cost and a nice support network behind us. We believe Qt will further our mission of providing the best user experience for our customers.’’

– Adam Christian, Senior Software Engineer, Tableau

“The support for free is amazing – the support for commercial is outstanding. If you want to feel that, you, the humble developer matters – use these guys.You are not only heard – if you lift your game with logging problems (give them a definite example of what is wrong, steps to reproduce, what you expect) – they 99% are fixed next release. New features, slight changes too. These guys are good. I’m a bit of a newcomer, only a year and a half using Qt but I’m a big fan.’’

– Reddit fan /u/6thComm

If you want to get or find out more about Premium Support, don’t hesitate to contact your account representative, or simply drop us a line.

The post Qt Premium Support: Learning and Experiences appeared first on Qt Blog.


The Qt Company Blog: Sharing Files on Android or iOS from or with your Qt App – Part 3

$
0
0

Welcome to Part 3 of my Blog series about Sharing Files to and from mobile Qt Apps.

Part 1 was about sharing Files or Content from your Qt App with native Android or iOS Apps, Part 2 explained HowTo share Files with your Qt App from other native Android Apps – this part now does the same from other native iOS Apps.

01_blog_overview

Some preliminary notes

  • Try it out: all sources are available at ⦁GitHub
  • Android Permissions not checked in Example App: enable WRITE_EXTERNAL_STORAGE manually
  • Current Android release is for Target SDK 23 ! (Android 7 requires ⦁FileProvider– wait for Blog Part 4)
  • All Use-Cases are implemented to be used x-platform – currently Android and iOS

If you‘re looking for an Android-only solution please also take a look at AndroidNative project.

Prepare iOS Info.plist

Similar to Android intent-filter in AndroidManifest.xml we must add some informations to Info.plist. If you haven‘t already done copy the Info.plist from your build directory into your project:

02_info_plist_in_project

Then add this into your .pro:

ios {
    ...
    QMAKE_INFO_PLIST = ios/Info.plist
    ...
}

Open the Info.plist and insert these lines:

CFBundleDocumentTypes
  CFBundleTypeNameGeneric FileCFBundleTypeRoleViewerLSHandlerRankAlternateLSItemContentTypespublic.data

See all the details from Apple Documentation „Registering File Types“.
Here‘s a short overview how the Types are organized:

03_uniform_type_identifiers

public.data is similar to MimeType */* we are using to filter Android Intents in our Example App.

After adding the lines to Info.plist our App will appear as a target App if Files or Attachments should be shared from other iOS Apps.

Fortunately iOS doesn‘t provide our own App as target if we want to share Files from our Example App with other iOS Apps.
Remember: On Android we had to create a custom Chooser to filter out our own App as target.

Get the incoming URL

The Files from other iOS Apps will be passed to the Qt App via application:openURL:

- (BOOL)application:(UIApplication *)application openURL:(NSURL *)url sourceApplication:(NSString *)sourceApplication annotation:(id)annotation

see also Apple documentation.

From Part 2 (Android implementation) you know that we have to wait until the Qt App is ready to handle the incoming URL and be able to emit a SIGNAL to QML UI.

We don‘t need this for iOS, because there‘s a Qt method we can use out of the box and grab the passed file url by registering QDesktopServices::setUrlHandler:

QDesktopServices::setUrlHandler("file", this, "handleFileUrlReceived");

This is easy to implement. We already have the IosShareUtils.mm class where we handle sharing Files to other Apps. Adding some lines of code:

IosShareUtils::IosShareUtils(QObject *parent) : PlatformShareUtils(parent)
{
    QDesktopServices::setUrlHandler("file", this, "handleFileUrlReceived");
}

void IosShareUtils::handleFileUrlReceived(const QUrl &url)
{
    QString myUrl = url.toString();
    // … remove "file://" from Url
    // … then check if File exists
    QFileInfo fileInfo = QFileInfo(myUrl);
    if(fileInfo.exists()) {
        emit fileUrlReceived(myUrl);
    } else {
        emit shareError(0, tr("File does not exist: %1").arg(myUrl));
    }
}

That‘s it 🙂

Thank You @taskfabric

Seems this is the first time I can tell you that there‘s easy stuff to manage Filesharing from Qt,
but I never would have found it out by myself. Didn‘t expected to take a look at QDesktopServices for sharing File URLs on Qt Mobile Apps.

Thanks to Thomas K. Fischer from Taskfabric.com who offered help at Qt Blog Comment
This is the real value of a great Qt Developer Community: Thomas appreciated my work on this sending me some lines of Code and pointing me to QDesktopServices. As a result it was easy for me to implement and publish the updated Sharing Example at Github.

Overview

Here‘s a short Overview about the iOS implementation:

04_handle_url_from_ios_apps

Test it!

Now it‘s a good point to test it.

Open „ekkes Share Example“ and navigate to one of the Tabs.

Open per ex. Apple Keynote App to share a File.

Here‘s the workflow from Apple Keynote App.
Tap on the SHARE Button:

05_keynote_share_01

Select „SEND COPY“:

06_keynote_share_02

„ekkes Share Example“ appears as Target:

07_keynote_share_03

Select ‚ekkes SHARE Example‘ and iOS will open the App. The App was already opened, so the current selected Page will be displayed and include a message about the received File.

08_keynote_share_04

So it works 🙂

No Qt Support for iOS Share Extensions

Attention: Sharing with a File URL works for all Apps providing Files or Attachments, but to handle Text or embedded Images shared from other Apps needs to be implemented with a “share extension”. See the details here.

Share Extensions are easy created using Xcode, but …
This is quite tricky to use with Qt, as the extension needs to be registered in Xcode and qmake overwrites the Xcode file on each run.

So Share (and other) Extensions cannot be included automatically while building from QtCreator and breaks workflows. See discussions https://bugreports.qt.io/browse/QTBUG-40101.

Hopefully Qbs will support this in the near future, because iOS App Extensions are an essential feature of iOS Apps in the meantime.

Some issues from Sharing Files to other Android Apps

Android: Sharing from Microsoft Word (and other MS Office Apps)

There are differences between Android 6 and Android 7 versions of MS Office Apps.

In both cases the Qt App received a SEND Action and a Content Url

MS Word:

content://com.microsoft.office.word.fileprovider/94161e0b-e48a-4142-9785-d0602d801e95/test.docx

Using QSharePathResolver.java class this File Url could be constructed:

/data/user/10/com.microsoft.office.word/files/tempOffice/Share/ff3251b4-c475-48e2-a7cc-f1df02d69874/test.docx

On Android 6 Devices the File Url could be opened and read without any problems from QFile – on Android 7 Devices I got a „File does not exist“ Error.

Other Apps using SEND Actions and Content Urls are working same on Android 6 or Android 7 Devices, so it‘s something special with MS Office Apps.

Testing some other ways to handle the File Url I found out that on Android 7 Devices for MS Word I can use InputStream for the given FileUrl. So I added an extra check for situations like this:

public class QShareActivity extends QtActivity
{
        // ...
    public static native boolean checkFileExits(String url);
}

bool AndroidShareUtils::checkFileExits(const QString &url)
{
    QString myUrl;
    if(url.startsWith("file://")) {
        myUrl= url.right(url.length()-7);
    } else {
        myUrl= url;
    }
    QFileInfo fileInfo = QFileInfo(myUrl);
        return fileInfo.exists();
}

JNIEXPORT bool JNICALL
  Java_org_ekkescorner_examples_sharex_QShareActivity_checkFileExits(JNIEnv *env,
                                        jobject obj,
                                        jstring url)
{
    const char *urlStr = env->GetStringUTFChars(url, NULL);
    Q_UNUSED (obj)
    bool exists = AndroidShareUtils::getInstance()->checkFileExits(urlStr);
    env->ReleaseStringUTFChars(url, urlStr);
    return exists;
}

Android: Sharing from Google Docs App fails if Qt App is open

In Android Manifest the Launch Mode is declared as

android:launchMode="singleInstance" android:taskAffinity=""

SingleInstance is the only launchMode where always the same instance of our one and only Activity will be opened. This enables workflows where User already logged into an App and navigated to a Page and if shared from another App exactly this Page will be displayed.

This works well and you can test it from „ekkes Share Example“ App: Open the App, select a specific Tab (Page), then open another App and share a File with the Example App. Our Example will be opened exactly on the selected Page.

If the App was open, onNewIntent() from our customized Activity should be called, but Google Docs always calls onCreate()– doesn‘t matter if the Target App is already running or not. Then a white screen comes up, the App hangs and must be closed. The Debug Log reports:

E Qt JAVA : Surface 2 not found!

I haven‘t found a way to workaround this yet – perhaps anyone else has an idea HowTo fix ?

Have Fun

Now it‘s time to download current Version from Github, build and run the Sharing Example App.

Stay tuned for the next part where FileProvider will be added to share Files on Android.

The post Sharing Files on Android or iOS from or with your Qt App – Part 3 appeared first on Qt Blog.

The Qt Company Blog: Qt Creator 4.6 Beta released

$
0
0

We are happy to announce the release of Qt Creator 4.6 Beta!

C++ Support

The possibly most noteworthy and least directly visible change is that we upgraded the backend for the Clang code model from Clang 3.9 to Clang 5.0. This enables support for many C++17 features that were not available in Clang 3.9. The Clang code model is not used by default. Open Help>About Plugins (Qt Creator>About Plugins on macOS) and turn on the ClangCodeModel plugin to enable it.

Another feature that is not visible until you enable it, is the new option to integrate Clang-Tidy and Clazy warnings into the diagnostic messages that you see in the C++ editor. Go to Options>C++>Code Model>Clang Code Model Warnings, create a copy of one of the presets, and choose the checks that you want to be performed.

The informational tooltips on symbols are now generated from information from Clang instead of the built-in model (if you enabled the Clang code model). It now resolves auto to the actual type and shows template parameters for template types. It shows the first or the \brief paragraph of a documentation comment, too.

We also added separate highlighting of function definitions and fixed some issues with saving header files on Windows while Clang has a grip on them.

Navigation

We added 3 more filters to Locator. Type “b” to jump to a bookmark, filtering on file name and notes. The other two are not directly related to navigation but nevertheless useful.
The filter “t” triggers an item from the main menu. You can either use the display name of the item to locate it, or parts of the menu path leading to it. For example “t sess expe” could be used to trigger the menu item File>Sessions>Experimental Stuff.
Use “=” to evaluate simple ECMAScript (JavaScript) expressions. You have all functionality from the ECMA-262 specification at your disposal, and for convenience, we also added the functions from the Math object as global functions (so you can write “max(1, 2)” instead of “Math.max(1, 2)”).

We continued the work on the File System navigation pane that we started with 4.5. It now has breadcrumbs for the file path at the top, and we added actions for adding, removing, and renaming files to its context menu.

Model Editor

Thanks to Jochen, the original contributor to the model editor, it received a big update in this release. It now supports text alignment and multi-line object names. You can export only selected elements or the whole diagram to images. A wider range of panes now supports drag & drop of items. Enable the model editor by enabling the plugin in Help>About Plugins (Qt Creator>About Plugins on macOS).

There have been many more improvements all over Qt Creator. Please have a look at our changelog for a more detailed overview.

Get Qt Creator 4.6 Beta

The opensource version is available on the Qt download page, and you find commercially licensed packages on the Qt Account Portal. Qt Creator 4.6 Beta is also available under Preview>Qt Creator 4.6.0-beta1 in the online installer. Please post issues in our bug tracker. You can also find us on IRC on #qt-creator on chat.freenode.net, and on the Qt Creator mailing list.

The post Qt Creator 4.6 Beta released appeared first on Qt Blog.

V-Play Engine: How to Access REST Services with Qt and V-Play: Weather Service Example App (Open Source)

$
0
0

REST and RESTful web services are the most common way to access data through the Internet. Qt with V-Play provides an easy way to connect via REST. This article guides you through the most important steps to create an App and connect to a REST service. Additionally, it provides reusable code snippets.

Spoiler: Basic REST Example with V-Play

Before we jump into the details of creating the sample App, this is how a basic request to a REST service looks, using the XMLHttpRequest:

// Create the XMLHttpRequest object
var xhr = new XMLHttpRequest

// Listen to the readyStateChanged signal
xhr.onreadystatechange = function() {
  // If the state changed to DONE, we can parse the response
  if (xhr.readyState === XMLHttpRequest.DONE) {
    // The responseText looks like this {"ip":"xxx.xxx.xxx.xxx"} 
    // Parse the responseText string to JSON format
    var responseJSON = JSON.parse(xhr.responseText)
    // Read the ip property of the response
    var ip = responseJSON.ip
    // Log your ip to the console output
    console.debug("My IP is: " + ip)
  }
}

// Define the target of your request
xhr.open("GET", "https://api.ipify.org?format=json")
// Execute the request
xhr.send()

Real-Life Sample Project

For the most useful results, we build a real-life Qt client. It accesses one of the web’s most popular weather services. It’s easy to adapt to any other REST service: the process is always the same. You only need to change the endpoint URL and parse the corresponding content.

Qt-Qml-V-Play-REST-Weather-App-300

The full sample is available open-source on GitHub:


Architecture

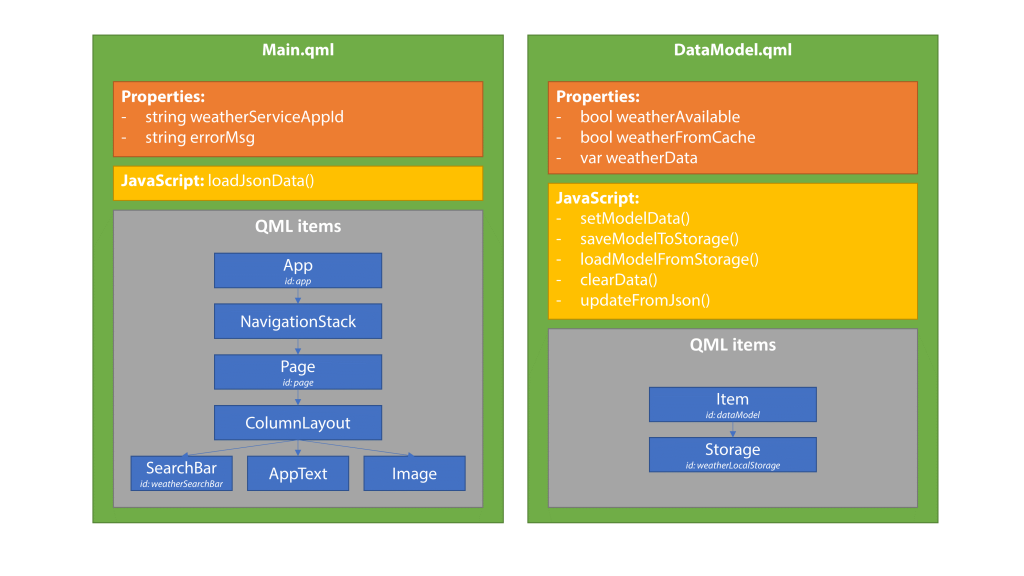
The app consists of two files:

  • Main.qml: contains the UI and REST logic
  • DataModel.qml: stores & caches the parsed data from the REST service

App Architecture for REST Services with Qt, QML and V-Play

Basic UI for a Responsive REST Client App

First, we create the user interface: the QML items in “Main.qml”. We use V-Play APIs. They adapt to the style of the target platform (Desktop, Android, iOS). These three items are usually present in every Qt / QML app:

  1. The App component is always the top-level element in the QML file. It adds a lot of vital layout data to standard Qt classes. Two mechanisms are especially important. Device-independent pixels (dp) for sizes and scale-independent pixels (sp) for fonts.
  2. Initially, our REST client app only has a single page. It’s still a good idea to add the NavigationStack item as a child. Later, it could handle navigating to a detail page. In our current app, the NavigationStack ensures that the top navigation bar is visible.
  3. The third item is the Page. It’s the container for the automatic title bar and the visible QML items of our app. The platform-specific theming is applied automatically.

Visualization UI

After the generic UI elements, we define the custom interface. The user enters the city name in a SearchBar. The AppText elements below show the parsed data / error message.

QML Page Layout

We need vertically stacked UI elements. The generic QML ColumnLayout is the best layout manager for this scenario. Its documentation is short. Essentially, it’s a convenience version of the GridLayout with a single column.

QML contains another class which looks similar at first sight: the Column. What’s the difference of ColumnLayout vs Column?

  • Column is a Positioner. It arranges QML items in a regular fashion (i.e., below each other). The child items are responsible for their size. The Column takes care of the position.
  • ColumnLayout is a Layout. In addition to the position, it also manages the child item size. This makes it more suitable for responsive user interfaces. It ensures the individual item’s place on the screen is a good compromise of the available space and the minimum item size.

We’re dealing with a mobile UI. Thus, the ColumnLayout is the better choice.

ColumnLayout {
    anchors.fill: parent
    anchors.margins: app.dp(16)
    // ... QML child items ...
}

To achieve the expected look & feel of the UI on a phone, we set two properties:

  • anchors.fill: parent– this stretches the layout to the available width and height.
    What happens if we don’t specify the layout size?
    The layout area would adapt to the minimum requested size of its managed QML items. The text items always grab the space they need for showing their contents. But the SearchBar is flexible: it takes what it gets and doesn’t have a minimum width. Therefore, the SearchBar would be too small or even invisible if we didn’t have enough text in the rest of the UI.
  • anchors.margins: app.dp(16)– text shouldn’t stick to the screen edge. The Google Material Design recommends screen edge left and right margins of 16dp. Note that in iOS, you should also consider the safe area in addition to the margins. This ensures your content is not within the cutout-areas of the iPhone X in landscape mode.
    In our app, we use a margin of 16 density-independent pixels. This ensures a similar spacing on all mobile phones, independent of the screen’s pixel density.

Data Input: SearchBar

Entering data for searching or filtering is a common task in every mobile app. Fortunately, V-Play includes an advanced QML item. It handles interaction and platform-specific theming. You get a full-blown search text input control by specifying a handful of settings. This screenshot shows an empty SearchBar with the iOS theme:

SearchBar for a REST client with Qt, QML and V-Play

SearchBar {
   id: weatherSearchBar
   focus: true
   Layout.fillWidth: true
   placeHolderText: qsTr("Enter city name")
   onAccepted: loadJsonData()
}

By setting the width to correspond to the parent’s width (-> the layout), we ensure the search bar always fills the available screen width. The placeHolderText is great for better usability.

Finally, with onAccepted, we call a custom JavaScript function that we will code shortly. This signal is emitted whenever the user presses the Return or Enter key.

Data Display: AppText

The AppText QML type is another component of V-Play. It is a styled QML Text item. It picks up the platform’s colors and styling by default.

Our layout consists of several AppText items. Each has a dynamic text property, which is bound to weather data from the DataModel. The layout ensures the items are below each other.

AppText {
   text: qsTr("Weather for %1").arg(DataModel.weatherData.weatherForCity)
   Layout.fillWidth: true
   wrapMode: Text.WordWrap
   color: Theme.tintColor
   font.family: Theme.boldFont.name
   font.bold: true
   font.weight: Font.Bold
   visible: DataModel.weatherAvailable
}

Let’s examine the most complex AppText item in our layout: the header of the weather information. It shows the city name and country.

  • Text: the city name is bound to our data model.
    To prepare for future app translation, we wrap the text string with qsTr(). Read more: How to Make a Multi Language App or Game with V-Play
  • Layout: some text might not fit in a single line. Therefore, we activate word wrapping. The QML item needs to have a width to know where to insert the line break. We set the width to fill the available space provided by the layout.
  • Styling: we apply a bold and colored style to the text. The global Theme item of V-Play provides app-wide and platform-adapted color and font resources.
  • Visibility: the item should only be visible if weather data is available in the model. The binding automatically adapts the visibility.

Remaining Screen Height

By default, the layout distributes the available screen height between all items. Our current layout is quite compact. We don’t want a huge unused area between each text line.

To solve this, we add an Item with an activated fillHeight property. It’s not visible on the screen but is as tall as possible. This pushes the other items together.

Item {
    Layout.fillHeight: true
}

Weather Services

The most popular weather services are OpenWeatherMap, Yahoo Weather and Weather Underground. In this tutorial, we use OpenWeatherMap. It’s quick to sign up, it provides free weather data access and is frequently used (also by Google).

API Key

Sign up for free at https://openweathermap.org/appid

Immediately afterwards, you get an email with usage samples. OpenWeatherMap already generated an API key called “Default” in your account.

Sign up for the ApiKey of OpenWeatherMap to use the REST Service

It takes around 10 minutes until the key is active. Click on the sample link in your welcome email to check if the service is already up and running for your account.

REST Request & JSON Parsing with Qt / QML

How do we fill the UI with actual weather data? Most Internet services provide a REST API. In Qt, QML and JavaScript are tightly integrated. Instead of having to resort to C++ code, we can use standard JavaScript code to access a RESTful API.

In technical terms, the XMLHttpRequest object is embedded in the QML Global Object. Its functionality corresponds to the W3C Standard. The only exception is that it doesn’t enforce the same-origin policy. This makes our life easier, as we do not have to deal with CORS (Cross-Origin Resource Sharing). In QML JavaScript, all REST requests typically go to an external web server.

You need 4 steps for a REST request:

  1. Instantiate XMLHttpRequest
  2. Register a state change listener
  3. Set the target URL & request properties
  4. Send the REST request

Let’s analyze these steps:

1. Instantiate XMLHttpRequest

In the first line, we create an instance of the XMLHttpRequest object. It’s OK to be a local object. Every REST request creates a new instance.

var xhr = new XMLHttpRequest

2. Register a State Change Listener

By default, XMLHttpRequest is asynchronous. Therefore, we define an event handler. The most flexible approach is attaching a handler function to the onreadystatechange event.

During the lifetime of the REST request, it runs through several states:

  1. UNSENT
  2. OPENED
  3. HEADERS_RECEIVED
  4. LOADING
  5. DONE <- request is finished. Isalwayscalled (also in case of an error!)

To provide progress indicators while loading, you could register for intermediate events. For quick requests like ours to a weather service, it’s usually enough to only handle the DONE event.

xhr.onreadystatechange = function() {
   if (xhr.readyState === XMLHttpRequest.DONE) {
       // ... handle response data ...
   }
}

3. Set the Target URL & Request Properties

Next, we configure the REST request. The open() function needs at least two parameters:

  • Method: the HTTP method for the REST request. The REST protocol allows full interaction with a server.
    To retrieve data, you use GET or POST methods (depending on the service definition).
    An interactive RESTful web service can also implement the PUT, PATCH and DELETE methods for modifying data.
  • Url: target to invoke. In case of a GET request, the parameters are part of the URL.

The open() function checks the data you supply and advances the request state to OPENED.

The OpenWeatherMap service works using GET requests. The URL needs to contain:

  1. Query: the city name, e.g., ?q=Vienna
    We retrieve the query string from the text of the weatherSearchBar QML item.
  2. Units: metric or imperial, e.g., &units=metric
  3. API key / App ID: sign up to get a free app id. E.g., &appid=xyz
    It’s a good idea to store your API key / App ID as a property in your app.

The full code to construct the query URL and to open the REST request:

var params = "q=" + weatherSearchBar.text + "&units=metric&appid=" + app.weatherServiceAppId
xhr.open("GET", "http://api.openweathermap.org/data/2.5/weather?" + params)

4. Send the REST Request

A simple statement. If your RESTful service uses POST, you supply the body as parameter. For our GET method, call:

xhr.send()

Parse the REST Response

Once our REST request proceeds to the DONE state, we check the results. As we call an external service through the Internet, many things can go wrong. It’s important to handle all possible failures.

Most REST / JSON tutorials show a simplified handler. It’d fail without an Internet connection. Here, we handle all possible issues.

JSON Response

If everything went well, we received a response. The responseText property contains the JSON data, which we parse through JSON.parse(). This is the shortened JSON response. The full OpenWeatherMap response contains more data.

{
  "weather": [
    {
      "main": "Snow",
      "description": "light snow",
      "icon": "13n"
    }
  ],
  "main": {
    "temp": -0.32,
  },
  "name": "Vienna",
  "cod": 200
}

Identify Failed REST Requests

A request can fail because of several reasons:

  • Connection issues: e.g., no Internet connection or the server is down
  • Request issues: the server / service does not understand your request, e.g., due to a typo in the URL
  • Access issues: the RESTful service can’t fulfil your request. Examples: unauthorized client, invalid API key
  • Service issues: unable to send a positive response. E.g., because the requested city doesn’t exist, or because no weather is currently available for the city

Usually, REST services only send the positive HTTP status code 200 if everything worked well. In all other cases, they send a different HTTP status code (e.g., 404 if the city wasn’t found). Additionally, it may send a response text even in case of a failure. This provides extra information on what went wrong.

But, some REST services always return the successful HTTP code 200. They only report an error in the response text. Check the service documentation and test the REST APIs.

OpenWeatherMap is a well-designed RESTful service. It always sends a response JSON. The JSON data includes a response code (called “cod”). So, it’s best to parse the responseText (if available). If parsing the JSON was successful (!= null) and the JSON contains a “cod” of 200, we know that everything went well. Otherwise, we need to analyze the error.

var parsedWeather = xhr.responseText ? JSON.parse(xhr.responseText) : null
if (parsedWeather && parsedWeather.cod === 200) {
   // Success: received city weather data
} else {
   // Issue with the REST request
}

Successful REST Request

If the REST service returned data, we reset any previous error message in our UI. Then, we update our DataModel.

// Success: received city weather data
app.errorMsg = ""
DataModel.updateFromJson(parsedWeather)

REST Response Error Handling

In technical terms, we differentiate 3 types of REST request failures:

  1. The status code of the XMLHttpRequest is still 0, even though its status already changed to DONE. This indicates that the request didn’t go through.
    Potential reasons: no Internet connection, server is down, …
  2. We received response text, but it contains an error description. For our weather app, we show the message to the user.
    Potential reasons: city not found, API key is wrong, …
  3. No response text, but a HTTP response status code. Create a custom error message for the user.
    Potential reasons: REST service crashed (e.g., 500 Internal Server Error), …

This code snippet handles all 3 cases. It formulates a brief error message for the app user.

// Issue with the REST request
if (xhr.status === 0) {
   // The request didn't go through, e.g., no Internet connection or the server is down
   app.errorMsg = "Unable to send weather request"
} else if (parsedWeather && parsedWeather.message) {
   // Received a response, but the server reported the request was not successful
   app.errorMsg = parsedWeather.message
} else {
   // All other cases - print the HTTP response status code / message
   app.errorMsg = "Request error: " + xhr.status + " / " + xhr.statusText
}

JSON Data Model for REST Requests

An architecture that separates the model from the view makes your app easy to extend. So, we create an extra class to manage the data model.

Right-click the qml folder in Qt Creator’s “Project”-window and select “Add new…”. Choose the Item template in the V-Play Apps category. Call the file “DataModel.qml”.

Singleton Pattern in QML

We want our model to be accessible in the whole app. Thus, we use the Singleton pattern. This requires three steps:

1. Prepare the QML file

In the very first line of DataModel.qml– before the import statements – add:

pragma Singleton

2. Register the singleton

Create a new file called “qmldir” in Other files > qml in the Projects window.

Register a Singleton through the Qmldir in Qt

Add the following line to the qmldir file:

singleton DataModel 1.0 DataModel.qml

In the next step, we’ll import a directory to access our singleton file. When importing a directory, Qt always looks first for a qmldir file. It’s using that to customize the way it sees and imports qml files. In our case, the QML engine now knows to treat the DataModel.qml file as a singleton.

3. Import the Singletons

In Main.qml, add the following import after all the other import statements:

import "."

This causes Qt to scan the directory. From now on, our DataModel.qml file is accessible via the “DataModel” identifier in Main.qml.

QML Data Model Structure

Our data model requires three properties. Two contain information about the state of the data (weatherAvailable and weatherFromCache).

The third property is weatherData. It’s defined with the type var and initialized as an array with []. This allows assigning key-value pairs for the actual data. It lets us cache and restore the data with a single statement. Dynamic binding to the UI is still possible.

The basic structure of our data model:

pragma Singleton
import VPlay 2.0
import QtQuick 2.7

Item {
   id: dataModel

   property bool weatherAvailable: false
   property bool weatherFromCache: false

   property var weatherData: []
}

Save Weather Data to the Model

We want to keep the model generic. You could add a different data provider later, or the JSON layout changes.

Our app extracts the data it needs from the weather JSON. The app then stores the relevant data in its own model. If we’d later migrate to a different data provider, it wouldn’t influence the model or the UI.

The most efficient way to achieve this: create a setModelData() function. It takes the parsed parameters and saves it to our weatherData property.

function setModelData(weatherAvailable, weatherForCity, weatherDate, weatherTemp, weatherCondition, weatherIconUrl, weatherFromCache) {
    dataModel.weatherData = {
           'weatherForCity': weatherForCity,
           'weatherDate': weatherDate,
           'weatherTemp': weatherTemp,
           'weatherCondition': weatherCondition,
           'weatherIconUrl': weatherIconUrl
           }

    dataModel.weatherAvailable = weatherAvailable
    dataModel.weatherFromCache = weatherFromCache
}

Parse JSON Data from the Weather Service

In a previous step, we already converted the JSON text to objects with JSON.parse(xhr.responseText).

The QML runtime implements the ECMAScript language specification. Thus, working with JSON data in QML is like standard JavaScript. Every JSON object is accessible as a property. You retrieve JSON array values using the [] accessor.

The updateFromJson() method extracts the useful information from JSON and forwards it to our model.

function updateFromJson(parsedWeatherJson) {
   // Use the new parsed JSON file to update the model and the cache
   setModelData(true,
                parsedWeatherJson.name + ", " + parsedWeatherJson.sys.country,
                new Date(),
                parsedWeatherJson.main.temp,
                parsedWeatherJson.weather[0].main,
                "http://openweathermap.org/img/w/" + parsedWeatherJson.weather[0].icon + ".png",
                false)
}

Note: JavaScript and QML are very similar. The differences are hard to spot.

We choose the Qt variant, as it makes serialization easier. Qt provides platform-independent storage and transmission of all Qt data types.

Now, the app is functional! Go ahead and test it on any platform or device.

Data Persistence

REST requests over the Internet take time. To improve the user experience, we add data persistence to our app. With this enhancement, our app immediately shows cached data when it’s started. The update request to the webservice then runs in the background.

We stored our weather data in DataModel.qml. Now, we extend our model to encapsulate its own caching.

Storage QML Type

File handling is different on every platform. V-Play includes a powerful cross-platform type called Storage. It handles the most common use-case: key-value data storage. You don’t need to write complex SQL statements like in the base Qt Quick Local Storage QML type.

At the same time, all built-in QML types are serializable to Strings. With a single line of code, we export the whole model to persistent storage.

Initialize the Storage by adding the element as a child of our dataModel item:

Storage {
   id: weatherLocalStorage

   Component.onCompleted: {
       // After the storage has been initialized, check if any weather data is cached.
       // If yes, load it into our model.
       loadModelFromStorage()
   }
}

Load QML Data from Persistent Storage

The ready-made implementation from V-Play calls onCompleted() once the storage is accessible. We use this to check if cached data is available. We access stored data using getValue(). If no data is available, it returns undefined. A simple if(savedWeatherData) statement lets us execute code accordingly.

function loadModelFromStorage() {
   var savedWeatherData = weatherLocalStorage.getValue("weatherData")
   if (savedWeatherData) {
       dataModel.weatherData = savedWeatherData
       dataModel.weatherAvailable = true
       dataModel.weatherFromCache = true
   }
}

The powerful APIs de-serialize the storage into the live model data. To inform the user that he’s now seeing cached data, we set the other model properties accordingly.

Save QML Data to Persistent Storage

To serialize our weather data to the storage, we use setValue(). The second argument is our whole weather data storage object. V-Play automatically serializes it to the storage.

function saveModelToStorage() {
   weatherLocalStorage.setValue("weatherData", dataModel.weatherData)
}

What’s the best place to update the storage? Especially in mobile apps, it’s recommended to immediately update persistent storage. A mobile operating system may shut down apps at any time, e.g., for an incoming call and low system resources. Thus, call saveModelToStorage() at the end of our setModelData() method.

Deploy the App to Android, iOS and Desktop

V-Play provides platform-independent styling and a responsive layout. The V-Play Live Service features live code reloading every time you save changes to QML files. The PC client simulates the app appearance on iOS, Android or Desktop platforms.

With the V-Play Live Scripting App for Android or iOS, you can extend testing to a real mobile device. Your development PC and the phone communicate over the local area network.

This screenshot shows a sample configuration of the V-Play Live Server. Two clients are connected. The app is running on a Google Pixel 2 phone (with the V-Play Live App) and on a desktop client.

V-Play Live Server with 2 connected clients REST Client with V-Play running on a Google Pixel 2

Download the final, open source QML REST client sample code from GitHub:

It extends the code from this article with several comments. It’s a great starting point for your own REST projects!


More Posts Like This


v-play-live-reloading-windows-mac-linux-ios-android-qt


feature

The post How to Access REST Services with Qt and V-Play: Weather Service Example App (Open Source) appeared first on V-Play Engine.

KDAB on Qt: GammaRay 2.9.0 Release

$
0
0

We have released version 2.9.0 of our Qt application introspection tool GammaRay. GammaRay allows you to observe behavior and data structures of Qt code inside your program live at runtime. GammaRay 2.9 introduces a number of new features interesting to Qt Quick, QWidgets, Qt 3D and non-graphical Qt users alike.

Qt Quick

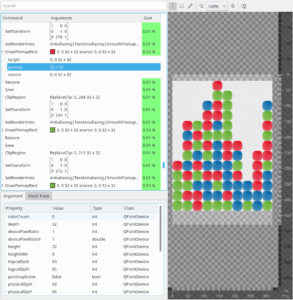
One focus area of this release is the paint analyzer. It got significantly improved argument inspection, stack traces for all operations, and, in addition to QWidgets, QGraphicsView and QQuickPaintedItem, it's now also available for the Qt Quick software renderer (with Qt 5.9.3 or newer) and Qt 3D painted textures. The paint analyzer now also measures the time each operation takes. With all that combined you have a powerful tool when being faced with rendering performance issues in applications using the Qt Quick software renderer.

GammaRay paint analyzer / profiler with a Qt Quick software renderer application.


For the Qt Quick OpenGL renderer we have some interesting new feature too of course, such as the texture inspection tab. This enables you to see the textures used on the GPU backing Image elements or Text elements using distance field rendering. This is useful to spot sub-optimal texture atlas usage, or textures containing unnecessary content, both of which can hurt GPU memory consumption. The texture inspection view supports analyzing this with diagnostic overlays, highlighting transparent borders or repeated areas that can for example be optimized by the use of BorderImage elements.

GammaRay texture inspector highlighting a largely transparent element in a texture atlas


Core Features

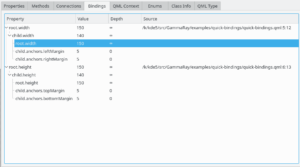
There's also new features for the non-UI aspects of Qt. The new QML binding inspector (requires Qt 5.10 or newer) allows you to analyze the dependencies of a QML property binding. It provides source code navigation to the corresponding binding dependency and thus is quite useful for debugging non-trivial binding loops.

GammaRay QML binding inspector showing a binding loop.


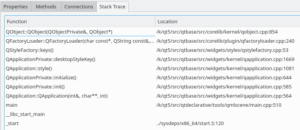
The new QObject creation stack trace view expands on the QObject creation source navigation we introduced in the previous release and also shows you the full stack trace leading up to the creation of a specific object (not available on all platforms). Very useful when you spot objects in GammaRay that shouldn't be there (anymore).

GammaRay object creation stack trace view.


Widgets

For QWidget users, the GammaRay widget inspector is now able to visualize the tab focus chain. This makes testing the tab order a lot more convenient than tabbing manually through a big dialog.

GammaRay tab focus chain visualization highlighting unexpected transitions.


Qt 3D

Qt 3D isn't forgotten either. The geometry inspector got a couple of extensions, such as vertex picking support and a number of new diagnostic shading modes that allow you to easily spot issues in e.g.  normal, tangent or texture coordinate attributes.

GammaRay Qt 3D geometry inspector visualizing the normal attribute of a vertex buffer.


And that's just scratching the surface, there's many more features and improvements in this release. You can find a full list of changes here.

If you like GammaRay, there's an easy way to support its development. Just enable telemetry data submission via 'Help > Contribute' in the GammaRay client. This allows us to see which platforms, Qt versions and tools are most relevant for you, so we can focus on those. Thank you!

GammaRay is available as part of Qt Automotive Suite including Qt Creator integration and professional support, or GPL-licensed on Github.

[training_callout] continue reading

The post GammaRay 2.9.0 Release appeared first on KDAB.

The Qt Company Blog: Memory usage improvements in Qt3D

$
0
0

Together with engineers from KDAB and the Qt community, we are continuing to improve performance and stability of Qt3D. Back in November, I wrote about how we have reduced CPU usage in Qt3D. In this post I would like to share some improvements we have made to reduce memory consumption.

Qt 3D has a flexible architecture that separates the frontend, which runs on the GUI thread, from the backend, which consists of aspects responsible for rendering, input handling, and animation. The aspects are run on a separate thread and can start jobs that are run on a thread pool. This allows Qt 3D to make use of needed CPU resources in parallel, but it also means we need to keep data duplication to a minimum. By reducing the amount of duplicated data and improving the allocation strategy for backend objects, the memory usage has been significantly reduced.

Even small projects benefit from these improvements, such as the Simple C++ example, which uses no textures or other assets:

Simple C++ Example

On my Linux desktop, this example is down from 92 MB in Qt 5.6.3 to 47 MB on Qt 5.9.4:

Qt3D simple-cpp example RAM usage

The same can be seen in more complex applications, such as this internal demo application for an automobile instrument cluster. It is using Qt Quick and Qt 3D to render the dashboard of an electric car. The demo has a number of different views for navigation, media, and a consumption overview. It also renders a live 3D model of the car with multiple textures:

Qt3D and QtQuick instrument cluster

The memory usage in this example has dropped from about 220 MB of RAM in Qt 5.6.3 to 135 MB in Qt 5.9.4:

Qt 3D instrument cluster demo RAM usage

We are working hard to improve performance and stability further in upcoming releases. In Qt 5.10.1 we have improved on-demand rendering performance, while in Qt 5.11 we streamline the order in which rendering jobs are executed. This ensures stability and allows for more performance improvements in the future. In later releases, we will increase data caching between frames to reduce the amount of work even further.

The post Memory usage improvements in Qt3D appeared first on Qt Blog.

The Qt Company Blog: Qt Creator 4.5.1 released

$
0
0

We are happy to announce the release of Qt Creator 4.5.1!

This is a pure bugfix release, please find the details in our changelog.

Our prebuilt binaries are based on Qt 5.10.1, which was also released today. Besides other things this fixes an annoying issue with override / wait cursors on Windows.

Get Qt Creator 4.5.1

The opensource version is available on the Qt download page, and you find commercially licensed packages on the Qt Account Portal. Qt Creator 4.5.1 is also available through an update in the online installer. Please post issues in our bug tracker. You can also find us on IRC on #qt-creator on chat.freenode.net, and on the Qt Creator mailing list.

The post Qt Creator 4.5.1 released appeared first on Qt Blog.

The Qt Company Blog: Qt 5.10.1 Released

$
0
0

I am pleased to inform that Qt 5.10.1 is released today. As a patch release, Qt 5.10.1 does not add any new functionality but provides many bug fixes and other improvements.

Compared to Qt 5.10.0, the new Qt 5.10.1 contains over 300 bug fixes and in total close to 1400 changes since Qt 5.10.0. For details of the most important changes, please check the Change files of Qt 5.10.1.

Qt 5.10.1 can be updated by using the online installer’s maintenance tool. For new installations, please download the latest online installer from the Qt Account portal or from the qt.io download page. Offline packages are available for commercial users via the Qt Account portal and at via the qt.io download page for open-source users.

The post Qt 5.10.1 Released appeared first on Qt Blog.


Woboq: Two C++ tricks used in Verdigris implementation

$
0
0

A verdigris statue

I have just tagged the version 1.0 Verdigris. I am taking this opportunity to write an article about two C++ tricks used in its implementation.

Verdigris is a header-only C++ library which lets one use Qt without the need of moc. I've written an introductory blog post about it two years ago and have since then received several contributions on GitHub that extend the software.

Optionally Removing Parentheses in a Macro

This trick is used in the W_PROPERTY and the W_OBJECT_IMPL macro. The first argument of W_PROPERTY is a type. Typically: W_PROPERTY(QString, myProperty MEMBER m_myProperty).
But what happens when the type contains one or several commas, as in: W_PROPERTY(QMap, myProperty MEMBER m_myProperty)? That's not valid, macro expansion does not consider template and therefore the first argument would be up to the first comma. The solution is to put the type name in parentheses. The new problem is then how can we ignore parentheses in the implementation of the macro.

Let's rephrase the problem with simplified macros. Imagine we want to do a macro similar to this:

// Naive implementation of a macro that declares a getter function#define DECLARE_GETTER(TYPE, NAME) TYPE get_##NAME()// Can be used like thisDECLARE_GETTER(QString, property1);   // line A// OK: expands to "QString get_property1()"// But this does not work:DECLARE_GETTER(QMapint>, property2);
// ERROR: 3 arguments passed to the macro, but only 2 expected// And thisDECLARE_GETTER((QMapint>), property3);  // line B// ERROR: expands to "(QMap) get_property3()"// Can we get rid of the parenthesis?

The question is: How can we implement DECLARE_GETTER so both line A and line B produce the expected result? Can we get the macro to remove the parentheses.

Let's make a first attempt:

// REMOVE_PAREN will be our macro that removes the parenthesis#define DECLARE_GETTER(TYPE, NAME) REMOVE_PAREN(TYPE) get_##NAME()// Forward to REMOVE_PAREN_HELPER#define REMOVE_PAREN(A) REMOVE_PAREN_HELPER A#define REMOVE_PAREN_HELPER(...) __VA_ARGS__DECLARE_GETTER((QMap<QString, int>), property1);
// OK: expands to "QMap get_property1()"// This worked because "REMOVE_PAREN_HELPER (QMap)" was expanded to "QMap"DECLARE_GETTER(QString, property2);
// ERROR: expands to "REMOVE_PAREN_HELPER QString get_property2()"// There was no parenteses after REMOVE_PAREN_HELPER so it was not taken as a macro"

We managed to remove the parentheses, but we broke the case where there are no parentheses. Which lead to a sub-question: How to remove a specific token if present? In this case, how to remove "REMOVE_PARENT_HELPER" from the expansion

// Same as before#define DECLARE_GETTER(TYPE, NAME) REMOVE_PAREN(TYPE) get_##NAME()// Macro that removes the first argument#define TAIL(A, ...) __VA_ARGS__// This time, we add a "_ ," in front of the arguments#define REMOVE_PAREN_HELPER(...) _ , __VA_ARGS__#define REMOVE_PAREN(A) REMOVE_PAREN2(REMOVE_PAREN_HELPER A)#define REMOVE_PAREN2() TAIL(REMOVE_PAREN_HELPER_##__VA_ARGS__)//  ##__VA_ARGS__ will "glue" the first token of its argument with "REMOVE_PAREN_HELPER_"// The first token is://  -  "_" if REMOVE_PAREN_HELPER was expanded, in which case we have "REMOVE_PAREN_HELPER__"//      which will be removed by the TAIL macro; or//  - "REMOVE_PAREN_HELPER if it was not expanded, in chich case we now have//    "REMOVE_PAREN_HELPER_REMOVE_PAREN_HELPER"// So we define a macro so that it will be removed by the TAIL macro#define REMOVE_PAREN_HELPER_REMOVE_PAREN_HELPER _,

The above code should give you an idea on how things should work. But it is not yet working. We need to add a few layer of indirection so all macros arguments gets expanded

Here is the real code from Verdigris:

#define W_MACRO_MSVC_EXPAND(...) __VA_ARGS__#define W_MACRO_DELAY(X,...) W_MACRO_MSVC_EXPAND(X(__VA_ARGS__))#define W_MACRO_DELAY2(X,...) W_MACRO_MSVC_EXPAND(X(__VA_ARGS__))#define W_MACRO_TAIL(A, ...) __VA_ARGS__#define W_MACRO_REMOVEPAREN(A) W_MACRO_DELAY(W_MACRO_REMOVEPAREN2, W_MACRO_REMOVEPAREN_HELPER A)#define W_MACRO_REMOVEPAREN2(...) W_MACRO_DELAY2(W_MACRO_TAIL, W_MACRO_REMOVEPAREN_HELPER_##__VA_ARGS__)#define W_MACRO_REMOVEPAREN_HELPER(...) _ , __VA_ARGS__#define W_MACRO_REMOVEPAREN_HELPER_W_MACRO_REMOVEPAREN_HELPER ,#define DECLARE_GETTER(TYPE, NAME) W_MACRO_REMOVEPAREN(TYPE) get_##NAME()// And now it works as expected:DECLARE_GETTER(QString, property1);
DECLARE_GETTER((QMap<QString, int>), property2);

Note that the W_MACRO_MSVC_EXPAND is there only to work around a MSVC bug.

Building a constexpr State in a Class from a Macro

Conceptually, this is what the macro does

classFoo : publicQObject {
    w_SlotState(w_internal::w_number<0>, W_ThisType**) { return {}; } friend constexpr w_internal::binary::tree<> w_SignalState(w_internal::w_number<0>, W_ThisType**) { return {}; } friend constexpr w_internal::binary::tree<> w_MethodState(w_internal::w_number<0>, W_ThisType**) { return {}; } friend constexpr w_internal::binary::tree<> w_ConstructorState(w_internal::w_number<0>, W_ThisType**) { return {}; } friend constexpr w_internal::binary::tree<> w_PropertyState(w_internal::w_number<0>, W_ThisType**) { return {}; } friend constexpr w_internal::binary::tree<> w_EnumState(w_internal::w_number<0>, W_ThisType**) { return {}; } friend constexpr w_internal::binary::tree<> w_ClassInfoState(w_internal::w_number<0>, W_ThisType**) { return {}; } friend constexpr w_internal::binary::tree<> w_InterfaceState(w_internal::w_number<0>, W_ThisType**) { return {}; } public: struct W_MetaObjectCreatorHelper; public: using W_BaseType = std::remove_reference_t; public: static const QMetaObject staticMetaObject; virtual const QMetaObject *metaObject() const; virtual void *qt_metacast(const char *); virtual int qt_metacall(QMetaObject::Call, int, void **); static inline QString tr(const char *s, const char *c = nullptr, int n = -1) { return staticMetaObject.tr(s, c, n); } static inline QString trUtf8(const char *s, const char *c = nullptr, int n = -1) { return staticMetaObject.tr(s, c, n); } private: __attribute__((visibility("hidden"))) static void qt_static_metacall(QObject *, QMetaObject::Call, int, void **); struct QPrivateSignal {};">W_OBJECT(Foo) // init the stateintxx();
   W_INVOKABLE(xx) // add things to the stateintyy();
   W_INVOKABLE(yy) // add more things
};
(objectInfo); static constexpr auto string_data = data.first; static constexpr auto int_data = data.second; }; constexpr const QMetaObject Foo::staticMetaObject = w_internal::createMetaObject(); void Foo::qt_static_metacall(QObject *_o, QMetaObject::Call _c, int _id, void** _a) { w_internal::qt_static_metacall_impl(_o, _c, _id, _a); } const QMetaObject *Foo::metaObject() const { return &staticMetaObject; } void *Foo::qt_metacast(const char *_clname) { return w_internal::qt_metacast_impl(this, _clname); } int Foo::qt_metacall(QMetaObject::Call _c, int _id, void** _a) { return w_internal::qt_metacall_impl(this, _c, _id, _a); }">W_OBJECT_IMPL(Foo); // Do something with the state

But what's the state? How do we represent it?
The idea is to have a static function (let's call it w_state) whose return value contains the state. Each W_INVOKABLE macro would then expand to a new definition of that function. Of course, it needs to take different argument, so this just declares a new overload. We do it by having a w_number class template, which inherits from w_number. (This idea is basically inspired from CopperSpice's cs_counter, whose authors described in a talk at CppCon 2015)

Here is a simplified expanded version:

template<int N>structw_number : publicw_number<N - 1> {
    staticconstexprintvalue = N;
    staticconstexprw_number<N-1>prev() { return {}; }
};
// Specialize for 0 to break the recursion.template<>structw_number<0> { staticconstexprintvalue = 0; };


classFoo {
public:
    // init the state  (expanded from W_OBJECT)staticconstexprtuple<>w_state(w_number<0>) { return{}; }

    intxx();

    // add &Foo::xx to the state by defining w_state(w_number<1>)staticconstexprautow_state(w_number<tuple_size<decltype(w_state(w_number<255>()))>::value + 1>n)
        ->decltype(tuple_cat(w_state(n.prev()), make_tuple(&Foo::xx)))
    { returntuple_cat(w_state(n.prev()), make_tuple(&Foo::xx)); }

    intyy();

    // add &Foo::yy to the state by defining w_state(w_number<2>)staticconstexprautow_state(w_number<tuple_size<decltype(w_state(w_number<255>()))>::value + 1>n)
        ->decltype(tuple_cat(w_state(n.prev()), make_tuple(&Foo::yy)))
    { returntuple_cat(w_state(n.prev()), make_tuple(&Foo::yy)); }
};

// Use that stateconstexprautoFooMetaObject = buildMetaObject(Foo::w_state(w_number<255>()));

This is working pretty well. At the end of this simplified example, our state is a std::tuple containing &Foo::xx and &Foo::yy, from which we could build the meta object. (In the real implementation, the state is a bit more complicated and contains more data)

This works because the call to w_state(w_number<255>())) that we use to get the size of the tuple, is referring to the previous declaration of w_state. Since our current function is not yet defined yet, the most appropriate function is the remaining one with the highest number.
Notice that we have to repeat the same code in the decltype and after the return and we cannot use return type deduction because we need to use that function before the class is fully defined.

So far so good. However, I've hit what I think is a compiler bug when doing that with class template (eg, Foo would be template Foo). For this reason, instead of using static function, I have used friend functions in verdigris. The principle is exactly the same. It is not well-known, but friend functions can be declared inline in the class, despite still being global functions. (I've also used that fact in the implementation of Q_ENUM)
One just need to add a type which relates to the current class as an argument. I use a pointer to a pointer to the class instead of just a pointer because i don't want potential pointer conversion when calling it with a derived class.

classBar {
public:

    // init the state  (expanded from W_OBJECT)friendconstexprtuple<>w_state(Bar **, w_number<0>) { return{}; }

    intxx();

    friendconstexprautow_state(Bar **t, w_number<tuple_size<decltype(w_state(
            static_cast<Bar**>(nullptr), w_number<255>()))>::value + 1>n)
        ->decltype(tuple_cat(w_state(t, n.prev()), make_tuple(&Bar::xx)))
    { returntuple_cat(w_state(t, n.prev()), make_tuple(&Bar::xx)); }

    intyy();

    friendconstexprautow_state(Bar **t, w_number<tuple_size<decltype(w_state(
            static_cast<Bar**>(nullptr), w_number<255>()))>::value + 1>n)
        ->decltype(tuple_cat(w_state(t, n.prev()), make_tuple(&Bar::yy)))
    { returntuple_cat(w_state(t, n.prev()), make_tuple(&Bar::yy)); }
};

// Use that stateconstexprautoBarMetaObject = buildMetaObject(w_state(static_cast<Bar**>(nullptr), w_number<255>()));

Conclusion

Please let me know when you find Verdigris useful or want to help out, either here in the comments or contribute directly on GitHub.

V-Play Engine: Web Editor: Test Online Code Examples on Android and iOS with Live Code Reloading

$
0
0

Did you ever wonder how to quickly test online code examples? Did you ever see a code example and thought “I would love to try that right away”?

V-Play got you covered! With the V-Play Web Editor, you can run code examples on your Android or iOS phone, right from your desktop browser. It’s a Cloud IDE for editing, running and debugging QML Code. You don’t need to install any native SDKs or development environment like Qt Creator on your computer. You don’t even need to install the V-Play SDK or Qt SDK. All you need is to download the V-Play Live Scripting app for Android or iOS.

1. Download the V-Play Live Scripting App

The V-Play Live Scripting app is available on Android and iOS. Download it to use Live Code Reloading from your browser or desktop.

Google_Play_Badge-1App Store
ic_launcherV-Play & QML Live Scripting App
Search in App Stores for: “V-Play Live Scripting”

2. Run Code Examples from Documentation and Blog with the V-Play Web Editor

You can find the V-Play Web Editor for Qml code at https://v-play.net/web-editor/.

web-ui

For convenience you can also find a button above all code examples in our documentation and on the blog. Click on it to open the example in the Web Editor. Here is an example that you can try right away (make sure you read this post on your desktop!):

import VPlayApps 1.0
import VPlay 2.0
import QtQuick 2.8

App {
  NavigationStack {
    Page {
      title: "My First App"

      AppButton {
        anchors.centerIn: parent
        text: "Celebrate"
        onClicked: {
          nativeUtils.displayAlertDialog("Yay", "That is so cool!")
        }
      }
    }
  }
}

There are some more cool examples at the end of this post, make sure to give them a try!

3. Test on Android and iOS at the Same Time

You can connect all your mobile phones to the Web Editor at the same time. This means you can test how an example looks on different platforms simultaneously.

The Web Editor also displays log output of your connected devices.


web-ui-clients

4. Live Code Reloading in your Browser

You would like to change the example code a bit? No problem!

You can edit the code in the Web Editor and click the run button, or hit CTRL+S (CMD+S on macOS). The code reloads on your mobile phone immediately and shows the new result.

It is also possible to write your own code, or copy/paste any example to the Web Editor. You get the full log output of any connected mobile phone, to find possible errors in your code.

Cloud IDE Benefits for You

The biggest benefit was already highlighted in the introduction of this post. You can test code examples right away on your mobile phone from the browser. This works without installing any SDK on your desktop.

Besides that, it is also useful for developers that already have everything installed. You save the effort to create a new project to test an example. You can explore the documentation and test any interesting example with only a button click.

With Live Code Reloading, you can tweak the example within your browser until it fits for you.

Live Code Reloading on Desktop, Android and iOS

You can also use the V-Play Live Scripting app for development on desktop. You can find more info about V-Play Live Code Reloading in this post.


What’s Next for the V-Play Cloud IDE for QML

Currently the run button might also be displayed for code examples in the documentation that will not run successfully.

The majority of examples and code snippets from the V-Play Apps documentation is working fine already, and while you’re reading this the games documentation is finalized as well. This means you can already start working with the Web Editor and start saving development time!

We will update the V-Play Live Scripting app next week with an improved user interface and a project cache. You will be able to open your projects on your mobile phone also when not connected to your desktop, to show it to friends, customers or to yourself. :)

The next steps are then support for autocompletion, integrated help and Git support. This allows you to work on the same project on Desktop (with Qt Creator or any other IDE you prefer) and the web, with the V-Play Cloud IDE for QML code.

More QML Code Examples

QML Map Example

web-editor-example-map

Displays a map using the MapBox service.

import VPlayApps 1.0
import QtLocation 5.5

App {
  NavigationStack {
  
    Page {
      title: "Map Example"
    
      // show the map
      AppMap {
        anchors.fill: parent
        plugin: Plugin {
          name: "mapbox"
          // configure your own map_id and access_token here
          parameters: [  PluginParameter {
              name: "mapbox.mapping.map_id"
              value: "mapbox.streets"
            },
            PluginParameter {
              name: "mapbox.access_token"
              value: "pk.eyJ1IjoiZ3R2cGxheSIsImEiOiJjaWZ0Y2pkM2cwMXZqdWVsenJhcGZ3ZDl5In0.6xMVtyc0CkYNYup76iMVNQ"
            },
            PluginParameter {
              name: "mapbox.mapping.highdpi_tiles"
              value: true
            }]
        }
      
      }
    }
  }
}

QML List  Example

web-editor-example-listview

Shows a simple list with a button to add new list items.

import VPlayApps 1.0

App {
  NavigationStack {
  
    Page {
      id: page
      title: "Add List Items"
    
      // the data model for the list
      property var dataModel: [
        { text: "Item 1" },
        { text: "Item 2" },
        { text: "Item 3" }
      ]
    
     // button to add an item
      AppButton {
        id: button
        anchors.horizontalCenter: parent.horizontalCenter
        text: "Add Row"
        onClicked: {
          // create and add new item
          var itemNr = page.dataModel.length + 1
          var newItem = { text: "Item "+itemNr }
          page.dataModel.push(newItem)
        
          // signal change in data model to trigger UI update (list view)
          page.dataModelChanged()
        }
      }
    
     // list view
      AppListView {
        id: listView
        anchors.top: button.bottom
        anchors.bottom: parent.bottom
        width: parent.width
      
        model: page.dataModel
        delegate: SimpleRow {}
      }
    }
  
  }
}

QML AdMob Ad Banner Example

web-editor-admob-banner-example

Shows the easy integration of a native AbMob ad banner.

import QtQuick 2.0
import VPlayApps 1.0
import VPlayPlugins 1.0

App {
  NavigationStack {
    Page {
      title: "AdMob"

      AdMobBanner {
        adUnitId: "ca-app-pub-3940256099942544/6300978111"
      }
    }
  }
}

QML Physics Example

web-editor-example-ball

Simple game example where gravity pulls a ball downwards.

import VPlay 2.0
import QtQuick 2.8

GameWindow {
  Scene {
    EntityManager {
      id: entityManager
    }

    // gravity will pull the ball down
    PhysicsWorld {
      gravity.y: 9.81
    }

    // just a simple ball shaped entity
    EntityBase {
      id: entity
      width: 20
      height: 20
      x: 160
      y: 240

      Rectangle {
        anchors.fill: parent
        color: "red"
        radius: 10
      }

      // the collider enables physics behavior
      BoxCollider {
        id: collider
        anchors.fill: parent
      }
    }

    // this timer resets the ball after 3 seconds
    Timer {
      running: true
      interval: 3000
      repeat: true
      onTriggered: {
        entity.x = 160
        entity.y = 240
        collider.linearVelocity = Qt.point(0,0)
      }
    }
  }
}


You can find more code examples everywhere in our documentation.

The code snippets page is a compilation of several useful code examples for apps.
Go to Code Snippets Page


More Posts Like This


v-play-live-reloading-windows-mac-linux-ios-android-qt

Release 2.14.0: Live Code Reloading for Desktop, iOS & Android


feature

How to Make Cross-Platform Mobile Apps with Qt – V-Play Apps

The post Web Editor: Test Online Code Examples on Android and iOS with Live Code Reloading appeared first on V-Play Engine.

Cutelyst Framework: Cutelyst on TechEmpower benchmarks round 15

$
0
0

On Valentines day TechEmpower released the results of fifth round of it's benchmarks tests on web frameworks, it took almost a year since round 14 and I really hope round 16 comes out sooner.

Since this round took a long time and was scheduled to be release many times last year I decided not to update Cutelyst to avoid not having the chance to fix any issues and have broken results. Cutelyst 1.9.0 and Qt 5.9 were used, both had some performance improvements compared to round 14, and thus you can see better results on this round compared to 14, most notably the JSON tests went from 480k request/second to 611k req/s, also due this Cutelyst release used jemalloc was again not used due a bug we had in CMake files that didn't link against it.

In this round some  other frameworks have also done their optimizations and a few managed to do better than Cutelyst, even though we were faster in all tests compared to the last round. It might be even related to some OS tuning as most results seemed to went up a bit, however if you put the filter on "FullStack" frameworks Cutelyst is leading in most tests.

TreeFrog framework had results in TechEmpower long before I wrote the tests for Cutelyst, but due errors on TreeFrog tests on last rounds this was the first round where you can compare the results of two Qt Web Frameworks.

For the next round I expect the results to be even better now that we will properly use jemalloc, and our epoll dispatcher got a better implementation, I also plan to use Cutelyst 2 and try increasing some buffers as the servers have plenty of RAM that I didn't care on using.

If you want to know more about Cutelyst visit https://cutelyst.org/ and give us a Star on GitHub (we are now past 300!!) https://github.com/cutelyst/cutelyst

The Qt Company Blog: Qt in Visual Studio: Improving Performance

$
0
0

In the last post, we discussed a new approach to design time and build time integration of external tools in Visual Studio using MSBuild rules and targets. This will be included in the upcoming release of version 2.2 of the Qt VS Tools. In this post, we will discuss the performance improvements that are also included in this new version.

We’ll focus on two situations where users of the current version (2.1) of the Qt VS Tools have reported sub-standard performance:

  • Adding new header files, especially to projects with many configurations
  • Converting Qt projects (.pro files) with many files

We’ll look at the scale of these problems and why they occur, then discuss the steps that have been taken to fix the problems and the improvements that have been achieved.

Adding Header Files to a Project

To understand the scale of this problem and the effectiveness of our solution, we ran the same set of tests using both the current and the new version. These tests consisted of adding several header files containing Qt macros to projects with varying numbers of configurations. For more information on the test setup and a detailed analysis of the results, please refer to the section “Measuring Performance”, at the end of this post.

Looking into the results of testing version 2.1, we found that the time to add files to a project got progressively worse, up to several minutes, the more configurations were defined in the projects. The worst case scenario was just under 45 minutes for adding 10 files to a project with 20 configurations. It was possible to determine that the performance degradation is closely related to the approach previously followed, where files generated by moc were explicitly added to the project in order to be included in the C++ compilation. The time spent modifying properties of generated files accounted for 98% of total time.

As we discussed in the previous post, the new approach based on MSBuild rules and targets allows source files to be added to the build process while it is ongoing. This way, instead of adding the files generated by moc as static project items, they are added dynamically to the C++ compilation during the processing of the moc target. This should represent a significant improvement to the cost of adding new header files to a project. The test results from version 2.2 show that this is indeed the case: the time spent on each test case was, on average, 95% less than that of version 2.1, and what was previously the worst case scenario (10 files added to a project with 20 configurations) now took only 3,2 seconds to complete.

This improvement in performance is not limited to the action of adding header files to projects. It will have an impact in all operations that handle generated files as project items. The following is a list of other use cases that should also benefit from the increase in performance (especially in projects with several configurations):

  • Importing Qt projects (see next section);
  • Creating new Qt classes;
  • Manually adding/removing the Q_OBJECT macro in a file;
  • Changing the Qt version;
  • Changing the path to the moc, rcc and uic generated files.

Importing Qt Projects

The problem described above also applies when importing a .pro file, since properties of generated files are also accessed and modified during import; in fact, the import procedure modifies properties of all project files. To avoid this problem, in the new version of the Qt VS Tools, the Visual Studio project that is generated by qmake is not immediately loaded into Visual Studio; all modifications are carried out as an XML transformation on the project file. Only then is it loaded into Visual Studio. This way we avoid any project-wide processing while the project is loaded.

To test this optimization, we imported the Qt example project demobrowser. Below is a recording of this test using version 2.1 (left) and version 2.2 (right) of the Qt VS Tools (the recording also includes building and running the program). We found that the time to import the project decreased from over 30 seconds in the current version to less than 6 seconds in the new version.

Importing demobrowser


Measuring Performance

To measure the scale of the performance problem when adding new header files, we ran a series of tests with an instrumented build of the Qt VS Tools that recorded the number and duration of calls to every function. As the performance seemed to be influenced by the number of project configurations, we tested with several projects containing respectively 2, 5, 10, 20 and 40 configurations. As the number of files added also seemed to be a factor, we tested each project with 5, 10, 20 and 40 files added, for a total of 20 test cases. We will use the variable C to represent the number of configurations, and the variable F to represent the number of files added.

The results of testing with version 2.1 of the Qt VS Tools show that the performance degrades significantly as we increase the number of configurations and the number of files added. The graph below summarizes the test results. Some tests were interrupted after 45 minutes; this is noted in the graph by grayed-out bars. The blue bar on the left serves as a 1 minute scale.

Test Results v2.1

Looking further into the test data, we find that most of the elapsed time was spent calling functions of the Visual Studio SDK. For example, in the test case C=20,F=10, which took almost 45 minutes to complete, 98% of that time was spent in the following calls:

Calls to Visual Studio SDK

These functions were called while adding generated files to the project – files generated by moc must be added to the project in order to be included in the C++ compilation. For every header file added, one generated file per configuration will also be added to the project, i.e. F×C generated files. In the test case of C=20,F=10, this accounts for the 200 calls, e.g. to the AddFile function.

Each one of the F×C generated files can only be compiled if the corresponding project configuration is active. For all other configurations, the file must be set to “excluded from build”. This is the reason for the larger number of calls to the set_ExcludedFromBuild function, i.e. F×C×(C-1) calls to that function. In the example of the C=20,F=10 test case, this accounts for the 3800 calls to set_ExcludedFromBuild.

We’ve also found that the functions of the Visual Studio SDK tend to become slower as the number of calls increases. In the case of set_ExcludedFromBuild, we see that the average time per call went from 11 milliseconds, when calling the function 10 times, to 535 milliseconds per call for 3800 calls:

Calls to set_ExcludedFromBuild

With the approach followed in version 2.1, which requires that generated files be added to the project, there doesn’t seem to be much room for improvement in performance: almost all time is spent inside external functions and these functions are called exactly the number of times needed. The problem of the performance degradation seems then directly linked to the approach itself.

To test the performance of the new approach, we ran the same 20 test cases using the new version 2.2 of the Qt VS Tools, which uses the Qt/MSBuild targets; the results are shown in the graph below. As before, the blue bar on the left represents the same 1 minute scale.

Test Results v2.2

Comparing the results of both tests, in version 2.2 the time spent was, on average, 95% less than that of version 2.1. The average cost of adding header files to a project, per file and configuration (i.e. total time divided by F×C), decreased from 300 milliseconds to 40 milliseconds.

The post Qt in Visual Studio: Improving Performance appeared first on Qt Blog.

The Qt Company Blog: Qt 5.11 Alpha Released

$
0
0

Qt 5.11 Alpha is released today. As usual the official Alpha is a source code delivery only, but later we will offer development snapshots of Qt 5.11 regularly via the online installer.

Please check Qt 5.11 New Features wiki to see what new is coming with Qt 5.11 release. Please note that the feature list is still in progress and not to be considered final before the first Beta release.

Next milestone in our way to final Qt 5.11 release (which is planned to happen in May) will be first Beta release. We are targeting to get it out as soon as possible soon after the Alpha. We will release several Beta releases in similar manner as before, available via the online installer.

Please download the Qt 5.11 Alpha source packages from your Qt Account or from download.qt.io.

Most importantly, remember to give us feedback by writing to the mailing lists and reporting bugs.

The post Qt 5.11 Alpha Released appeared first on Qt Blog.

The Qt Company Blog: Qt 5.11 Brings New Accessibility Backend on Windows

$
0
0

Accessibility technology encompasses assistive tools such as screen readers, magnifiers and braille displays, as well as APIs and frameworks that allow applications to expose elements of their UI to such tools.

While some UI widgets provided by the operating system may already be prepared to provide content and metadata to assistive tools, Qt renders UI elements itself. This approach requires a way to expose information about these elements to accessibility frameworks, which would otherwise perceive the applications as sets of empty windows.

To expose information about UI elements on Windows, Qt relied on the legacy Microsoft Active Accessibility framework (MSAA), until Qt 5.10. However, proper framework support was lacking in some areas, and nowadays MSAA has been superseded by a new framework and its use is no longer recommended for new applications.

With release 5.11 we will replace the MSAA accessibility backend with a new implementation based on the more modern Microsoft UI Automation, which superseded MSAA as the de facto standard for accessibility on the Windows platform. UI Automation has been available in all Windows releases since RTM versions of Windows 7 and Server 2008, as well as provided with system updates on Windows XP, Vista and Server 2003.

Since the accessibility changes in Qt 5.11 are internal, existing accessible applications are not expected to require any changes to utilize the improved functionality provided by UI Automation. Compatibility with MSAA-only assistive tools is maintained by bridge components built in the UI Automation framework itself.

One area where immediate improvement resulting from the new approach can be perceived is in the control of Qt-based applications using the built-in virtual keyboard in touchscreen-based Windows computers, like the Microsoft Surface line. In Qt 5.10, compatibility with some UI widgets was limited and events like the automatic showing and hiding of the virtual keyboard were not supported. With Qt 5.11, the same level of functionality available to applications based on native Windows widgets should be expected.

Also, the new UI Automation support in Qt may become useful for application testing, since it can provide metadata and programmatic control of UI elements, which can be leveraged by automated test suites and other tools.

We invite users to test the new accessibility functionality, and to give us feedback by writing to the mailing lists and reporting bugs.


The post Qt 5.11 Brings New Accessibility Backend on Windows appeared first on Qt Blog.

The Qt Company Blog: Protecting a Qt Application or a Device Against Hacking, Part 2

$
0
0

Why would anyone want to hack an application or a device? And how would they go about their attack? And, most importantly, how can you protect your software against malicious attacks?

This post is a follow-up to part 1 of the topic. This time we take a fairly detailed look at attackers’ motivations, methods and the ways to deter most attacks from succeeding. This blog post is aimed primarily at anyone who have specific reverse engineering or tampering related risks in their systems, for example related to processing licenses, valuable content or media, proprietary algorithms or financial transactions.

Why would anyone want to hack my software?

“We’re not Facebook or handle ultra-sensitive data – why would anyone want to hack us?” It is easy to think that our application does not attract attackers to take the effort to reverse engineer the software.

However, there are several reasons why attackers might want to target any application. Here are the most common motivations.

Circumventing a licensing check

This is one of the most common targets. The attacker tries to disable the logic that checks for a valid license in order to be able to use the application without limitations. The usual way to achieve this is by modifying the application binary.

Extracting secret keys or passwords

Applications often contain embedded information which is used to encrypt the data stored in the application, enable protected communication for example with a cloud backend, or enable the application to use other resources that require authentication. By carefully analysing the application binary, it is easy to locate and extract the secret keys or passwords, if they are not protected.

Understanding how a proprietary algorithm works

Many applications contain implementations of algorithms that have intellectual property value. These may be developed by the company developing the application, or parts of the application that are licensed from other developers. If the algorithm code is not obfuscated in any way, the pseudo-code of the algorithm can be easily extracted from the application binary.

Finding open vulnerabilities that can be exploited to attack running systems

Many applications use third party modules (code, libraries, other assets) either directly or indirectly. Any such modules can have vulnerabilities. Further, updating such modules, especially in embedded applications, may not be straightforward. Obtaining knowledge of such vulnerabilities can be used to attack other systems that use the same modules.

Changing the application’s operation

Sometimes the attackers aim to change the behavior of the application, but only very slightly, so that the changed application is virtually not distinguishable from the original application. For example, consider an application used for financial transactions, used by consumers or businesses. If an attacker is able to distribute a slightly altered version that is able to manipulate a recipient’s bank account number, it is possible to gain significant monetary benefit in a short time before anyone notices the attack.

Changing the device operation or configuration

Physical devices depend more and more on the device software, such as firmware or special applications. Because of this, the configuration of devices is often done purely with software. For example, a high power variant of an engine may be just a locked configuration in the engine controller software. In this kind of scenario, the attacker aims to perform “feature unlock attack” by targeting to modify the controller software.

Making and distributing an application version that crashes or jams

Sometimes the attacker’s target is not to directly benefit from modifying the application. Instead, the target may be simply to cause harm to the services related to the application. For example, an application that crashes every time a certain operation is performed may cause significant monetary losses or bad reputation for the related services.

How attackers think – Popular hacking methods explained 

To protect your application against various kinds of attacks, it is useful to first think like an attacker. Try to think of the obvious ways to attack specifically against your application and the different motivations an attacker might have.

Even more importantly, think out of the box: what would be the unlikely but still possible attack against your application? Also, put yourself in different user roles and try to identify the ways to attack from the viewpoint of each responsibility actor of your application. The actors typically operate over trust boundaries and that may then reveal execution paths or data flow which initially do not seem likely or possible.

Static binary analysis

Probably the most common way to attack an application is static binary analysis. It is often easy to obtain the actual binary. Tools to analyse the binary are available either free or with a reasonable cost. Tools allow parsing and extracting the various parts of the binary with a single click. There is no need for the attacker to write custom code for every target platform or architecture.

A typical application binary contains multiple types of sections. They can be roughly categorized as sections containing code, sections containing static data such as strings and sections containing runtime data. Out of these, the code and static data sections are the most interesting for the static analysis context.

Static data sections, such as a string section, usually contain the data that can be considered as application assets. It is deceptively easy to think that data embedded as strings is protected from attackers. That is not the case. In the worst case, the string data may contain even passwords or application’s secrets in plain format. If they are un-encrypted or un-obfuscated, extracting the string values is as easy as reading a book.

The code section contains all of the application logic. Disassembler tools can easily resolve the pseudo code structure, call hierarchy, local and global variable references and other similar information. But even an average-sized application will contain lots of binary code. So, the aim of the attacker is not to resolve every line of code. Instead, the aim is to identify the relevant parts of code to be used as the target for the attack.

For example, a few hundred instructions containing a license check logic is an attractive target for an attack. It does not require very special knowledge to break the license check. At the very minimum, modifying one single instruction may be enough.

hopper_disassembler


Capture from Hopper disassembler tool demonstrating the control flow capabilities

Dynamic binary analysis

If an application is using the typical first level of protection, the code obfuscation, static binary analysis may not be enough to reveal the secrets. The typical next step is dynamic binary analysis. This means basically analysing the application operation in runtime: collecting all the possible data from code execution and memory usage and analysing the execution paths that can’t be revealed with static analysis.

There is a wide range of tools available for dynamic analysis. The free or low-cost tools provide the basic capability for disassembling and debugging an application. But there are also high-end tools, such as IDA Pro, which are built with loads of tools for analysing the target binaries.

A crucial element of dynamic binary analysis is to also understand the attack context. The typical attack context is so-called “whitebox attack context”. It means that the attacker has full access to the target application, to the application binary and to the execution environment. In practice this means that the attacker is able to control every aspect of application execution when trying to break it or steal its secrets.

Why is the attack context so important? Because it drives the assumptions what the developer can do about possible attacks and how they affect your application. Once again, it is easy to assume that “as my application is running in environment X, attack type Y is not applicable”. But very often, usually due to the resourcefulness of the attacker, the attack context ends up being the whitebox attack which means that the assumptions done in the design phase are the ones which eventually leave the application vulnerable. For example, developer may think that if an application is running in an embedded device, an attacker has no meaningful access to it. But in reality, attacker could gain access to device firmware, remove the software protection in the firmware, and then attack the application directly.

Another important concept is so-called “code lifting”. Code lifting refers to the scenario where the target application can be lifted for example to a simulator environment where the attacker has full capability to control the code execution or monitor the memory usage – even kernel memory. This is often paired with the white-box attack context. First the attacker gain access to the target application binary, and then moves it to another execution environment.

Methods to protect applications and devices against hacking

In the first blog post, we presented some basic methods for protection of your application, such as using static linking instead of dynamic linking, and making sure that the symbol stripping is enabled when generating the final application binary. But when there is a need for more comprehensive protection, there are additional methods for protecting applications against various kinds of attacks.

These methods can be roughly divided to four categories:

  • Obfuscation
  • Anti-tampering
  • Anti-debugging
  • Whitebox cryptography

Obfuscation

The purpose of code obfuscation is to mainly prevent static analysis. Typical ways to perform code obfuscation is adding obfuscation of the strings used in the application, encrypting the static data sections of the binary so that they are decrypted when the application starts, and adding artificial code structures or execution paths which cannot be resolved with static analysis.

An example of code obfuscation would be a case where a code block is paired with a parallel “copy block” and the execution of the two blocks is controlled with a conditional branch with specific characteristics. The branch logic should be deterministic so that the developer can trust that the code is executed correctly, but static analysis can’t deduce the runtime behavior.

Just like static analysis is the first way to perform an attack, it is also the first level of defense. For example, a high-quality disassembler may be able to see partially through the obfuscation patterns. Also, the quality of modern compilers poses a problem. Fake code blocks may be wiped away by code optimization and hence decrease the quality of obfuscation.

Anti-tampering

The purpose of anti-tampering is to protect the application against dynamic analysis. While there are various approaches on how to implement anti-tampering, the basic idea is that the original application binary is modified to include additional code that does runtime checking of the binary. Such code snippets monitor specific areas of the binary to check if the area is modified and perform counteraction if a modification is detected.

Applying anti-tampering is very much application and execution environment specific. For example, there is a tradeoff between how much code modification checks can be used vs. the performance of the application. Also, the target architecture plays a major role: an approach that works well in certain environment may not protect the application in a different environment.

This also means that adding anti-tamper protection is much more tedious that adding basic code obfuscation. While code obfuscation can be usually applied at the compiler frontend level, anti-tampering has a dependency to compiler backend and architecture-specific parts.

Anti-debugging

The purpose of anti-debugging is simply trying to prevent the attacker from performing code lifting and running the application in a simulator or a similar environment with a debugger. Being able to use a debugger is often a big aid for the attacker as it enables the attacker to stop code execution and monitor the application memory space and registers at any point of time.

The usual approach for implementing anti-debugging is trying to detect the debugger process and preventing it from hooking the target application. The big challenge is that the attacker may try to attach the debugger at any point of application execution. It is not enough to only perform such check when the application is starting, for example. Resolving this challenge is not trivial. Detailed knowledge about the debugger behavior is required, and the anti-debugging logic must be built to protect from all possible ways to utilize the debugger.

Whitebox cryptography

Whereas code or string obfuscation tries to obfuscate the static application data, it does not distinguish security critical data from other static data. Hence, any application containing data such as cryptographic keys needs to have a solution for protecting these critical assets. It may prove to be very difficult to protect the keys only, but there is an alternative solution: whitebox cryptography.

The target of whitebox cryptography is to be able to protect the cryptographic keys even in an environment subjected to a whitebox type of an attack. The usual approach to implement whitebox cryptography is to integrate the key for a cryptographic algorithm as part of the algorithm implementation itself. That means, the key becomes an inseparable part of the algorithm implementation.

The benefit here is that instead of using the cryptographic key in an application, it is possible to use whitebox implementation of the algorithm directly, and no keys are exposed to the attacker.  For example, one of the most commonly used cryptographic algorithms is AES algorithm. It has been a target for wide academic research from whitebox cryptography perspective, and it is also an essential algorithm to have in the product feature set for whitebox cryptography vendors.

Example case: INSIDE Secure tools
INSIDE Secure is an example of a state-of-the-art code protection tool vendor. Their Code Protection toolset can be run on a Qt application to both obfuscate the binary and static data including string, and make the Qt application self-protecting against tampering, irrespective of the integrity of the environment.

This makes it very hard to circumvent licensing checks, find out sensitive IPR, or breach the application integrity when processing financially valuable transactions.

Summary

A successful protection of an application is always a sum of its parts. As a developer, if you neglect one area, you will leave your application vulnerable to certain kind of attacks. Consequently, serious application protection is something that a normal developer should not try to implement by himself. There are a number of high quality tools available for just this purpose. Just go and pick the right one for you – and remember that a commercial license of Qt allows using these means of protecting your application or a device.

Can we help you?

Intopalo is a Qt Service Partner that specializes in software security. If you are not sure where to start, we are more than happy to give you a hand and guide you to the right direction. Visit Intopalo website for more information.

The post Protecting a Qt Application or a Device Against Hacking, Part 2 appeared first on Qt Blog.


KDAB on Qt: KDAB at Embedded World Nuremberg

$
0
0

Get your free ticket to Embedded World Nuremberg, courtesy of KDAB. Register here with code B377411.
Meet us on the Qt stand, Hall 4-258.

This year we've a training info point where you can find out about our on-site or scheduled, Introductory or Advanced courses in Qt, Modern C++, Qt 3D, OpenGL, Profiling and Debugging and more.

Or you can Ask the Experts if you have technical questions about any of these technologies, and get our latest publications, including a paper on C++ Modernization.

At Embedded World this year we will show the Qt Quick Software Renderer in action on the very competitively priced NXP i.MX6 ULL platform.

Providing a fluid 60fps touch UI and H.264 video decoding is challenging on such hardware, with no GPU or hardware video decoding acceleration. Yet it's very much possible, having the full feature set of Qt at your disposal, even with as little as 64MB of RAM and/or Flash memory. We'll be giving you the full story in a blog post soon:

Qt Quick Software Renderer

  • NXP i.MX6 ULL (no GPU/VPU/IPU)
  • 64MB RAM/Flash
  • Fluid 60fps touch UI
  • H.264 video decoding using PxP acceleration
  • Full Qt feature set available

Other demos on display:

CCI 1200 Agricultural Machinery Terminal

  • intelligent control where the driver needs it

Qi - Cellular Tissue Imaging in Qt 3D

  • using pictures to help profile and diagnose disease

Qt Automotive Suite

  • a comprehensive package for automotive IVI systems

KDAB GammaRay

  • letting you see your Qt code live at runtime

Clazy Static Code Analyzer

  • the Qt-oriented code checker and clang plug-in

KDAB Hotspot Profiler for C++

  • a GUI making Linux Perf accessible

See more on our demos here.

Get your free tickethere with code B377411 and meet us on the Qt stand, Hall 4-258.continue reading

The post KDAB at Embedded World Nuremberg appeared first on KDAB.

KDAB on Qt: Exporting 3D content for Qt 3D with Blender

$
0
0

At the heart of every 3D application is geometry. Qt 3D-based 3D applications are no different and require the user to either generate geometry or provide asset files for Qt 3D to load. This blog post demonstrates how Blender and its Python API could be used to write an exporter that generates geometry for Qt 3D.

For those of you not yet too familiar with Qt 3D, let me remind you that Qt 3D is based on an Entity Component System.
A given Entity gets its behavior defined by the various components it aggregates.

Assuming you want to render some 3D content, a renderable entity would be composed like so:

[sourcecode lang="cpp"]
Entity {
components: [
GeometryRenderer {
geometry: ...
},
Material {}
]
}
[/sourcecode]


Loading Geometries with Qt 3D

There are currently 3 ways to incorporate geometry in a Qt 3D application:

Using the default meshes provided by Qt 3D Extras

QConeMesh, QCuboidMesh, QCylinderMesh, QPlaneMesh, QSphereMesh, QTorusMesh

These are all QGeometryRenderer subclasses which take care of generating geometry based on configurable properties. It's up to you to provide a Material that will shade your geometry.

[sourcecode lang="javascript"]
Entity {
components: [
ConeMesh {
rings: 16
slices: 16
topRadius: 0.1
bottomRadius: 1.0
},
Material {...}
]
}
[/sourcecode]


Using QMesh component to load a geometry file

Several backend plugins are available for .obj, .fbx and gltf version 1. The list of plugins will likely grow in the future (work on a gltf version 2 importer is currently ongoing). QMesh is also a QGeometryRenderer subclass, you also need to provide a Material.

[code language="javascript"]
Entity {
components: [
Mesh {
source: "path/to/my/file.obj"
},
Material {...}
]
}
[/code]


Using QSceneLoader component to load a scene file

QSceneLoader is also plugin based. At the time of writing, one such plugin is based on the Open Asset Importer Library (Assimp) which supports the following formats.

There's also another plugin which supports gltf version 1.

[code language="javascript"]
Entity {
components: [
SceneLoader {
source: "path/to/my/scene.obj"
}
]
}
[/code]

The subtelty between QMesh and QSceneLoader is that QMesh loads only a single mesh whereas QSceneLoader will load an entire scene. Essentially QSceneLoader will generate a subtree of QEntity with QGeometryRenderer and QMaterial components. The nice thing is that QSceneLoader will also instantiate matching Materials to go with each mesh.

In most cases you'll either use QSceneLoader to load a rather complex scene or, if you know how the scene content is structured, decide yourself on which parts you need and use several QMesh components.

Issues

Now this is all fine but you'll often end up with one of these issues:

  • Geometry is generated at run-time which can be costly
  • Many 3D formats are text-based (takes up space on disk, slow parsing at run time)
  • Loading a scene subtree requires traversing said subtree to retrieve entities composed of components of interest
  • QSceneLoader may duplicate materials, effects, attributes depending on the scene file
  • Declaring several QEntity with QMesh components can be tedious
  • Import plugins for QMesh/QSceneLoader are not available on all platforms and may not cover all formats.


From a general perspective, the current mechanisms make it tedious for the developer to control a complex scene. They either completely hide away the structure of a loaded subtree or, on the contrary, force you to know exactly what composes your scene and let you do the heavy lifting of deciding which meshes you care about.

If you are after performance, you need to know how your scene is structured, which materials are in use and how large your geometries are. With this information you can decide if you need to:

  • rework you geometry to reduce the number of vertices to be drawn
  • group several parts together so that they can all be drawn at once
  • reduce the amount of materials required.

So what if instead of loading something blindly, we generated Qt 3D content in advance, as part of our tooling or asset conditioning work?


Blender

Blender is a free and opensource 3D creation suite. I wouldn't go as far as saying that it's intuitive to use for a newcomer, but it's a really powerful tool. In addition, it provides a powerful Python API which can be used to write importers, exporters or simply automate processes (importing and exporting geometries offline). The nice thing is that the API is documented, the bad thing is that the documentation is mostly a list of methods and members...

How could Blender solve any of the issues we have?

Instead of generating or loading geometry at runtime, I therefore decided I would try to experiment and write an exporter plugin for Blender.
The goal for it would be to generate the QML content for an application (though we could easily extend it to cover C++ as well) and export the geometry buffers to binary files that just need to be read at runtime without requiring any parsing.

This could solve the issues of slow startup caused by parsing text-based files and possibly duplicating effects and materials. This also solves the case of import plugins deployment (as we are now performing this offline) and only shipping binary files that can be read with the readBinaryFile functions on the QML Buffer element. Finally this also gives us the complete structure of our scene.

[sourcecode lang="javascript"]
Buffer {
type: Buffer.VertexBuffer
data: readBinaryFile("qrc:/assets/binaries/bufferdata.bin")
}
[/sourcecode]


Creating a Blender Exporter Addon

A blender addon can be easily created by subclassing bpy.types.Operator and optionally bpy_extras.io_utils.ExporterHelper which provides convenience helpers as well as a default UI layout.

Overview of an exporter class

  1. Define members from bpy.types.Operator and ExporterHelper
    • bl_idname
      • The addon will be accessible in the Blender API though bpy.ops.bl_idname
    • bl_label
      • The name used on the export button UI
    • filename_ext
      • The name of our format extension if we have one
  2. Set UI properties and export options
    • Blender provides default property types
    • In the Qt3DExporter cases, properties were added to control:
      • whether to export only the selected objects or the whole scene
      • whether to export only the visible objects in the scene
      • whether we want meshes to be grouped in a collection
      • whether we want materials to be grouped in a collection
      • whether we want to export a full Qt3D application or just the
  3. Implement the draw method to lay out our properties
    • Retrieve the operator's layout and add rows and columns
      • We can add labels and reference properties you have previously created
  4. Define the execute method which will be the entry point of our exporter

[sourcecode lang="python"]
class Qt3DExporter(bpy.types.Operator, ExportHelper, OrientationHelper):
"""Qt3D Exporter"""
bl_idname = "export_scene.qt3d_exporter";
bl_label = "Qt3DExporter";
filename_ext = ""

# We set up exporter UI here
use_mesh_modifiers = BoolProperty(
name="Apply Modifiers",
description="Apply modifiers (preview resolution)",
default=True,
)

use_selection_only = BoolProperty(
name="Selection Only",
description="Only export selected objects",
default=False,
)

def draw(self, context):
layout = self.layout
col = layout.box().column(align=True)
col.label("Nodes", icon="OBJECT_DATA")
col.prop(self, "use_selection_only")
col.prop(self, "use_visible_only")

def execute(self, context):
# Actual exporting work to be done here

def createBlenderMenu(self, context):
self.layout.operator(Qt3DExporter.bl_idname, text="Qt3D (.qml)")

# Register against Blender
def register():
bpy.utils.register_class(Qt3DExporter)
bpy.types.INFO_MT_file_export.append(createBlenderMenu)

def unregister():
bpy.utils.unregister_class(Qt3DExporter)
bpy.types.INFO_MT_file_export.remove(createBlenderMenu)

[/sourcecode]

Most of the work will be done in the execute method. When reaching that point you'll want to:

  1. check which options have been selected by the user
  2. retrieve the export path selected
  3. gather data from the blender scene
  4. perform any post processing or conversion
  5. write the exporter data in whichever format you're interested


Parsing Blender Data

Collections

We can do a lot of things with the Blender API, the hard part is really finding out what you need

In our particular case we only care (for a first version) about:

  • Objects (bpy.data.objects)
    • Collections of objects that reference a datablock
      • name
      • data (reference to a datablock)
      • type (type of datablock being referenced)
      • matrix_local
      • matrix_world
      • select (whether we are selected or not)
      • parent (reference to a parent object)
  • Meshes (bpy.data.meshes)
    • Collection of datablocks containing information about a mesh
      • name
      • material slots (references to materials used by the mesh)
      • uv_layers
      • vertex_colors
      • vertices (list of position)
      • edges (an edge references 2 vertices)
      • loops (collection of loops, a loop references a vertex and an edge)
      • polygons (a list of loops forming a polygon)
  • Materials (bpy.data.materials)
    • Collection of datablocks containing information about a materials
      • name
      • ambient
      • diffuse_color
      • specular_color
  • Modifiers (object.modifiers)
    • Collection of modifiers an object can reference
    • A modifier is a visual transformation applied to a mesh
      • Mirror
      • Array
      • Solidify
      • Subsurface...
    • An object referencing a Mesh datablock that has modifiers can be transformed into a Mesh with the modifiers applied by calling object.to_mesh()
  • Lamps (bpy.data.lamps)
    • Collection of datablocks containing information about lamps
      • type (POINT, SPOT, SUN)
      • color
      • intensity
      • SPOT
        • spot_size (cut off angle)
        • constant_coefficient (constant attenuation)
        • linear attenuation
        • quadation attenuation
      • POINT
        • constant_coefficient (constant attenuation)
        • linear attenuation
        • quadation attenuation
  • Scene (bpy.context.scene)
    • References objects and render settings for the scene

Now that we know what we care about, the next part is traversing these collections and converting them to Qt 3D content.

Meshes

First we need to go over all the meshes in the scene and gather information required to convert these to QGeometryRenderers, QGeometry, QAttributes and QBuffers.

The idea is to go over each Blender mesh and process then as follows:

  1. Triangulate
  2. Apply the modifiers it references
  3. Retrieve vertex data (position, normals, texture coordinates, colors)
    1. Write data into a binary file
    2. Record description of attributes
  4. Compute the indices
    1. For each material being referenced by the blender mesh
      1. Create a submesh (basically a QGeometryRenderer in Qt3D)
      2. For each polygon referenced by the submesh
        1. compute list of indices based on  the loops of the polygon
      3. generate and record the IndexAttribute for the submesh
    2. Generate the IndexBuffer based on the sub meshes
    3. Write data into a binary file.

We keep the data we have produced here for later.

Materials

Next, we need to gather information about each instance of Material of the scene to later on create and instantiate QMaterial subclasses.

For now the exporter is only recording the name, ambient, diffuse and specular color. Later on I'd like to extend that to either export a shader directly or switch to PBR materials.

Objects

Once we've created an intermediary representation for our mesh data and material data, we can proceed with the actual exporting of the scene.

The idea is to retrieve all the objects references by the BlenderScene. Then, from these objects, we can create a hierarchy.

Finally it's just a matter of traversing the tree.

For each object:

What type of object we are dealing with?


All of the above work has been implemented in a dedicated Exporter class. It is instantiated and called in the execute function of our addon which looks like below:

[sourcecode lang="python"]
def execute(self, context):
exportSettings = self.as_keywords()
exportSettings["global_matrix"] = axis_conversion(to_forward=self.axis_forward, to_up=self.axis_up).to_4x4()

self.binaryDirectoryName = "assets/binaries/"
self.shadersDirectoryName = "assets/shaders/"
self.qmlDirectoryName = "qml"

self.userpath = self.properties.filepath
if not os.path.isdir(self.userpath):
self.userpath = os.path.dirname(self.userpath)
msg = "Selecting directory: " + self.userpath
self.report({"INFO"}, msg)

# switch to work dir and create directories
os.chdir(self.userpath)
if not os.path.exists(self.binaryDirectoryName):
os.makedirs(self.binaryDirectoryName)
if not os.path.exists(self.shadersDirectoryName):
os.makedirs(self.shadersDirectoryName)
if not os.path.exists(self.qmlDirectoryName):
os.makedirs(self.qmlDirectoryName)

# Save scene into scene
scene = bpy.context.scene

exporter = Exporter(scene, exportSettings)
exporter.export()

# Create QML Files
exporter.createQMLNodeTree()

# Create .qrc file
exporter.generateQRCFiles()

# Create main.cpp
exporter.generateMainCppFile()

# Create .pro
exporter.generateProjectFile(self.userpath)

[/sourcecode]

Does it work?

Well actually it does.

As a test sample I've used a mesh from blendswap

Where to get it?

Here. Usage instructions are provided on the repository. It should work with pretty much any blender scene. Just make sure you have assigned a material to the elements you want to export.

Next steps

  • Export Animations
  • Export Armatures
  • Better Material support
    • export textures
    • generate shader when possible
    • investigate if the QShaderProgramBuilder could be used to export node trees from blender
  • Use instancing for Array modifiers
  • C++ support

continue reading

The post Exporting 3D content for Qt 3D with Blender appeared first on KDAB.

KDAB on Qt: KDAB’s City Lights Display with Qt 3D

$
0
0

https://youtu.be/swP3GWd1Zzc?rel=0&showinfo=0

The City Lights demo is an example of Qt 3D being put to novel use to implement a deferred rendering pipeline.

With OpenGL, the number of lights you can show on a screen, also affecting objects in a scene, is limited by the need to use a forward renderer. Using Qt 3D, the geometry considerations can be separated out from the lighting ones, which massively reduces the complexity. This enables the scene in this demo to run on fairly mediocre hardware at 60 frames a second, even though it contains approximately 1500 real time lights.

KDAB Director, Dr Sean Harmer, maintainer of the Qt 3D project, explains.


 continue reading

The post KDAB’s City Lights Display with Qt 3D appeared first on KDAB.

KDAB on Qt: emBO++, Bochum, Germany

$
0
0

KDAB is sponsoring this annual Embedded C++ conference and KDAB's Marc Mutz is speaking:
12-03 Midday, Views, views everywhere:

"There's a revolution coming.......`string_view` from C++17, `span` from the Guideline Support Library and `array_view` (targeted at C++2a) are just the beginning..."

Attend and find out more.


KDAB is proud to be sponsoring emBO++, the only event in Europe dedicated to Embedded C++ users.continue reading

The post emBO++, Bochum, Germany appeared first on KDAB.

KDAB on Qt: KDAB at ACCU

Viewing all 15410 articles
Browse latest View live