Quantcast
Channel: Planet Qt
Viewing all 15410 articles
Browse latest View live

The Qt Company Blog: Get certified and prove your Qt expertise

$
0
0

Qt certification program has been alive since 2009, although we have not shouted out loud about it during the past few years. The exams have been updated to include Qt5 content, including Qt Quick and QML, so now it is possible to test your QML skills as well.

Why to get certified?

Join the group of 4,500 certified developers.

A certificate formalizes and proves you have practical Qt knowledge, when you are looking for new challenges. Yes, we mean practical knowledge. Although you do not have to write any C++ or QML code in the exams, there are plenty of code snippets, which you need to understand well to be able to answer to the exam questions.

With certified developers, companies can have a selling point when pitching their company’s credentials as an expert Qt shop.

Certificates and exams

Currently, we offer three kinds of certifications and corresponding certificates:

  • Certified Qt and QML Developer
  • Certified Qt C++ Specialist
  • Certified Qt Quick Specialist

certificate_sample

To become a certified developer, candidates must pass the Qt and QML Essentials exam. After additionally passing either of the specialist exams, candidates achieve the certified specialist status. We have developed the Widget UI and Application Engine exam for candidates, who want to test their widget and Qt C++ programming expertise. Candidates, preferring QML programming, can take the Qt Quick UI exam and become certified Qt Quick specialists.

Exams consist of multiple choice questions. In each exam, candidates have 60 minutes to reply the questions. The number of questions depends on the exam. The essential exam has 50 questions, from which 31 must be answered correctly. In the specialist exams, the passing score is 16, while the total number of questions is 30. A question example is given below:

Select all statements, which are true in terms of QString

  • QString extends QObject.
  • It is an implicitly shared value type.
  • QString stores the data in the compressed binary format, so it is more memory efficient than QByteArray.
  • QString stores a string as Unicode characters.

We do not expect you remember all the Qt classes and QML types by heart. However, you should know some essential classes, like QObject, QString, QWidget, QQuickItem very well. In addition, make sure to understand the essential Qt programming concepts, such as Qt object memory management, meta-object system, widget layout management or QML bindings and signal handlers. Familiarise yourself with exam requirements and curriculums in https://www.qt.io/qt-certification.

Are my old Qt certificates still valid?

We have good news to everyone, who already has old Nokia Qt certificates. We have decided to keep old certificates still valid. Thus, if you want to get Qt Quick Specialist certificate and you already are Nokia Certified Qt Developer, you can just take the new Qt Quick UI exam.

How to prepare and make an exam appointment?

One of the frequently asked questions is, which material I need to read to prepare for the exam. Look at our extensive offering of trainings, training materials, and tutorials in https://www.qt.io/qt-training. Use the exam curriculums to study the relevant topics. If you are totally new to Qt, one week may not be enough to prepare for the essentials exam. Writing Qt programs is very efficient way to learn. After 4-6 weeks of using Qt classes and QML types, you may find essentials exam almost trivial. If you unlucky and fail the exam, you can get 50 per cent discount to re-take the exam.

Certification exams can be taken in any of the 3,000 authorized Pearson VUE test centers. Visit http://www.pearsonvue.com/qtcompany and find the nearest test center to you. In addition, you can create a Pearson VUE account to manage exams and exam appointments. Exam prices vary a lot between the test centers. So, ask the test center to get the exact price. An average price is about 200 €.

We print and send certificates to exam candidates once in a month. So, in the best case you will get your certificate within a few days after the exam.

Show your Qt expertise and get certified today!

If you have any further queries about certification, please do not hesitate to send an email to certification@qt.io.

The post Get certified and prove your Qt expertise appeared first on Qt Blog.


KDAB on Qt: Update to Linux perf report

$
0
0

Linux perf is an immensely useful and powerful tool suite for profiling of C/C++ applications.
I have used it extensively and successfully on various customer projects, both for desktop applications as well as automotive or industrial projects targeting low-end embedded Linux targets running on ARM hardware.

The biggest problem with perf really is its usability, or lack thereof. Over the years I have tried my best in educating people on how to use the tool suite, both in form of conference talks as well as during KDABs Linux profiling trainings and workshops and, most recently, by creating hotspot.

Additionally, I have started contributing upstream to the Linux kernel repository to alleviate some of the problems. A short time ago, one important patch series of mine got merged and will be part of Linux 4.15, which drastically improves Linux perf usability when dealing with common C++ workloads.

The patch series completely reworked the representation and handling of inlined frames in perf report.

Up until recently, inlined frames were not shown at all in the report. This made the interpretation of reports from C++ applications very hard, since the compiler will inline a lot of templates.

continue reading

The post Update to Linux perf report appeared first on KDAB.

Swift IM Blog: Swift 4.0-rc3: Now available

$
0
0

A new release candidate for Swift 4.0 is now available for download.

Swift 4.0-rc3 can now be downloaded from our releases page and includes the Dutch and German translations updates made since 4.0-rc2.

With this release we provide a new binary package, an AppImage for 64-bit Linux systems. This works on CentOS, Ubuntu, Debian and most other Linux distributions. It’s a single file binary package, including Swift and all its dependencies. Simply download it and mark it executable (chmod +x) to run it.

We encourage everyone to download the new build and try it out, and give us feedback to help us further improve Swift as we move toward a final release candidate.

Cutelyst Framework: Cutelyst 1.11.0 released!

$
0
0

Cutelyst the Qt Web framework got a new release, this is likely to be the last of the year and will be one of lasts releases of the 1.x.x series. I'd like to add HTTP/2 support before branching 1.x.x and having master as 2.0 but I'm not yet sure I'll do that yet.

For the next year I'd like to have Cutelyst 2 packaged on most distros soon due Ubuntu's LTS being released in April, and H2 might delay this or I delay it since it can be done using a front-end server like Nginx.

The 1.11.0 version includes three new plugins written by Matthias Fehring, a Memcached plugin that simplifies talking to a memcached server, a memcached based session store, that stores session information on the memcached server, and a static compressed plugin to serve compressed versions of static files.

Besides that I extended the EngineRequest class to serve as a base class for Engine's requests allowing to get rid of some ugly casts and void pointers that carry the real request/connection. This doesn't affect user code as long as they don't implement their own engine.

Setting a Json reply is now a bit simpler now that two overloads directly accepting QJsonObject and QJsonArray were added.

Cutelyst license preamble on files was fixed to state it's LGPLv2.1+, and finally pkg-config is now fully supported.

Go get/break/package/.* it!

https://github.com/cutelyst/cutelyst/archive/v1.11.0.tar.gz

The Qt Company Blog: Qt 3D Studio 1.0 Released

$
0
0


We are happy to announce that Qt 3D Studio 1.0 has now been released. Qt 3D Studio provides a 3D user interface authoring system that caters for both software developers and graphic designers.

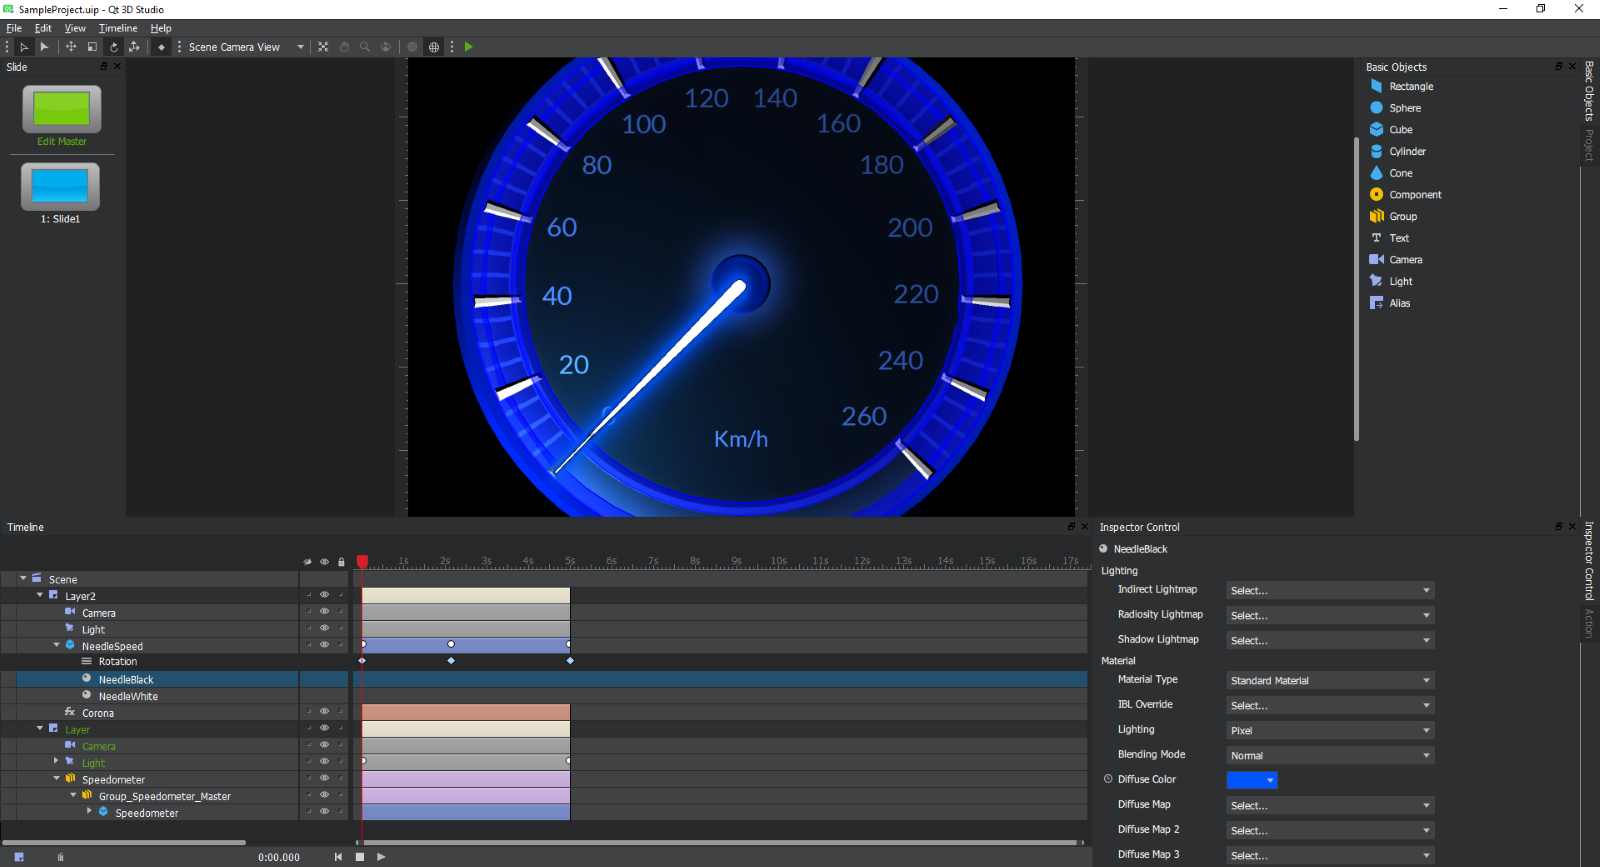
Qt 3D Studio Editor

Qt 3D Studio is the authoring tool for creating interactive 3D presentations and applications. Editor is a cross-platform Qt application which can be used in Windows, Mac and Linux. You can import design assets from popular authoring tools such as Photoshop, Autodesk Maya and The Foundry MODO.

qt3dstudioviewer

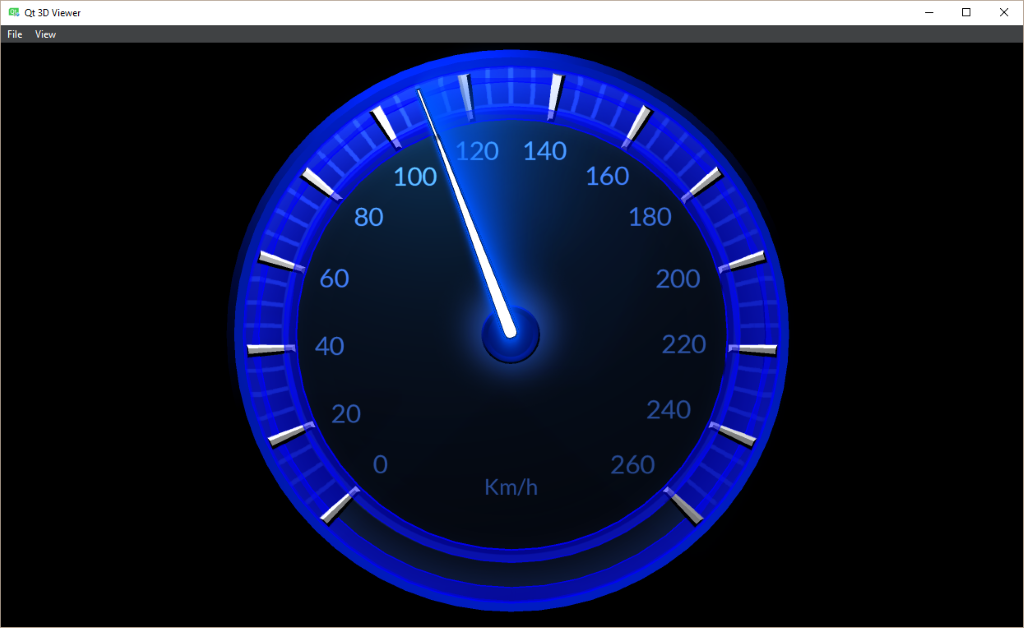
Qt 3D Studio Editor & Viewer with the remote connection feature

Qt 3D Studio Viewer

Qt 3D Studio Viewer is a great tool for testing the design in action. You can also use the remote connection feature built in to the Studio to connect to a device running the Viewer to see immediately the design changes in the device. We have published the Viewer application in the Google Play for easy start with Android devices.

Viewer can also generate image sequences  from Qt 3D Studio scenes which can then be animated or combined into a video. This is especially useful for example if you are using the same user interface also in devices which don’t have enough resources to run a full-blown 3D user interface. This allows you to use the same tools and workflow in both cases. This feature can be used to create videos you can easily share during the design process.

Installation & Platform support

Editor & Viewer are released for Windows & macOS. Linux is also supported, but pre-built binaries are not yet provided with the 1.0 release. So Linux users need to build from source. Please also refer to the build instructions if you are creating applications for Android or embedded targets. In addition to Windows, Mac, Linux and Android the Qt 3D Studio 1.0 supports embedded Linux as well as INTEGRITY and QNX real-time operating systems as deployment targets. In the future we will continue adding more platforms such as iOS. For detailed platform support please refer to documentation.

Easiest way to install the Qt 3D Studio is through the online installer where you can find it under Tools -section. If you don’t yet have the online installer you can get from our download page. If you are an existing commercial license holder you can find the relevant packages from Qt Account. Also offline installer packages are provided.

Please also remember that Qt 3D Studio relies on the development host and target device graphics adapter and drivers. During the development we have encountered some occasions where updating to latest drivers have fixed the issues user has been experiencing. If you encounter some issues, please post a report in our bug tracker.

How to get started – Documentation & Examples

As part of the installation packages we are providing sample projects and we have also added some demonstration applications to a separate git repository https://git.qt.io/public-demos/qt3dstudio. We will be adding examples and demo applications along the way so stay tuned. Documentation is available at http://doc.qt.io/qt3dstudio/index.html

Home Automation demo implemented with Qt 3D Studio and Qt Quick

Licensing

The Qt 3D Studio Editor is available for all Qt commercial licensees without any additional cost. Also the Qt 3D Studio Runtime can be used as part of desktop and mobile Qt applications without any additional cost. For open-source users Qt 3D Studio Editor and Runtime are available under GPLv3 license. For embedded devices, a separate distribution agreement is needed to cover the Qt 3D Studio Runtime (i.e. joint hardware and software distribution).

Way forward

We are planning on releasing bug fix releases as needed and the next feature release (1.1.0) will introduced around early February. Biggest change in next feature release is the new Data Node API which introduces a clearer separation between UI and application logic. Data Nodes works a “contract” between the UI designer and application developer and makes it easier to use the same data in several UI components. Also as mentioned already earlier we are working on a new Qt 3D Studio Runtime which is built on top of Qt 3D. The new Runtime will be released as part of Qt 3D Studio 2.0 release, planned for May 2018.

The post Qt 3D Studio 1.0 Released appeared first on Qt Blog.

V-Play Engine: Release 2.14.1: Update to Qt 5.9.3 | Use Live Code Reloading on macOS and Linux

$
0
0

V-Play 2.14.1 adds Live Code Reloading Support for macOS & Linux Desktop. With this addition, Live Code Reloading now allows to run and reload your projects on iOS and Android from all desktop platforms. No native iOS and Android build tools required.

V-Play 2.14.1 also introduces the new SocialView component for adding social features like user profile, leaderboard or even a full-featured messenger to your apps and games. It offers a cleaner and more customizable interface, compared to the more game-oriented VPlayGameNetworkView and VPlayMultiplayerView.

This update also adds support for Qt 5.9.3.

Live Code Reloading for Windows, macOS and Linux

Building your project takes some time. For mobile platforms, it can even take several minutes, depending on your development PC. This can become quite time-consuming. For example, if you are doing small iterations to fine-tune UI elements in apps. Same with animations, game-mechanics and so on. It slows down your development speed and therefore decreases your productivity.

V-Play Live reloads your project on every connected device, within seconds after code changes. This reduces the long compilation and deployment times, to only a couple of seconds. V-Play Live also allows you to run and test your applications on iOS from a Windows or Linux desktop. You don’t need to install any native SDKs for deployment with V-Play Live. See here for a quick demo:

&nbnsp

This video shows a project opened in Qt Creator (left) on Windows. The project runs with V-Play Live. In the bottom right corner, the screens from an Android Nexus 7 and an iPhone 5s are shared with screen mirror tools so you can see what is going on there. In the center, you can see the desktop client. After connecting the 2 devices to the Live Server (top right), we change the code in Qt creator. After we save the changes, all connected clients update their view, within a second!

Qt Charts with V-Play Live

After some of you requested it, this update also contains the powerful Qt Charts module with V-Play Live. Including charts in your app could not be easier.

V-Play Live Reload Benefits

Save Time: Deploy and Test in Seconds

V-Play Live reduces deployment time, from several minutes to a couple of seconds. It deploys your code changes to all connected devices, automatically after saving.

Let’s play a bit with numbers. If you have a really decent development PC, you might be able to deploy your application to Android within one minute. With V-Play Live, it will take 1-2 seconds.

1 - newTime/oldTime = 1 - 2/60 = 0.9667

You just saved 96.67% of time for deployment. If you deploy only 10 times per hour, you spent 20 seconds deploying, instead of 10 minutes. That is 2 extra coffee breaks per hour. Or more time to spend productive.

In this demo, you see all connected clients (Desktop, Android and iOS) update within a second after clicking save in the development environment:

v-play-live-code-change-reload-windows-android-ios

Feel free to do the calculation with numbers that are more realistic in your own case.

More V-Play Live Benefits

You can find more benefits in last week’s blog post.

How to Use V-Play Live

1. Get the Latest Version of V-Play

If you haven’t installed V-Play yet, go get it on our download page. If you already have V-Play installed, see the update instructions below.

2. Start V-Play Live

To start V-Play Live for your active project, click on the LIVE-Run button in Qt Creator:

v-play-live-run-button

The V-Play Live Server (below right) will start, and open a local V-Play Live Client (below left).

vplay-live-server-and-client-ui

The Live Server allows you to:

  • Manage your connected clients, both desktop and mobile.
  • See the log output of each connected client in a separate tab.
  • Detect code changes and reload all connected clients.
  • Select the qml file you would like to run. The default is the main entry point.

3. Connect Live Clients

If you do not want to connect any mobile device now, you are already set and can start development with your local Client. To connect a mobile device, download the V-Play Live App, for Android or iOS.

Google_Play_Badge-1App Store
ic_launcherV-Play & QML Live Scripting App
Search in App Stores for: “V-Play Live Scripting”

V-Play Live uses your local network to communicate between server and clients. Make sure that your device is connected to the same network as your development PC running the Live Server, for example the same Wi-Fi. The V-Play Live App will try connecting to the server once you run it on your mobile device. The Live Server then displays this dialog for the connection request:

vplay-live-client-connection-requesti

Accept the mobile device connection on the Server. Now all code changes are automatically sent to your connected mobile device(s).

Add Social Features to your Apps with the SocialView

Custom social features in your app boost retention and engagement rates. Many successful apps allow users to interact, compete or build social relationships. This is because social features are one of the key drivers to build up your user base.

The V-Play Game Network and V-Play Multiplayer & Messaging services include many ready-made social services. This makes it easy for you to create apps with e.g. user profiles, leaderboards or a messaging and friend system. This year’s conference management app for the Qt World Summit 2017 uses these services and allows to:

  • Search conference attendees to schedule Business Meetings.
  • Store custom user data like the company, job position or main Qt interest.
  • View user details and find conference attendees that match certain criteria.
  • Log in via Facebook to synchronize your data across devices.
  • Become friends and get in touch with the included messenger.
  • See a leaderboard with a ranking of users that work with the app, favor many talks and are active.

business-meet-and-chat

You can have a look and try out the features by downloading the app for iOS or Android:

App StoreGoogle_Play_Badge-1

A cloud-based backend and easy-to-use client QML components allow to use these features. The VPlayGameNetworkView and VPlayMultiplayerView provide a default UI for your V-Play Apps. These types include several child views you can show or hide using view states. But there are several drawbacks to this approach. The new SocialView type completely changes the way you can use social services in your apps or games:

  • V-Play Apps Compatibility: The SocialView integrates with your App Navigation. You can show the available view pages anywhere in your app!
  • Easier Customization: Extend the view with QML elements to weave in your custom user data. Touching the QML source code of the view is not required.
  • Native Look and Feel: The default UI of the new view uses a native style and user experience on iOS and Android.
  • Clean Separation into App Pages: Each page instance works standalone and is a unique view. This also allows to introduce custom social pages to work with the V-Play social services.

mobile-chat

The Qt World Summit 2017 app shows how to use the SocialView and enriches it with custom features. The full updated source code is available for you on GitHub.

Dynamic App Navigation for Android and iOS

You don’t have to worry about how to show a drawer menu on Android, and a tab navigation on iOS. The V-Play App Navigation components take care of providing a native main menu.

But you also want change the general menu setup in some cases. For example to:

  • Only make certain features visible based on specific conditions.
  • Add more quick-links to your Android menu, as there’s more available space in the drawer than in the iOS tab bar.
  • Switch between different configurations of a certain menu item.

You can now set conditions for showing a menu item with NavigationItem::showItem. This allows to hide and show items in your main navigation without a hassle. For example, it is now easy to show different navigation entries for iOS and Android:

NavigationItem {
  title: "Only on iOS"
  icon: IconType.apple
  showItem: Theme.isIos

  // ...
}


Besides the highlights mentioned above, there are many other fixes and improvements for the SDK. For a full list of improvements and fixes to V-Play in this update, please check out our change log!

How to Update V-Play

Test out these new features by following these steps:

  • Open the V-Play SDK Maintenance Tool in your V-Play SDK directory.
  • Choose “Update components” and finish the update process to get this release as described in the V-Play Update Guide.

V-Play Update in Maintenance Tool

If you haven’t installed V-Play yet, you can do so now with the latest installer from here. Now you can explore all of the new features included in this release!


More Posts Like This

v-play-live-reloading-windows-mac-linux-ios-android-qt

Release 2.14.0: Live Code Reloading for Desktop, iOS & Android

How to Make Cross-Platform Mobile Apps with Qt – V-Play Apps

How to Make a Qt app

The post Release 2.14.1: Update to Qt 5.9.3 | Use Live Code Reloading on macOS and Linux appeared first on V-Play Engine.

The Qt Company Blog: Sharing Files on Android or iOS from your Qt App

$
0
0

It‘s a common usecase to share Files or Content from native Android or iOS Apps with other Apps on your phone. So I thought this would be an easy task to add sharing to my mobile Apps built with QtQuickControls2.

Found the Blog from Eskil Abrahamsen Blomfeld about Intents with Qt for Android, part 1. Please read that Blog to learn about Android Intents, Qt Android Extras, JNI and HowTo use it from Qt. All of this was new to me – never did JNI before. Also I‘m not an experienced native developer for Android or iOS – that‘s the reason why I‘m using Qt for mobile App development.

I also found Share on iOS and Android using QML, where I learned HowTo share Text and a URL and HowTo structure a QtCreator project for Android and iOS with native code integration.

Unfortunately all of this didn‘t help me to share Files on Android or iOS from Qt mobile Apps.

For a DropBox-like project at customer site I needed sharing:

  • download Files from cloud
  • store Files in App sandbox data
  • view or edit Files in other Apps
  • print Files to local Printer

It took me some time and thanks to much help from other developers at Qt Forum and Slack (QtMob) I found ways to solve my use-cases.

The hardest part was the ugly JNI and Obj-C syntax 😉

Hopefully my experiences will make it easier for others to integrate Sharing-functionality into their Android or iOS Apps.

Here‘s my Example App at Github.

The Example App demonstrates:

  • Share Text and URL
  • View File
  • Edit File
  • Send File as Stream to …

To easy understand the complex structure please take a look at this Overview:

share_overview

UI: SwipeView with some Tabs. Each Tab contains a Page with some Buttons to test features.

01_tab_bar

Share Text and URL is the easiest one:

02_android_share_text_url

ShareUtils is registered as „shareUtils“:

void ApplicationUI::addContextProperty(QQmlContext *context)
{
    context->setContextProperty("shareUtils", mShareUtils);
}

Click on the Button to share Text and URL:

Button {
    text: qsTr("Share Text and Url")
    onClicked: {
        shareUtils.share("Qt","http://qt.io")
    }
}

Here‘s the share() method:

Q_INVOKABLE void share(const QString &text, const QUrl &url);
void ShareUtils::share(const QString &text, const QUrl &url)
{
    mPlatformShareUtils->share(text, url);
}

ShareUtils delegates this to PlatformShareUtils:

  • AndroidShareUtils on Android
  • IosShareUtils on iOS

The magic to detect the right class can be found in ShareUtils:

#if defined(Q_OS_IOS)
    mPlatformShareUtils = new IosShareUtils(this);
#elif defined(Q_OS_ANDROID)
    mPlatformShareUtils = new AndroidShareUtils(this);
#else
    mPlatformShareUtils = new PlatformShareUtils(this);
#endif

The Compiler knows the Platform you‘re running on and instantiates the matching platform specificClass.

Android:

void AndroidShareUtils::share(const QString &text, const QUrl &url)
{
    QAndroidJniObject jsText = QAndroidJniObject::fromString(text);
    QAndroidJniObject jsUrl = QAndroidJniObject::fromString(url.toString());
    jboolean ok = QAndroidJniObject::callStaticMethod("org/ekkescorner/utils/QShareUtils",
                                              "share",
                                              "(Ljava/lang/String;Ljava/lang/String;)Z",
                                              jsText.object(), jsUrl.object());
    if(!ok) {
        emit shareNoAppAvailable(0);
    }
}

QAndroidJniObjects are created for text and url and a Method from QShareUtils.java will be called:

    public static boolean share(String text, String url) {
        if (QtNative.activity() == null)
            return false;
        Intent sendIntent = new Intent();
        sendIntent.setAction(Intent.ACTION_SEND);
        sendIntent.putExtra(Intent.EXTRA_TEXT, text + " " + url);
        sendIntent.setType("text/plain");
        // Verify that the intent will resolve to an activity
        if (sendIntent.resolveActivity(QtNative.activity().getPackageManager()) != null) {
            QtNative.activity().startActivity(sendIntent);
            return true;
        } else {
            Log.d("ekkescorner share", "Intent not resolved");
        }
        return false;
    }

In our QShareUtils.java we create the Intent with ACTION_SEND and EXTRA_TEXT and start the Activity using QtNative.activity().

It‘s important to test if the Intent can be resolved– otherwise your App will crash.

Here‘s the iOS implementation:

void IosShareUtils::share(const QString &text, const QUrl &url) {
    NSMutableArray *sharingItems = [NSMutableArray new];
    if (!text.isEmpty()) {
        [sharingItems addObject:text.toNSString()];
    }
    if (url.isValid()) {
        [sharingItems addObject:url.toNSURL()];
    }
    // get the main window rootViewController
    UIViewController *qtUIViewController = [[UIApplication sharedApplication].keyWindow rootViewController];
    UIActivityViewController *activityController = [[UIActivityViewController alloc] initWithActivityItems:sharingItems applicationActivities:nil];
    if ( [activityController respondsToSelector:@selector(popoverPresentationController)] ) { // iOS8
        activityController.popoverPresentationController.sourceView = qtUIViewController.view;
    }
    [qtUIViewController presentViewController:activityController animated:YES completion:nil];
}

In this case we‘re using UIActivityViewController to get the share options displayed.

Let‘s take a look HowTo view or edit Files. My Example App contains an Image and a PDF File in assets:

03_assets

At first start of the Example App we copy these files from Assets to (QstandardPaths::AppDataLocation)/my_share_files. This simulates that you have downloaded the Files from your Cloud or WebService.

See all the details in the sources.

Now we want to view or edit these Files in another App. I learned that it‘s not possible to share Files from your AppData Location (Sandbox) – you must copy the Files from APP Data to USER Data – per ex. Documents Location. I create a app specific working directory at DocumentsLocation.

Attention: I‘m not checking if Permissions are set – this isn‘t the goal of this App. To access Files at DocumentLocation you have to set WRITE_EXTERNAL_STORAGE.

Using Files from DocumentsLocation sounds easy but makes things more complicated. We don‘t want to leave those Files at DocumentsLocation when sharing the File finished. Then we must delete them. And if the User edited the File we must know if the File was changed and saved or canceled. If the File was modified we must replace the origin File inside our AppData before deleting the File from DocumentsLocation.

Also after sending the File as a Stream per ex. to a Printer we must delete the copied File as soon as printing was done.

The workflows are different for Android and iOS.

Android needs

  • FilePath URI
  • a specific Action: ACTION_VIEW, ACTION_EDIT, ACTION_SEND
  • MimeType

to find matching Apps.

iOS needs

  • FilePath as NSURL

On iOS there‘s no way to limit the Apps for View or Edit capabilities.

Android does an in-place-Editing of the File, where iOS copies the File over to the other App. To get the modified File back a second manual step is required by the user.

file_flow

The interesting question now is „HowTo know when sharing is finished and if Edit mode was canceled or saved“ ?

Android gives us the startActivityForResult() to get a Result Code back.

Unfortunately I didn‘t found a way to get this Result Code back from the Java Code in QShareUtils.java.

Using Java code on the other side is much easier to read and write as JNI code.

There‘s a workaround: as soon as the Intent Activity is started, our Qt App changes ApplicationState to Suspended and when the Intent Activity closes, the ApplicationState goes back to Active. You can watch the ApplicationState to know when sharing was finished and you also can compare modified Timestamp of the File to recognize changes from Edit mode.

This workflow is marked ‚A‘ in the Overview at the beginning of this article.

More coding, but much more flexible is to use JNI to construct the complete Intent Activity and to go with QAndroidActivityResultReceiver To get the Result back.

Here‘s the method to construct the Edit Intent:

    QAndroidJniObject jniPath = QAndroidJniObject::fromString("file://"+filePath);
    if(!jniPath.isValid()) {
        emit shareError(requestId, tr("Share: an Error occured\nFilePath not valid"));
        return;
    }
    // next step: convert filePath Java String into Java Uri
    QAndroidJniObject jniUri = QAndroidJniObject::callStaticObjectMethod("android/net/Uri", "parse", "(Ljava/lang/String;)Landroid/net/Uri;", jniPath.object());
    if(!jniUri.isValid()) {
        emit shareError(requestId, tr("Share: an Error occured\nURI not valid"));
        return;
    }
    // THE INTENT ACTION
    // create a Java String for the ACTION
    QAndroidJniObject jniParam = QAndroidJniObject::getStaticObjectField("android/content/Intent", "ACTION_EDIT");
    if(!jniParam.isValid()) {
        emit shareError(requestId, tr("Share: an Error occured"));
        return;
    }
    // then create the Intent Object for this Action
    QAndroidJniObject jniIntent("android/content/Intent","(Ljava/lang/String;)V",jniParam.object());
    if(!jniIntent.isValid()) {
        emit shareError(requestId, tr("Share: an Error occured"));
        return;
    }
    // THE FILE TYPE
    if(mimeType.isEmpty()) {
        emit shareError(requestId, tr("Share: an Error occured\nMimeType is empty"));
        return;
    }
    // create a Java String for the File Type (Mime Type)
    QAndroidJniObject jniType = QAndroidJniObject::fromString(mimeType);
    if(!jniType.isValid()) {
        emit shareError(requestId, tr("Share: an Error occured\nMimeType not valid"));
        return;
    }
    // set Data (the URI) and Type (MimeType)
    QAndroidJniObject jniResult = jniIntent.callObjectMethod("setDataAndType", "(Landroid/net/Uri;Ljava/lang/String;)Landroid/content/Intent;", jniUri.object(), jniType.object());
    if(!jniResult.isValid()) {
        emit shareError(requestId, tr("Share: an Error occured"));
        return;
    }
    QAndroidJniObject activity = QtAndroid::androidActivity();
    QAndroidJniObject packageManager = activity.callObjectMethod("getPackageManager",
                                                                 "()Landroid/content/pm/PackageManager;");
    QAndroidJniObject componentName = jniIntent.callObjectMethod("resolveActivity",
                                                              "(Landroid/content/pm/PackageManager;)Landroid/content/ComponentName;",
                                                              packageManager.object());
    if (!componentName.isValid()) {
        emit shareNoAppAvailable(requestId);
        return;
    }
    // now all is ready to start the Activity:
    // we have the JNI Object, know the requestId
    // and want the Result back into 'this' handleActivityResult(...)
    QtAndroid::startActivity(jniIntent, requestId, this);

Thanks to QAndroidActivityResultReceiver we‘ll get the Result back into:

void AndroidShareUtils::handleActivityResult(int receiverRequestCode, int resultCode, const QAndroidJniObject &data)
{
    Q_UNUSED(data);
    // we're getting RESULT_OK only if edit is done
    if(resultCode == RESULT_OK) {
        emit shareEditDone(receiverRequestCode);
    } else if(resultCode == RESULT_CANCELED) {
        emit shareFinished(receiverRequestCode);
    } else {
        emit shareError(receiverRequestCode, tr("Share: an Error occured"));
    }
}

Now it‘s easy to connect to the SIGNAL (shareEditDone, shareFinished, shareError) from QML.This workflow is marked as ‚B‘ in the Overview above.

Please note: the JNI code is different for VIEW/EDIT and SEND – please take a look at all the details in the sources.

Was not so easy to figure out all the details but now it‘s really easy for you: just copy the code into your app 🙂

On iOS we‘re using a UIDocumentInteractionController:

    NSString* nsFilePath = filePath.toNSString();
    NSURL *nsFileUrl = [NSURL fileURLWithPath:nsFilePath];
    static DocViewController* docViewController = nil;
    if(docViewController!=nil)
    {
        [docViewController removeFromParentViewController];
        [docViewController release];
    }
    UIDocumentInteractionController* documentInteractionController = nil;
    documentInteractionController = [UIDocumentInteractionController interactionControllerWithURL:nsFileUrl];
    UIViewController* qtUIViewController = [[[[UIApplication sharedApplication]windows] firstObject]rootViewController];
    if(qtUIViewController!=nil)
    {
        docViewController = [[DocViewController alloc] init];
        docViewController.requestId = requestId;
        // we need this to be able to execute handleDocumentPreviewDone() method,
        // when preview was finished
        docViewController.mIosShareUtils = this;
        [qtUIViewController addChildViewController:docViewController];
        documentInteractionController.delegate = docViewController;
        [documentInteractionController presentPreviewAnimated:YES];
    }

Know when Preview is done from DocViewController:

-
(void)documentInteractionControllerDidEndPreview:(UIDocumentInteractionController *)controller
{
#pragma unused (controller)
    self.mIosShareUtils->handleDocumentPreviewDone(self.requestId);
    [self removeFromParentViewController];
}

We detect the end of preview and call documentPreviewDone() in IosShareUtils:

void IosShareUtils::handleDocumentPreviewDone(const int &requestId)
{
    emit shareFinished(requestId);
}

Now from QML we can connect to the SIGNAL and know when sharing was done.

The good thing: the workflow now is similar for Android and iOS and easier to handle from common QML code.

Please take a look at .pro– there are some Android and iOS specific sections. Also dont forget to add AndroidExtras.

Now it‘s time to download from Github, build and run the Sharing Example App.

Some Screenshots

Open in… Dialog on Android. Select the App you want to use for View or Edit mode:

04_android_share_chooser

Edit the Image and cancel or save:

05_android_share_edit_image

ACTION_SEND enables you to print Text, Images or PDF Files.

Choose the Printer Plugin:

06_android_share_send_chooser

Then select your Printer, configure the Printer and print:

07_android_share_print

On iOS the UIDocumentInteractionController gives you a preview of the File and provides the iOS Share Button at bottom left:

08_ios_preview

The Share Button presents the available Apps:

09_ios_share

Conclusion: you can share Files on Android and iOS and integrate into your specific workflows. SIGNALS are mitted to let you know what the User has done.

There‘s even a call to check if for a given MimeType and Action Type any matching Apps are available on Android.

Call this check before downloading a File from Cloud, to provide a better UX: instead of downloading and then telling users that there‘s no App available you can inform in advance.

One question is open for now: HowTo suppress the Preview on iOS and only show what you get from clicking on the Share Button. Thanks to any tips from Qt / Obj-C experts.

I‘ll continue work on this app and add some more Intent Actions for Android.Also will add functionality to open the App from outside by providing a File URI or MimeType.

Now have fun!

The post Sharing Files on Android or iOS from your Qt App appeared first on Qt Blog.

tHeBloG: Qt 5.10 Rendering Benchmarks

$
0
0

Qt 5.10.0 RC packages are available now and actual release is happening pretty soon. So this seems to be a good time to run some rendering benchmarks with 5.10, including new QML Shape element, QQuickPaintedItem and QNanoPainter.

After my previous blog post, some initial comments mentioned how QML Shape didn't reach their performance expectations. But I think that might be more of a "use the right tool for the job" -kind of thing. This demo application is very much designed to test the limits of how much heavily animated graphics can be drawn while keeping performance high and while having its own strengths, QML Shape likely isn't the tool for that.

To prove this point, there is a new 'flower' test case in QNanoPainter demo app which renders a nice flower path, animating gradient color & rotation (but not path). Combining it with new setting to render multiple items (not just multiple renders per item) and the outcome looks like this with 1 and 16 items:


Now when we know what the desired outcome looks like let's start testing with the first run. 

Test1: Nexus 6, 'Render flower' test:


Test1 conclusions: In this test QQuickPaintedItem (QImage backend) has clearly worst performance, CPU Raster paint engine and uploading into GPU is very non-optimal on Nexus 6. QML Shape performs the best, maintaining fluid 60fps still with 16 individual items. QNanoPainter manages quite well also and switching for QSGRenderNode backend instead of QQuickFramebufferObject to avoid rendering going through FBO gives a nice boost. When the amount of items increases this FBO overhead naturally also increases. QQuickPaintedItem with FBO backend is somewhat slower than QNanoPainter.

This test is kind of best-case-scenario for QML Shape. If path would animate that would be costly for QML Shape backend. Also for example enabling antialiasing turns tables, making QML Shape only render 2 items at 35fps while QNanoPainter manages fluid antialiased 60fps. But that's the thing, select the proper tool for your use case.

Next we can test more complex rendering where also paths animate and see how antialiasing affects the performance. In rest of the tests, instead of increasing item count we increase rendering count, meaning how many times stuff is rendered into a single QQuickItem. The default tests set contains ruler, circles, bezier lines, bars, and icons+text tests. With 1, 2 and 16 rendering counts it looks like this:


So let's continue to Test2: Nexus 6, all default tests enabled:


Test2 conclusions: Slowest performer is again QQuickPaintedItem (QImage). QML Shape becomes right after it, dropping quite a bit from lead position of Test1. Digging QML Shape performance a bit deeper and enabling different tests individually one can see that Bezier lines test makes the biggest fps hit. And disabling some code there revealed that biggest slowdown came from graph dots which were drawn with two PathArc, so improved fps by switching implementation to use QML Rectangle instead. QNanoPainter is fastest but even it only reaches 60fps with non antialiased single rendering. Note that QNanoPainter with QSGRenderNode is missing here and in all rest of the tests because when rendering only single item performance of it is almost the same as QNanoPainter with FBO.

Then we could switch to a bit more powerful hardware and repeat above test with that. 

Test3: Macbook Pro (Mid 2015, AMD R9 M370X), all default tests enabled:


Test3 conclusions: Macbook can clearly handle much more rendering than Nexus 6. As MSAA is fully supported here we are able to test both antialiased and non-antialiased for every rendering method. On macbook MSAA antialiasing is quite cheap which can be seen from QML Shape and QQuickPaintedItem reaching pretty similar frame rates with and without antialiasing. Slowest performer is antialiased QQuickPaintedItem (QImage) while QNanoPainter leading again, reaching solid 60fps with 16 render counts.

As we saw already earlier that Bezier lines test seemed particularly unsuitable for QML Shape, let's next repeat the above test except disabling that single test. After all we try to be fair here and avoid misinterpretations. 

Test4: Macbook Pro, all default tests except Bezier lines enabled:


Test4 conclusions: Most interesting data here comes from comparison to Test3 results. QQuickPaintedItem (QImage) results go up only few percentages, so bezier line test doesn't seem to influence much there. QQuickPaintedItem (FBO) results are now identical for antialiased and non antialiased so light blue line can't be seen under orange one. But not much changes in there either. QNanoPainter improves 30-50% reaching solid 60fps now with 32 render counts when antialiasing is disabled. And finally, QML Shape improves frame rates by whopping ~100% so we were right in this particular test being its Achilles' heel.

We are just scratching surface here. There would be plenty of things to test still and get deeper into individual tests. But for this blog post let's stop here.

General tips about about Qt 5.10 QML Shape usage could be:
  • Use QML Shape for simple shape items as part of QML UIs. Consider other options for more complex shapes which animate also the path. 
  • Also don't use non-trivial Shape elements in places where creation time matters e.g. ListView delegates or making multiple shapes inside Repeater, as parsing the QML into renderable nodes tree has some overhead.
  • When the need is to render rectangles, straight lines or circles, QML Rectangle element gives generally better performance than QML Shape counterpart. You can experiment with this enabling alternative code paths for RulerComponent and LinesComponent of the demo. 
  • If you target mostly hardware with NVIDIA GPU, GL_NV_path_rendering backend of QML Shape should be more performant. I didn't have suitable NVIDIA hardware available currently for testing so these results will have to wait, anyone else want to provide comparisons?

Follow up post is planned for comparing Windows side OpenGL vs. OpenGL ES + Angle rendering performances so stay tuned!


The Qt Company Blog: Increasing the number of lights in Qt 3D

$
0
0

While it is possible to draw scenes with almost unlimited numbers of lights using deferred rendering in Qt 3D, the default materials in Qt 3D Extras have been limited to eight lights because they are tied to forward rendering. Although we apply a few tricks that allow you to define more than eight lights in the scene, we only select the eight closest lights when rendering.

In the scene below, we have defined 100 lights that float around, but because only 8 of them are in use at the time and you can see how they pop in and out:

Although it’s possible to support more lights in other pipelines (this is for instance the case with the Qt 3D Studio Runtime), we also want the default materials in Qt 3D Extras to be able to use a larger number of lights, even when used with forward rendering.

The reason behind the current limit is that we need to support a range of OpenGL architectures, including some which are quite limited in terms of how much uniform data can be passed to the shader. We therefore need to pass a small array of light structs to the shader and loop over the lights in the fragment shader. Unfortunately, such loops are also very expensive on hardware with limited resources because they compile to a large number of shader program instructions. Sometimes so many that the resulting shader program won’t compile at all.

We have therefore started work on a solution that will both allow us to increase the number of lights on beefy hardware and at the same time reduce the number of shader program instructions on weaker hardware. It is based on Qt 3D’s new internal shader graph, which was recently introduced by Kevin Ottens from KDAB.

The shader graph is a game changer for Qt 3D. It allows us to build shaders dynamically with a structure similar to the material graphs you find in many modern 3D modeling applications. Each node in the graph can be thought of as a function – it is defined as a computation, takes a set of input values, and produces output values. For instance, a surface node can take the incoming and outgoing angles of light, the light color, and the surface color, and compute the resulting light contribution. By connecting nodes in the graph, you define the flow of computations in the shader program, which is translated to instructions in a programming language. Because all the computations are abstract, they can easily be translated to many different shader languages (or dialects), making it trivial to produce the same material definitions for different architectures.

In terms of increasing the number of lights, the great thing about the shader graph is that we can easily define a shader node for each of the lights in the scene. The graph then results in the right number of light calculations when converted to shader code. Instead of having a for loop inside the shader itself, we loop over the lights when the shader is generated. This is basically unrolling the old loop, which is way more efficient and allows us to have a much higher number of lights.

I am currently working on a prototype where we have moved the lighting system on top of the shader graph. While this work is still highly experimental, it is already producing some promising results. Here’s the same scene as above, but this time we are actually seeing 100 lights in use at the same time:

Before this becomes part of the default materials in Qt 3D Extras, we also want to change how lights are gathered in a scene and passed on to the shaders. Currently, the light gathering is tightly coupled with the rendering code, but we want to reduce the number of assumptions we make and give you more control over how light information is passed to your shaders. In turn, this will also make it easier to create applications that can switch between rendering modes, for instance if you want to support both forward and deferred rendering of the same scene

If this sounds interesting for your applications, feel free to share thoughts on how you would like to work with lights in your code.

The post Increasing the number of lights in Qt 3D appeared first on Qt Blog.

Pier Luigi Fiorini on Qt: SDDM v0.17.0

$
0
0

We are happy to release a new SDDM with a few improvements.

SDDM is a Qt based graphical login manager developed in a collaborative fashion by people from Liri, KDE and LXQt.

This new version include the following changes:

* Added possibility to change border width of ComboBox widget.
* Added missing utmp/wtmp/btmp handling.
* Make greeter see icons set by AccountsServices.
* Fix sddm.conf man page syntax error and update.
* Fix ComboBox widget.
* Fix connection of PropertiesChanged event for LogindSeat.
* Avoid race conditions with Xsetup.
* Update de translation.
* Update lt translation.
* Update zh_TW translation.
* Adjust order of components in the default PATH.
* Set default input method to qtvirtualkeyboard.


Download it here.

The Qt Company Blog: Jump-Start Your Development with the Qt Starter Pack

$
0
0

If you want to impress today’s customers, you have to keep up with the slick and smooth UIs they’re used to from their smartphones and tablets. Fortunately, the Qt software framework is no slouch and can fulfill the highest product requirements for embedded and desktop solutions.

Driving the Qt technology and its road map, we’re very proud of how comprehensive the Qt framework is. However, the sheer amount of the libraries can seem a bit daunting for Qt developers, some of which are still pondering how to use them to their full potential. To help you with this challenge right out of the gate and save you time and money, we have created a new globally available service: The Qt Starter Pack.

What is The Qt Starter Pack?

The Qt Starter Pack consists of an on-site workshop with a dedicated Qt engineering specialist with additional consulting after the workshop. Our expert developers teach you how to move things forward quickly at the start of the project, reaching your project milestones and go-to-market in record time.

Sounds great coming from us, but here is what some of our customers had to say:

The Qt Starter Pack

The Qt consultants gave us initial training which really helped us kick start our project & avoid typical software development pitfalls enabling us to get to market faster.” Kristof Braem, CEO, Medec Benelux

With the support of Qt consultants we were able to leverage on their knowledge and create one of the most advanced In-Vehicle Infotainment (IVI) systems and instrument clusterson the market – from scratch.” Goran Haček, IVI development coordinator, Rimac Automobili

It was quite amazing for us to see that we were able to cut down the development time from 1000 – 1300 hrs to 50 hrs by being able to allow all developers and customers to work on the same IDE.” Rune Volden, R&D Manager, Ulstein Power & Control

Sounds interesting, tell me more!

A dedicated Qt specialist takes you on a deep dive into product design and development and sets the solution development with Qt on the right path.

Of course, we tailor the workshop to your specific needs, but here are some general topics you can expect.

  • Use cases walk-through and feasibility studies
  • Hardware evaluation and optimization best practices
  • Evaluation of different options for high-level architecture design
  • Implementation practices
  • Memory footprint configuration and optimization
  • Identification of possible risks and bottlenecks with recommendations
  • Covering your specific topics and questions

With our experience in product development, we will help you avoid common pitfalls, manage performance and memory consumption and build a solid foundation for your project.

How can I get it?

We are happy to tell you more about the Qt Starter Pack and how we can help you to succeed. Contact us to discuss how we can boost your development to the next level.

The post Jump-Start Your Development with the Qt Starter Pack appeared first on Qt Blog.

V-Play Engine: Release 2.14.2: Live Code Reloading with Native Cross-Platform Plugins

$
0
0

V-Play 2.14.0 introduced V-Play Live Code Reloading, which reduces your deployment time from minutes to seconds. V-Play 2.14.2 now adds support for using native cross-platform plugins with live code reloading.

2.14.2 also adds improvements to the SocialView components and adds improvements for Navigation components.

What is V-Play Live Code Reloading

V-Play Live reloads your project on every connected device, within seconds after code changes. This reduces the long compilation and deployment times, to only a couple of seconds. V-Play Live also allows you to run and test your applications on iOS from a Windows or Linux desktop. You don’t need to install any native SDKs for deployment with V-Play Live.

how-does-v-play-live-work-compared-with-standard-deployment

Watch this video for a quick demo of V-Play Live in action:


V-Play Live displays your app or game with the Live Client application. The desktop Live Client is part of your V-Play installation. For Android and iOS, you can download the Live Client apps in the app stores. For most projects those Live Client apps are sufficient. They have several V-Play Plugins and most of the Qt modules configured, so you can use them with V-Play Live.

Soon you will have the option to extend your own project with the live reloading feature, to build custom Live Clients. This allows you to use any custom C++ or native code together with live reloading for QML & JavaScript. This will also make it possible to use even more V-Play Plugins and features with V-Play Live.

How to Use V-Play Live

V-Play Live is super easy to use. We already covered that in our last blog post, you can read it here: How to use V-Play Live

What are V-Play Plugins

Do you want to add advertisements to your app or game? Do you want to add analytics to track and understand your audience? Do you need push notifications or other cloud services?

V-Play got you covered! With V-Play Plugins, you can add such native cross-platform plugins with just a few lines of code.


v-play-native-cross-platform-plugins


Beginning with V-Play 2.14.2, you can use many of those plugins also with V-Play Live. This helps you test a plugin without performing any extra setup steps. V-Play Live has several plugins configured already, so you can use them right away. For some plugins, this is not possible yet.

Use V-Play Plugins with V-Play Live

Here is a short video showing how to use V-Play Plugins with V-Play Live:


The following list shows which plugins you can already use with V-Play Live. There are no extra setup steps needed. For some services you will need to create an account at the service provider website. You can find the website links in the code examples below.

Access V-Play Plugins

To use V-Play Plugins in your QML code, add

import VPlayPlugins 1.0

at the top of your QML file.

Google AdMob

The AdMob plugin offers several ad formats to optimize your monetization. It features banner ads, interstitial ads and rewarded videos.

AdMobBanner {
  // this is a public test Id, you can create your own at www.google.com/ads/admob/
  adUnitId: "ca-app-pub-3940256099942544/6300978111"
}

You can test the code examples in this post like this:

import QtQuick 2.0
import VPlayApps 1.0
import VPlayPlugins 1.0

App {
  NavigationStack {
    Page {
      title: "AdMob"

      AdMobBanner {
        adUnitId: "ca-app-pub-3940256099942544/6300978111"
      }
    }
  }
}

Chartboost

Charboost is another advertisement service that offers interstitial ads. You can also use it to cross-promote your apps & games.

Chartboost {
  appId: "your App Id from www.chartboost.com"
  appSignature: "your App Signature from www.chartboost.com"
  shouldRequestInterstitialsInFirstSession: true
 
  onPluginLoaded: {
    cacheInterstitial()
  }
  onInterstitialCached: {
    chartboost.showInterstitial()
  }
  onInterstitialFailedToLoad: {
    console.debug("InterstitialFailedToLoad at location:", location, "error:", error)
  }
}

Google Analytics

Google Analytics offers in-depth analysis how users interact with your apps & games.

GoogleAnalytics {
  propertyId: "your Property Id from analytics.google.com"
  
  onPluginLoaded: {
    logEvent("V-Play Live","Test App Loaded","Test Events", 1)
  }
}

Flurry Analytics

Flurry is another popular analytics service that’s provided as V-Play Plugin. Here is a short example how to use it:

Flurry {
  id: flurry
  apiKey: "your Api Key from y.flurry.com"

  onPluginLoaded: {
    flurry.logEvent("App started");
  }
}

V-Play Game Network & Cloud Services

V-Play Game Network offers cross-platform leaderboards and achievements. You can also use an integrated cloud storage for your apps & games.

You can find more about the offered services here: V-Play Game Network & Cloud Services

V-Play Multiplayer & Social Services

V-Play Multiplayer enables you to create real-time and round-based multiplayer games. You can also use those features in your apps, and connect your users with the integrated chat system.

You can read more about the offered services here: V-Play Multiplayer & Social Services

Local Push Notifications

Schedule local notifications based on an upcoming point in time or a time interval.

This code examples schedules a notification 5 seconds after pressing the button. If you close the app, or move it to the background, the notification will be received as push notification.

NotificationManager {
  id: notificationManager
  onNotificationFired: {
    // Log output when the notification is fired. You can find the log output in the Live Server
    console.debug("Notification fired: " + notificationId)
  }
}

Notification {
  id: testNotification
  notificationId: "testNotification"
  message: "Hey there!"
  timeInterval: 5 // in seconds
}

AppButton {
  text: "Schedule Notification"
  onClicked: {
    // Cancel old notification if scheduled
    notificationManager.cancelNotification(testNotification.notificationId)
    // Schedule testNotification
    notificationManager.scheduleNotification(testNotification)
  }
}

More Plugins

You can find the full list of V-Play Plugins here: V-Play Plugins

The following plugins will have no or limited functionality with V-Play Live at the moment: In-App purchases, Facebook, Google Firebase, Game Center, Google Cloud Messaging, OneSignal, HockeyApp.

Of course, you can still use those plugins with standard local deployment, as used to. Nothing changes for your existing projects.

SocialView Improvements

This update brings many new features for the SocialView. For example, you can now search users and start new chats with the newMessagePage. It is even possible to create a custom user search with the SocialUserSearchPage base type.

business-meet-and-chat

For a guide how to best use the SocialView in your projects, please see How to Add a Messenger or Leaderboard to your Mobile App.

Navigation Fix

The update also brings a fix for triggering NavigationItem signals like onSelected.

Changelog

For a full list of improvements and fixes to V-Play in this update, please check out the change log!


How to Update V-Play

Test out these new features by following these steps:

  • Open the V-Play SDK Maintenance Tool in your V-Play SDK directory.
  • Choose “Update components” and finish the update process to get this release as described in the V-Play Update Guide.

V-Play Update in Maintenance Tool

If you haven’t installed V-Play yet, you can do so now with the latest installer from here. Now you can explore all of the new features included in this release!


More Posts Like This

v-play-2-14-1-live-reloading-windows-mac-linux-ios-android-qt

Release 2.14.1: Update to Qt 5.9.3 | Use Live Code Reloading on macOS and Linux

v-play-live-reloading-windows-mac-linux-ios-android-qt

Release 2.14.0: Live Code Reloading for Desktop, iOS & Android


feature

How to Make Cross-Platform Mobile Apps with Qt – V-Play Apps

The post Release 2.14.2: Live Code Reloading with Native Cross-Platform Plugins appeared first on V-Play Engine.

V-Play Engine: How to Add a Messenger or Leaderboard to your Mobile App

$
0
0

Custom social features in your app boost retention and engagement rates. Many successful apps allow users to interact, compete or build social relationships. This is because social features are one of the key drivers to build up your user base.

Using Social Services is Easy!

… at least with the SocialView, which includes many ready-made social features. This makes it easy for you to create apps with e.g. user profiles, leaderboards or a messaging and friend system. This year’s conference management app for the Qt World Summit 2017 uses these services and allows you to:

  • Search conference attendees to schedule Business Meetings.
  • Store custom user data like the company, job position or main Qt interest.
  • View user details and find conference attendees that match certain criterias.
  • Log in via Facebook to synchronize your data across devices.
  • Become friends and get in touch with the included messenger.
  • See a leaderboard with a ranking of users that favor many talks and are active.

business-meet-and-chat

You can have a look and try out the features by downloading the app for iOS or Android:

App StoreGoogle_Play_Badge-1

A cloud-based backend and easy-to-use client QML components are the core of all these features. The SocialView type integrates the available cloud services so you can use them in your app. Among many other features it includes:

  • User Profiles and Authentication: Each user registers with the social services as soon as he first opens your app. No registration required.
  • Social Leaderboards: You can let players compare against each other in a competitive way, keeping them playing.
  • Fully Customizable UI: With the strength of QML you can customize all views to your app and give an extra-polished look.
  • Integrated Cloud Storage: Store project-specific data for your users in the cloud.
  • Friend System: Add your friends or make new friends with other users you meet in-app.
  • In-App Messenger & Push Notifications: You can chat with your friends, even if they’re not online. This makes it easy for your users to get in touch. They also receive Push Notifications for each incoming message.
  • Facebook Login & Account Synchronization: You can allow users to log-in with Facebook. This enables them to synchronize their profile and progress across devices.
  • Native Look and Feel: The view provides a native style and user experience on both iOS and Android.
  • Fully Cross-Platform: All features work cross-platform, so your iOS users can also connect or play with Android users.

mobile-chat

To see how to add such services, have a look at the Qt World Summit 2017 app. It shows how to use the SocialView and enriches it with custom features. The full updated source code is available for you on GitHub.

How to Add User Profiles or a Messenger with the SocialView

The SocialView offers a flexible usage for both games and apps. You can add user profiles, leaderboards or the messaging and friend system to any project.

Use the SocialView Standalone

The view contains several pages that each cover a certain use-case:

  • profilePage– shows the user profile a GameNetworkUser
  • leaderboardPage– shows the highscores for a certain leaderboard and time frame
  • inboxPage– shows the active chats of the currently logged-in user
  • chatPage– shows a chat of the logged-in user with another user
  • newMessagePage– shows a user search and allows to start a chat

If not specified otherwise, it shows the user profile of the logged-in user by default. This is how a minimum example setup for a full-featured SocialView integration looks like in QML:

import VPlay 2.0

GameWindow {
 VPlayGameNetwork {
   id: gameNetwork
   gameId: 285
   secret: "AmazinglySecureGameSecret"
   multiplayerItem: multiplayer
 }

 VPlayMultiplayer {
   id: multiplayer
   appKey: "dd7f1761-038c-4722-9f94-812d798cecfb"
   pushKey: "a4780578-5aad-4590-acbe-057c232913b5"
   gameNetworkItem: gameNetwork
 }

 SocialView {
   id: socialview
   gameNetworkItem: gameNetwork
   multiplayerItem: multiplayer
 }
}

No extra code needed. The view also is a full-featured NavigationStack type by itself. So you can configure the initialPage or e.g. push the default leaderboard with simple call to:

socialView.push(socialView.leaderboardPage)

This is the perfect way for integrating the view to V-Play Games.

Add SocialView Pages to your App Navigation

The SocialView contains several individual social pages. They are independent pages, but linked to the SocialView behind the scenes. Each page can work with any NavigationStack layout you might use in your existing V-Play App.

The following code snippet creates an app with two separate navigation tabs. One for the user profile, and one for showing the inbox of the friend and messaging service:

import VPlay 2.0
import VPlayApps 1.0

App {

 VPlayGameNetwork {
   id: gameNetwork
   gameId: 285
   secret: "AmazinglySecureGameSecret"
   multiplayerItem: multiplayer
 }

 VPlayMultiplayer {
   id: multiplayer
   appKey: "dd7f1761-038c-4722-9f94-812d798cecfb"
   pushKey: "a4780578-5aad-4590-acbe-057c232913b5"
   gameNetworkItem: gameNetwork
 }

 SocialView {
   id: socialView
   gameNetworkItem: gameNetwork
   multiplayerItem: multiplayer
   visible: false // hide social view, as we show the pages on custom NavigationStacks instead
 }

 // main navigation
 Navigation {

   // first navigation item: Profile
   NavigationItem {
     title: "Profile"
     icon: IconType.user

     NavigationStack {
       initialPage: socialView.profilePage
     }
   }

   // second navigation item: Messenger Inbox
   NavigationItem {
     title: "Messenger"
     icon: IconType.comment

     NavigationStack {
       initialPage: socialView.inboxPage
     }
   }
 }
}

This already shows the flexible usage possibilities of the new view. The approach in the above example works with the page properties of the SocialView. This is the fastest way for adding e.g. the own user profile or the default leaderboard to your app navigation.

You can also show a different user profile or leaderboard. The SocialView provides functions that let you pass your desired settings. For example, the following call displays the profile of a certain user:

socialView.pushProfilePage(gameNetworkUser, targetNavigationStack)

The function also allows to specify the target NavigationStack for adding the page. Similar functions exist for all available SocialView pages. So you can integrate the social pages anywhere in your app!

Customize the Features and Look of your Social Services

Each project is different and has its own unique style. To add your own style to the view, there are several customization options you can use. They allow to:

  • Match the view colors and fonts with your project style.
  • Enrich the UI with custom elements and features.
  • Introduce completely new social pages.

The V-Play Apps types build the core of the customizable SocialView UI. This means, it also comes with a native look and feel for Android and iOS and e.g. offers a native back navigation.

Change the View Colors and Fonts

The SocialView offers several properties for the general look of all social pages. It is possible to customize used fonts and colors to match your project style with a few lines of code.

The view tint matches the configured color of your app theme by default. No further adjustments needed if this is the color of your choice for the social pages.

The following example disables the user country feature and sets an orange tint. It also switches to the configured theme font instead of the default social view font:

SocialView {
   gameNetworkItem: gameNetwork
   multiplayerItem: multiplayer

   // custom styling
   tintColor: "orange"
   tintLightColor: Qt.lighter(tintColor, 1.2)
   countryCodeEnabled: false
   bodyFontName: Theme.normalFont.name
   headerFontName: Theme.normalFont.name
 }

Add Custom UI Elements with Delegates

The V-Play Game Network service allows to store project-specific data of your users. In your app, this data is available with the customData property. The Qt World Summit app also sets this field to store personal information, e.g. the Qt interest, on the profile page.

profile-custom-views

But how can you display the UI for editing or showing this information in the user profile?

The SocialUserDelegate type lets you provide the full QML code of such additions. It is set up to represent a single GameNetworkUser, which the view displays in the social pages.

Let’s say you allow users to enter a custom description text somewhere in your app, which you store as custom data. This simple code snippet allows you to display the description in the user profile:

SocialView {
   id: socialView
   gameNetworkItem: gameNetwork
   multiplayerItem: multiplayer

   // show custom user data in profile
   profileUserDelegate: SocialUserDelegate {
     AppText {
       text: gameNetworkUser.customData 

       x: dp(Theme.navigationBar.defaultBarItemPadding) // add indent / padding
       width: parent.width-x
       font.pixelSize: sp(14)
       wrapMode: AppText.WrapAtWordBoundaryOrAnywhere

       // add social view style to text
       font.family: socialViewItem.bodyFontName
       color: socialViewItem.bodyColor
     }
   }
 }

That is all you need! The new custom text now shows up in the user profile page:

Extend the profile page with a custom delegate.

The above example uses the profile user delegate, which is not set to a specific item by default.
Other delegates for e.g. the leaderboard and inbox page are already predefined. Each delegate item represents a single user of the displayed list in this case.

To customize these user lists, you can overwrite the used delegates. This example replaces each score entry of the leaderboard with a custom QML item:

SocialView {
   id: socialView
   gameNetworkItem: gameNetwork
   multiplayerItem: multiplayer

   leaderboardUserDelegate: SocialUserDelegate {
     height: col.height

     // show user name and score below each other
     Column {
       id: col
       anchors.centerIn: parent
       AppText {
         anchors.horizontalCenter: parent.horizontalCenter // center name horizontally
         text: gameNetworkUser.name
       }
       AppText {
         anchors.horizontalCenter: parent.horizontalCenter // center score horizontally

          // it is possible to access each response entry of the related API request using modelData
         text: "Score: " + modelData.value
       }
     }
   }
 }

The new social delegate system is the perfect way to customize the social pages to your liking! But that is not all, you can even throw in completely custom social pages.

How to Create New Social Pages

The ability to add your own delegates also opens another possibility. You can extend the view with custom social pages, which extend the new SocialPage base type. It works together with SocialView to:

  • Offer quick access to the Game Network and Multiplayer features.
  • Show a loading indicator in the navigation bar. Your users will see that there’s a loading process going on whenever there are pending API requests.
  • Apply the configured SocialView styling like the view tint color or body font.

Let’s upgrade the profile page and add a button. It will take us to a new social page, where we show the custom data of the user:

SocialView {
   id: socialView
   gameNetworkItem: gameNetwork
   multiplayerItem: multiplayer

   profileUserDelegate: SocialUserDelegate {
     id: userDelegate
     SocialViewButton {
       anchors.horizontalCenter: parent.horizontalCenter
       text: "Show User Details"
       onClicked: {
         // show custom social page and pass gameNetworkUser
         parentPage.navigationStack.push(userDetailPage, { gameNetworkUser: userDelegate.gameNetworkUser  })
       }
     }
   }
 }

Component {
   id: userDetailPage
   SocialPage {
     // add a property for the user we want to show on the page
     property GameNetworkUser gameNetworkUser: null

     // show custom data
     AppText {
       text: gameNetworkUser.customData

       x: dp(Theme.navigationBar.defaultBarItemPadding) // add indent/padding
       width: parent.width-x
       font.pixelSize: sp(14)
       wrapMode: AppText.WrapAtWordBoundaryOrAnywhere

       // add social view style to text
       font.family: socialViewItem.bodyFontName
       color: socialViewItem.bodyColor
     }
   }
 }

This addition uses the profileUserDelegate to extend the profile page. It adds a button, which takes us to a new custom social page:

Add buttons to integrate custom social pages.

That page only shows the plain string text value of customData. But of course you could do much more. The following example extends the above code to allow saving the favorite song and food for each user. The userDetailPage now shows input fields to edit and store the data for the logged-in user. When viewing the profiles of other users, it just displays the stored values:

import VPlay 2.0
import VPlayApps 1.0
import QtQuick 2.9

App {
 VPlayGameNetwork {
   id: gameNetwork
   gameId: 285
   secret: "AmazinglySecureGameSecret"
   multiplayerItem: multiplayer
 }

 VPlayMultiplayer {
   id: multiplayer
   appKey: "dd7f1761-038c-4722-9f94-812d798cecfb"
   pushKey: "a4780578-5aad-4590-acbe-057c232913b5"
   gameNetworkItem: gameNetwork
 }


 SocialView {
   id: socialView
   gameNetworkItem: gameNetwork
   multiplayerItem: multiplayer

   profileUserDelegate: SocialUserDelegate {
     id: userDelegate
     SocialViewButton {
       anchors.horizontalCenter: parent.horizontalCenter
       text: "Show User Details"
       onClicked: {
         // show custom social page and pass gameNetworkUser
         parentPage.navigationStack.push(userDetailPage, { gameNetworkUser: userDelegate.gameNetworkUser  })
       }
     }
   }
 }

 Component {
   id: userDetailPage
   SocialPage {
     title: "User Details"
     // add a property for the user we want to show on the page
     property GameNetworkUser gameNetworkUser: null

     // parse the JSON data stored in customData property, if it is set
     property var userCustomData: !!gameNetworkUser && !!gameNetworkUser.customData ? JSON.parse(gameNetworkUser.customData) : {}

     // for logged-in user, allow editing the custom fields
     Column {
       x: dp(Theme.navigationBar.defaultBarItemPadding) // add indent
       y: x // padding top
       width: parent.width-x
       spacing: x
       visible: gameNetworkUser.userId === gameNetworkItem.user.userId // only show if profile of logged-in user

       AppText {
         text: "Edit the fields below to set your details."
       }
       AppTextField {
         id: songInput
         text: !!userCustomData.song ? userCustomData.song : ""
         placeholderText: "Enter your favorite song."
       }
       AppTextField {
         id: foodInput
         text: !!userCustomData.food ? userCustomData.food : ""
         placeholderText: "Enter your favorite food."
       }
       SocialViewButton {
         text: "Save"
         onClicked: {
           var customData = JSON.stringify({ "song": songInput.text, "food": foodInput.text })
           gameNetworkItem.updateUserCustomData(customData)
         }
       }
     }

     // for other users, show data of custom fields
     Column {
       x: dp(Theme.navigationBar.defaultBarItemPadding) // add indent
       y: x // padding top
       width: parent.width-x
       spacing: x
       visible: gameNetworkUser.userId !== gameNetworkItem.user.userId // only show if profile of other user

       AppText {
         text: "Favorite Song: "+(!!userCustomData.song ? userCustomData.song : "")
       }
       AppText {
         text: "Favorite Food: "+(!!userCustomData.song ? userCustomData.food : "")
       }
     }
   }
 }
}


The detail page now allows to enter and store the custom data:
The final userDetailPage allows to enter your favorite song and food.

You can see all customization features in action with the Qt World Summit 2017 app on GitHub:

GitHub - Qt World Summit 2017 app

Now it is up to you to add customized social features to your apps – the SocialView is definitely the right tool for it!


More Posts Like This


Release 2.14.1: Update to Qt 5.9.3 | Use Live Code Reloading on macOS and Linux
V-Play Update 2.12.1: Qt Quick Designer Improvements

How to Make Cross-Platform Mobile Apps with Qt – V-Play Apps

How to Make a Qt app

The post How to Add a Messenger or Leaderboard to your Mobile App appeared first on V-Play Engine.

tHeBloG: Qt 5.10 QML Shape testing

$
0
0

When implementing component into QtQuick UI which needs something more than rectangles, images and texts, pure declarative QML hasn't been enough. Popular choices to use for items with some sort of vector drawing are QML Canvas, QQuickPaintedItem or QNanoPainter.

But with Qt 5.10 there will be supports for new Shape element with paths that contain lines, quads, arcs etc. so I decided to install Qt 5.10 beta3 and implement all tests of "qnanopainter_vs_qpainter_demo" with also QML + Shape elements. (This kinda makes it "qnanopainter_vs_qpainter_vs_qmlshape_demo" but not renaming now). So here is in all glory the same UI implemented with QNanoPainter (left), QQuickPaintedItem (center), and QML+Shape (right):


Hard to spot the differences right? If only there would be a way to prove this, some way to x-ray into these UIs... like QSG_VISUALIZE=overdraw to visualize what Qt Quick Scene Graph Renderer sees?


Here you can see that scene graph sees QNanoPainter and QQuickPaintedItem as just big unknown rectangles, while QML+Shape it sees into as that is composed of native scene graph nodes. But proof is in the pudding as they say, what looks the same doesn't perform the same. Here's a video showing all 3 running with two different Android devices:


As different rendering components can be enabled/disabled and settings changed, this demo is quite nice for doing performance comparisons of both exact drawing methods or combining all methods. But those will have to wait for another blog post and for non-beta Qt 5.10 to get fair results. In the mean time, feel free to pull latest sources from github, test yourself and provide patches or comments!

V-Play Engine: How to Add a Messenger or Leaderboard to your Mobile App

$
0
0

Many successful apps allow users to interact, compete or build social relationships. Features like an in-app messenger, a friend system or leaderboards help to increase app retention and engagement rates. This applies for games as well as apps. The SocialView makes it easy to add such features. It takes advantage of ready-made services and also offers e.g. user profiles & authentication, cloud storage, an in-app chat and much more. If you think this sounds complex don’t worry: This post shows you how to add such features without a hassle.

Using Social Services is Easy!

… at least with the SocialView, which includes many ready-made social features. This makes it easy for you to create apps with e.g. user profiles, leaderboards or a messaging and friend system. For example, this year’s conference management app for the Qt World Summit 2017 uses these services and allows you to:

  • Search conference attendees to schedule Business Meetings.
  • Store custom user data like the company, job position or main Qt interest.
  • View user details and find conference attendees that match certain criterias.
  • Log in via Facebook to synchronize your data across devices.
  • Become friends and get in touch with the included messenger.
  • See a leaderboard with a ranking of users that favor many talks and are active.

business-meet-and-chat

You can have a look and try out the features by downloading the app for iOS or Android:

App StoreGoogle_Play_Badge-1

This is already a rich feature set, but there is much more you can do. The SocialView is extensible and allows to customize all features!

A cloud-based backend and easy-to-use client QML components build the core of the view. The SocialView integrates these cloud services so you can use them in your app. Among many other features, the SocialView services include:

  • User Profiles and Authentication: Each user registers with the social services as soon as he first opens your app. No registration required.
  • Social Leaderboards: You can let players compare against each other in a competitive way, keeping them playing.
  • Fully Customizable UI: With the strength of QML you can customize all views to your app and give an extra-polished look.
  • Integrated Cloud Storage: Store project-specific data for your users in the cloud.
  • Friend System: Add your friends or make new friends with other users you meet in-app.
  • In-App Messenger & Push Notifications: You can chat with your friends, even if they’re not online. This makes it easy for your users to get in touch. They also receive Push Notifications for each incoming message.
  • Facebook Login & Account Synchronization: You can allow users to log-in with Facebook. This enables them to synchronize their profile and progress across devices.
  • Native Look and Feel: The view provides a native style and user experience on both iOS and Android.
  • Fully Cross-Platform: All features work cross-platform, so your iOS users can also connect or play with Android users.

mobile-chat

To see how to add such services, have a look at the Qt World Summit 2017 app. It shows how to use the SocialView and enriches it with custom features. The full updated source code is available for you on GitHub.

How to Add User Profiles or a Messenger with the SocialView

The SocialView offers a flexible usage for both games and apps. You can add user profiles, leaderboards or the messaging and friend system to any project.

Use the SocialView Standalone

The view contains several pages that each cover a certain use-case:

  • profilePage– shows the user profile a GameNetworkUser
  • leaderboardPage– shows the highscores for a certain leaderboard and time frame
  • inboxPage– shows the active chats of the currently logged-in user
  • chatPage– shows a chat of the logged-in user with another user
  • newMessagePage– shows a user search and allows to start a chat

If not specified otherwise, it shows the user profile of the logged-in user by default. This is how a minimum example setup for a full-featured SocialView integration looks like in QML:

import VPlay 2.0

GameWindow {
 VPlayGameNetwork {
   id: gameNetwork
   gameId: 285
   secret: "AmazinglySecureGameSecret"
   multiplayerItem: multiplayer
 }

 VPlayMultiplayer {
   id: multiplayer
   appKey: "dd7f1761-038c-4722-9f94-812d798cecfb"
   pushKey: "a4780578-5aad-4590-acbe-057c232913b5"
   gameNetworkItem: gameNetwork
 }

 SocialView {
   id: socialview
   gameNetworkItem: gameNetwork
   multiplayerItem: multiplayer
 }
}

No extra code needed. The view also is a full-featured NavigationStack type by itself. So you can configure the initialPage or e.g. push the default leaderboard with simple call to:

socialView.push(socialView.leaderboardPage)

This is the perfect way for integrating the view to V-Play Games.

Add SocialView Pages to your App Navigation

The SocialView contains several individual social pages. They are independent pages, but linked to the SocialView behind the scenes. Each page can work with any NavigationStack layout you might use in your existing V-Play App.

The following code snippet creates an app with two separate navigation tabs. One for the user profile, and one for showing the inbox of the friend and messaging service:

import VPlay 2.0
import VPlayApps 1.0

App {

 VPlayGameNetwork {
   id: gameNetwork
   gameId: 285
   secret: "AmazinglySecureGameSecret"
   multiplayerItem: multiplayer
 }

 VPlayMultiplayer {
   id: multiplayer
   appKey: "dd7f1761-038c-4722-9f94-812d798cecfb"
   pushKey: "a4780578-5aad-4590-acbe-057c232913b5"
   gameNetworkItem: gameNetwork
 }

 SocialView {
   id: socialView
   gameNetworkItem: gameNetwork
   multiplayerItem: multiplayer
   visible: false // hide social view, as we show the pages on custom NavigationStacks instead
 }

 // main navigation
 Navigation {

   // first navigation item: Profile
   NavigationItem {
     title: "Profile"
     icon: IconType.user

     NavigationStack {
       initialPage: socialView.profilePage
     }
   }

   // second navigation item: Messenger Inbox
   NavigationItem {
     title: "Messenger"
     icon: IconType.comment

     NavigationStack {
       initialPage: socialView.inboxPage
     }
   }
 }
}

This already shows the flexible usage possibilities of the new view. The approach in the above example works with the page properties of the SocialView. This is the fastest way for adding e.g. the own user profile or the default leaderboard to your app navigation.

You can also show a different user profile or leaderboard. The SocialView provides functions that let you pass your desired settings. For example, the following call displays the profile of a certain user:

socialView.pushProfilePage(gameNetworkUser, targetNavigationStack)

The function also allows to specify the target NavigationStack for adding the page. Similar functions exist for all available SocialView pages. So you can integrate the social pages anywhere in your app!

Customize the Features and Look of your Social Services

Each project is different and has its own unique style. To add your own style to the view, there are several customization options you can use. They allow to:

  • Match the view colors and fonts with your project style.
  • Enrich the UI with custom elements and features.
  • Introduce completely new social pages.

The V-Play Apps types build the core of the customizable SocialView UI. This means, it also comes with a native look and feel for Android and iOS and e.g. offers a native back navigation.

Change the View Colors and Fonts

The SocialView offers several properties for the general look of all social pages. It is possible to customize used fonts and colors to match your project style with a few lines of code.

The view tint matches the configured color of your app theme by default. No further adjustments needed if this is the color of your choice for the social pages.

The following example disables the user country feature and sets an orange tint. It also switches to the configured theme font instead of the default social view font:

SocialView {
   gameNetworkItem: gameNetwork
   multiplayerItem: multiplayer

   // custom styling
   tintColor: "orange"
   tintLightColor: Qt.lighter(tintColor, 1.2)
   countryCodeEnabled: false
   bodyFontName: Theme.normalFont.name
   headerFontName: Theme.normalFont.name
 }

Add Custom UI Elements with Delegates

The V-Play Game Network service allows to store project-specific data of your users. In your app, this data is available with the customData property. The Qt World Summit app also sets this field to store personal information, e.g. the Qt interest, on the profile page.

profile-custom-views

But how can you display the UI for editing or showing this information in the user profile?

The SocialUserDelegate type lets you provide the full QML code of such additions. It is set up to represent a single GameNetworkUser, which the view displays in the social pages.

Let’s say you allow users to enter a custom description text somewhere in your app, which you store as custom data. This simple code snippet allows you to display the description in the user profile:

SocialView {
   id: socialView
   gameNetworkItem: gameNetwork
   multiplayerItem: multiplayer

   // show custom user data in profile
   profileUserDelegate: SocialUserDelegate {
     AppText {
       text: gameNetworkUser.customData 

       x: dp(Theme.navigationBar.defaultBarItemPadding) // add indent / padding
       width: parent.width-x
       font.pixelSize: sp(14)
       wrapMode: AppText.WrapAtWordBoundaryOrAnywhere

       // add social view style to text
       font.family: socialViewItem.bodyFontName
       color: socialViewItem.bodyColor
     }
   }
 }

That is all you need! The new custom text now shows up in the user profile page:

Extend the profile page with a custom delegate.

The above example uses the profile user delegate, which is not set to a specific item by default.
Other delegates for e.g. the leaderboard and inbox page are already predefined. Each delegate item represents a single user of the displayed list in this case.

To customize these user lists, you can overwrite the used delegates. This example replaces each score entry of the leaderboard with a custom QML item:

SocialView {
   id: socialView
   gameNetworkItem: gameNetwork
   multiplayerItem: multiplayer

   leaderboardUserDelegate: SocialUserDelegate {
     height: col.height

     // show user name and score below each other
     Column {
       id: col
       anchors.centerIn: parent
       AppText {
         anchors.horizontalCenter: parent.horizontalCenter // center name horizontally
         text: gameNetworkUser.name
       }
       AppText {
         anchors.horizontalCenter: parent.horizontalCenter // center score horizontally

          // it is possible to access each response entry of the related API request using modelData
         text: "Score: " + modelData.value
       }
     }
   }
 }

The new social delegate system is the perfect way to customize the social pages to your liking! But that is not all, you can even throw in completely custom social pages.

How to Create New Social Pages

The ability to add your own delegates also opens another possibility. You can extend the view with custom social pages, which extend the new SocialPage base type. It works together with SocialView to:

  • Offer quick access to the Game Network and Multiplayer features.
  • Show a loading indicator in the navigation bar. Your users will see that there’s a loading process going on whenever there are pending API requests.
  • Apply the configured SocialView styling like the view tint color or body font.

Let’s upgrade the profile page and add a button. It will take us to a new social page, where we show the custom data of the user:

SocialView {
   id: socialView
   gameNetworkItem: gameNetwork
   multiplayerItem: multiplayer

   profileUserDelegate: SocialUserDelegate {
     id: userDelegate
     SocialViewButton {
       anchors.horizontalCenter: parent.horizontalCenter
       text: "Show User Details"
       onClicked: {
         // show custom social page and pass gameNetworkUser
         parentPage.navigationStack.push(userDetailPage, { gameNetworkUser: userDelegate.gameNetworkUser  })
       }
     }
   }
 }

Component {
   id: userDetailPage
   SocialPage {
     // add a property for the user we want to show on the page
     property GameNetworkUser gameNetworkUser: null

     // show custom data
     AppText {
       text: gameNetworkUser.customData

       x: dp(Theme.navigationBar.defaultBarItemPadding) // add indent/padding
       width: parent.width-x
       font.pixelSize: sp(14)
       wrapMode: AppText.WrapAtWordBoundaryOrAnywhere

       // add social view style to text
       font.family: socialViewItem.bodyFontName
       color: socialViewItem.bodyColor
     }
   }
 }

This addition uses the profileUserDelegate to extend the profile page. It adds a button, which takes us to a new custom social page:

Add buttons to integrate custom social pages.

That page only shows the plain string text value of customData. But of course you could do much more. The following example extends the above code to allow saving the favorite song and food for each user. The userDetailPage now shows input fields to edit and store the data for the logged-in user. When viewing the profiles of other users, it just displays the stored values:

import VPlay 2.0
import VPlayApps 1.0
import QtQuick 2.9

App {
 VPlayGameNetwork {
   id: gameNetwork
   gameId: 285
   secret: "AmazinglySecureGameSecret"
   multiplayerItem: multiplayer
 }

 VPlayMultiplayer {
   id: multiplayer
   appKey: "dd7f1761-038c-4722-9f94-812d798cecfb"
   pushKey: "a4780578-5aad-4590-acbe-057c232913b5"
   gameNetworkItem: gameNetwork
 }


 SocialView {
   id: socialView
   gameNetworkItem: gameNetwork
   multiplayerItem: multiplayer

   profileUserDelegate: SocialUserDelegate {
     id: userDelegate
     SocialViewButton {
       anchors.horizontalCenter: parent.horizontalCenter
       text: "Show User Details"
       onClicked: {
         // show custom social page and pass gameNetworkUser
         parentPage.navigationStack.push(userDetailPage, { gameNetworkUser: userDelegate.gameNetworkUser  })
       }
     }
   }
 }

 Component {
   id: userDetailPage
   SocialPage {
     title: "User Details"
     // add a property for the user we want to show on the page
     property GameNetworkUser gameNetworkUser: null

     // parse the JSON data stored in customData property, if it is set
     property var userCustomData: !!gameNetworkUser && !!gameNetworkUser.customData ? JSON.parse(gameNetworkUser.customData) : {}

     // for logged-in user, allow editing the custom fields
     Column {
       x: dp(Theme.navigationBar.defaultBarItemPadding) // add indent
       y: x // padding top
       width: parent.width-x
       spacing: x
       visible: gameNetworkUser.userId === gameNetworkItem.user.userId // only show if profile of logged-in user

       AppText {
         text: "Edit the fields below to set your details."
       }
       AppTextField {
         id: songInput
         text: !!userCustomData.song ? userCustomData.song : ""
         placeholderText: "Enter your favorite song."
       }
       AppTextField {
         id: foodInput
         text: !!userCustomData.food ? userCustomData.food : ""
         placeholderText: "Enter your favorite food."
       }
       SocialViewButton {
         text: "Save"
         onClicked: {
           var customData = JSON.stringify({ "song": songInput.text, "food": foodInput.text })
           gameNetworkItem.updateUserCustomData(customData)
         }
       }
     }

     // for other users, show data of custom fields
     Column {
       x: dp(Theme.navigationBar.defaultBarItemPadding) // add indent
       y: x // padding top
       width: parent.width-x
       spacing: x
       visible: gameNetworkUser.userId !== gameNetworkItem.user.userId // only show if profile of other user

       AppText {
         text: "Favorite Song: "+(!!userCustomData.song ? userCustomData.song : "")
       }
       AppText {
         text: "Favorite Food: "+(!!userCustomData.food ? userCustomData.food : "")
       }
     }
   }
 }
}


The detail page now allows to enter and store the custom data:
The final userDetailPage allows to enter your favorite song and food.

You can see all customization features in action with the Qt World Summit 2017 app on GitHub:

GitHub - Qt World Summit 2017 app

Now it is up to you to add customized social features to your apps – the SocialView is definitely the right tool for it!


More Posts Like This


Release 2.14.1: Update to Qt 5.9.3 | Use Live Code Reloading on macOS and Linux
V-Play Update 2.12.1: Qt Quick Designer Improvements

How to Make Cross-Platform Mobile Apps with Qt – V-Play Apps

How to Make a Qt app

The post How to Add a Messenger or Leaderboard to your Mobile App appeared first on V-Play Engine.


V-Play Engine: Release 2.14.2: Live Code Reloading with Native Cross-Platform Plugins

$
0
0

V-Play 2.14.0 introduced V-Play Live Code Reloading, which reduces your deployment time from minutes to seconds. V-Play 2.14.2 now adds support for using native cross-platform plugins with live code reloading.

2.14.2 also adds improvements to the SocialView components and adds improvements for Navigation components.

What is V-Play Live Code Reloading

V-Play Live reloads your project on every connected device, within seconds after code changes. This reduces the long compilation and deployment times, to only a couple of seconds. V-Play Live also allows you to run and test your applications on iOS from a Windows or Linux desktop. You don’t need to install any native SDKs for deployment with V-Play Live.

how-does-v-play-live-work-compared-with-standard-deployment

Watch this video for a quick demo of V-Play Live in action:


V-Play Live displays your app or game with the Live Client application. The desktop Live Client is part of your V-Play installation. For Android and iOS, you can download the Live Client apps in the app stores. For most projects those Live Client apps are sufficient. They have several V-Play Plugins and most of the Qt modules configured, so you can use them with V-Play Live.

Soon you will have the option to extend your own project with the live reloading feature, to build custom Live Clients. This allows you to use any custom C++ or native code together with live reloading for QML & JavaScript. This will also make it possible to use even more V-Play Plugins and features with V-Play Live.

How to Use V-Play Live

V-Play Live is super easy to use. We already covered that in our last blog post, you can read it here: How to use V-Play Live

What are V-Play Plugins

Do you want to add advertisements to your app or game? Do you want to add analytics to track and understand your audience? Do you need push notifications or other cloud services?

V-Play got you covered! With V-Play Plugins, you can add such native cross-platform plugins with just a few lines of code.


v-play-native-cross-platform-plugins


Beginning with V-Play 2.14.2, you can use many of those plugins also with V-Play Live. This helps you test a plugin without performing any extra setup steps. V-Play Live has several plugins configured already, so you can use them right away. For some plugins, this is not possible yet.

Use V-Play Plugins with V-Play Live

Here is a short video showing how to use V-Play Plugins with V-Play Live:


The following list shows which plugins you can already use with V-Play Live. There are no extra setup steps needed. For some services you will need to create an account at the service provider website. You can find the website links in the code examples below.

Access V-Play Plugins

To use V-Play Plugins in your QML code, add

import VPlayPlugins 1.0

at the top of your QML file.

Google AdMob

The AdMob plugin offers several ad formats to optimize your monetization. It features banner ads, interstitial ads and rewarded videos.

AdMobBanner {
  // this is a public test Id, you can create your own at www.google.com/ads/admob/
  adUnitId: "ca-app-pub-3940256099942544/6300978111"
}

You can test the code examples in this post like this:

import QtQuick 2.0
import VPlayApps 1.0
import VPlayPlugins 1.0

App {
  NavigationStack {
    Page {
      title: "AdMob"

      AdMobBanner {
        adUnitId: "ca-app-pub-3940256099942544/6300978111"
      }
    }
  }
}

Chartboost

Charboost is another advertisement service that offers interstitial ads. You can also use it to cross-promote your apps & games.

Chartboost {
  appId: "your App Id from www.chartboost.com"
  appSignature: "your App Signature from www.chartboost.com"
  shouldRequestInterstitialsInFirstSession: true
 
  onPluginLoaded: {
    cacheInterstitial()
  }
  onInterstitialCached: {
    chartboost.showInterstitial()
  }
  onInterstitialFailedToLoad: {
    console.debug("InterstitialFailedToLoad at location:", location, "error:", error)
  }
}

Google Analytics

Google Analytics offers in-depth analysis how users interact with your apps & games.

GoogleAnalytics {
  propertyId: "your Property Id from analytics.google.com"
  
  onPluginLoaded: {
    logEvent("V-Play Live","Test App Loaded","Test Events", 1)
  }
}

Flurry Analytics

Flurry is another popular analytics service that’s provided as V-Play Plugin. Here is a short example how to use it:

Flurry {
  id: flurry
  apiKey: "your Api Key from y.flurry.com"

  onPluginLoaded: {
    flurry.logEvent("App started");
  }
}

V-Play Game Network & Cloud Services

V-Play Game Network offers cross-platform leaderboards and achievements. You can also use an integrated cloud storage for your apps & games.

You can find more about the offered services here: V-Play Game Network & Cloud Services

V-Play Multiplayer & Social Services

V-Play Multiplayer enables you to create real-time and round-based multiplayer games. You can also use those features in your apps, and connect your users with the integrated chat system.

You can read more about the offered services here: V-Play Multiplayer & Social Services

Local Push Notifications

Schedule local notifications based on an upcoming point in time or a time interval.

This code examples schedules a notification 5 seconds after pressing the button. If you close the app, or move it to the background, the notification will be received as push notification.

NotificationManager {
  id: notificationManager
  onNotificationFired: {
    // Log output when the notification is fired. You can find the log output in the Live Server
    console.debug("Notification fired: " + notificationId)
  }
}

Notification {
  id: testNotification
  notificationId: "testNotification"
  message: "Hey there!"
  timeInterval: 5 // in seconds
}

AppButton {
  text: "Schedule Notification"
  onClicked: {
    // Cancel old notification if scheduled
    notificationManager.cancelNotification(testNotification.notificationId)
    // Schedule testNotification
    notificationManager.scheduleNotification(testNotification)
  }
}

More Plugins

You can find the full list of V-Play Plugins here: V-Play Plugins

The following plugins will have no or limited functionality with V-Play Live at the moment: In-App purchases, Facebook, Google Firebase, Game Center, Google Cloud Messaging, OneSignal, HockeyApp.

Of course, you can still use those plugins with standard local deployment, as used to. Nothing changes for your existing projects.

SocialView Improvements

This update brings many new features for the SocialView. For example, you can now search users and start new chats with the newMessagePage. It is even possible to create a custom user search with the SocialUserSearchPage base type.

business-meet-and-chat

For a guide how to best use the SocialView in your projects, please see How to Add a Messenger or Leaderboard to your Mobile App.

Navigation Fix

The update also brings a fix for triggering NavigationItem signals like onSelected.

Changelog

For a full list of improvements and fixes to V-Play in this update, please check out the change log!


How to Update V-Play

Test out these new features by following these steps:

  • Open the V-Play SDK Maintenance Tool in your V-Play SDK directory.
  • Choose “Update components” and finish the update process to get this release as described in the V-Play Update Guide.

V-Play Update in Maintenance Tool

If you haven’t installed V-Play yet, you can do so now with the latest installer from here. Now you can explore all of the new features included in this release!


More Posts Like This

v-play-2-14-1-live-reloading-windows-mac-linux-ios-android-qt

Release 2.14.1: Update to Qt 5.9.3 | Use Live Code Reloading on macOS and Linux

v-play-live-reloading-windows-mac-linux-ios-android-qt

Release 2.14.0: Live Code Reloading for Desktop, iOS & Android


feature

How to Make Cross-Platform Mobile Apps with Qt – V-Play Apps

The post Release 2.14.2: Live Code Reloading with Native Cross-Platform Plugins appeared first on V-Play Engine.

The Qt Company Blog: Qt Creator 4.5.0 released

$
0
0

We are happy to announce the release of Qt Creator 4.5.0!

CMake Support

Variables in the configuration UI in the Projects mode are now grouped by prefix, and have type-specific editors for boolean and path values. You can also change the type of variables and unset accidentally added ones. Also, we improved the handling of configuration changes outside of Qt Creator. The change notification now shows detailed information about how the cached values  differ from the values on disk.

Android Support

Integrated Adnroid SDK package manager - Qt Creator 4.4
Since Android SDK tools version 25.3.0, there is no UI tool available to manage the Android SDK packages. Because of that, we have added such UI to Qt Creator. Unfortunately, the command line tool for managing SDKs that is provided with the SDK cannot update packages on Windows, and fails with JDK 9, so this applies to Qt Creator as well. Also, we provide better information about problems with the installed SDK, such as missing components or not met minimum version requirements.

Qt Creator no longer supports local deployment nor Ant, starting with this version. Both features have been deprecated for a long time.

Other Improvements

We started on making the File System navigation pane more useful. It is showing a file system tree now, and you can select the root directory from a list containing the “computer” root, your home directory, your default projects directory, and the base directories of all the projects you have open in Qt Creator. More features are to come in the future.

Locator now does fuzzy camel case matching in the same way as code completion does. For example, you can type “c andesu” in the locator to open the “AndroidDebugSupport” class.

On Windows, we fixed detection of Visual Studio Build Tools 2017.

For iOS, we had to fix our mechanism for switching between simulator device types with Xcode 9, because that changed the behavior of the Simulator application.

If you used Tools>External>Text>Sort Selection before, and wonder if we have removed this useful feature, I can reassure you that we have not. On the contrary, we made it a first-class citizen instead of an external tool, and moved the menu entry to Edit>Advanced>Sort Selected Lines.

This release includes many more improvements and fixes. Please, take a look at our change log for a more detailed overview.

Get Qt Creator 4.5.0

The opensource version is available on the Qt download page, and you find commercially licensed packages on the Qt Account Portal. Qt Creator 4.5.0 is also available through an update in the online installer (as an update to 4.4.1). Please post issues in our bug tracker. You can also find us on IRC on #qt-creator on chat.freenode.net, and on the Qt Creator mailing list.

The post Qt Creator 4.5.0 released appeared first on Qt Blog.

The Qt Company Blog: Qt 5.10 released

$
0
0

I’m happy to let you all know that Qt 5.10 has just been released. Qt 5.10 comes with a ton of new functionalities that I’m thrilled to talk to you about.

Before we dive into all the great new features of Qt 5.10, I want to talk to you about another exciting new addition to Qt being released today.

Qt 3D Studio

As the name suggests, Qt 3D Studio is a graphical editor used to create of 3D user interfaces and is derived from the NVIDIA Drive Design product that NVIDIA contributed to Qt earlier this year.

Qt 3D Studio consists of both a runtime component that is run in your application and a graphical design tool to design and create the UI. While the tool is a standalone application, the runtime can easily be integrated with the rest of Qt.

Qt 3D Studio will work with both Qt 5.9 and 5.10. The runtime and the 3D Studio application are both available under commercial and GPL licensing. For more details, please have a look at the separate blog post about it.

qt3dstudio_floorplan_preview

Qt Qml, Qt Quick, and Qt Quick Controls

A lot of exciting new things have happened in this area. Qt Quick has now gained a plugin that allows placing arbitrarily shaped items into the scene. Have a look at the blog post and documentation for more details.

shape_tiger

The new pointer handlers are the next big new feature in Qt Quick. This is a large step forward for Qt Quick that significantly improves how to handle many more complex multi-touch use cases. Instead of using Mouse- and TouchArea to handle those input events, you can now attach handlers for different types of pointer events to any item. Support for this is still in technology preview. Please have a look at the blog post and documentation for all the details.

On top of that, Qt Quick gained a larger amount of smaller enhancements. Chief among them the support to directly load ETC1 and ETC2 compressed textures, multisampling support for layers and some properties to tune font handling.

Qt Quick Controls 2 has also received many new functionalities. First of all, there are now two new styles available. One is an image-based style that makes it very easy to use your own artwork to create a custom look and feel. The other one, called Fusion style, gives a platform agnostic, desktop-oriented look and feel. Those styles also support propagating palettes.

Left: Imagine style - Right: Fusion style

Left: Imagine style – Right: Fusion style

We’ve also added Action, ActionGroup and MenuBar items. Outside of MenuBar, Actions are also supported in buttons, delegates, and menus. In addition, we added numerous smaller features to existing controls.

Qt Qml finally supports declaring enums in QML and dynamically retranslates all strings on language changes.

Graphics

A massive new feature in the graphics area is a new QPA plugin that allows streaming a full Qt User Interface to any WebGL enabled browser. You can find details in this blog post.

On the OpenGL side, QSurfaceFormat can now be used to request sRGB-compatible framebuffers, and the full set of the OpenGL ES 3.2 API is now available across platforms through QOpenGLExtraFunctions.

Qt 3D

Thanks to our friends at KDAB, Qt 3D has also gained a couple of new features. There are new node types that can be used in frame graphs, such as a proximity filter and a framebuffer blit. We now have support for Shader graphs that enable the creation of shaders from a graph based description, a technology preview of a skeletal animation system and a Scene2D Qt Quick element, which simplifies embedding Qt 3D content in a Qt Quick Scene.

Apart from that, the focus on Qt 3D development is now slowly shifting from developing all the required features to improving performance and memory consumption. Some of the results of that effort can be seen in the following blog post.

Qt 3D will also become much more important for Qt moving forward. We are currently working on basing the runtime for Qt 3D Studio on top of Qt 3D in order to unify the architecture for all our 3D related APIs and tools.

Qt Core and Network

Qt Core now has a brand new QStringView class, that is conceptually similar to std::string_view. For the moment, it’s still missing some const functions from QString, but that will get finalized for Qt 5.11.

Qt Core also received a new QRandomGenerator class that provides a high-quality random generator and access to seedless random numbers generated with hardware or operating system facilities. There’s now also a set of explicit big/little endian data types (qint16_le, etc), and a KeyValueIterator for our associative containers that provide STL compatible iteration semantics over those containers.

Qt Network now supports OpenSSL 1.1, stores HSTS (HTTP Strict Transport Security) policies in a persistent way in QNetworkAccessManager and has implemented the h2c protocol upgrade used by non-SSL HTTP/2.

Qt Widgets

We have added a couple of smaller features, such as QWidget::createWindowContainer() on Android, enabling QOpenGLWidget for rendering and grabbing offscreen content, adding a tabStopDistance property in QTextOption and QTextEdit and an API for better selection handling to QLineEdit. QDockWidgets can now be dropped side by side.

Additionally, a large set of bugs have been fixed in this module for Qt 5.10.

Embedded functionality

While most of the items above improve our overall offering, both for application development and device creation, we also have some items that focus on the embedded side.

The Qt Virtual Keyboard has gained support for many new languages and handwriting support for Arabic, Farsi, Chinese, Japanese and Korean.

A brand-new version of the device emulator is coming with Qt 5.10. It now supports multiple screens, multitouch and has received support for plugins. Have a look at the separate blog post for details.

On the Boot2Qt side, we updated our device images to Yocto 2.3 (Pyro), giving you a more up-to-date Linux to base your work upon.

Qt for Automation, containing the KNX and MQTT modules, is now also available in Qt 5.10.

Other modules

We updated Qt WebEngine to use Chromium 61. You can now pause and resume downloads and start them programmatically.

On Windows desktop, you can now use the UWP backend for Qt Bluetooth on Windows, and on X11, the Qt X11Extras module now allows peeking into the event queue.

Finally, Qt Network Authorization (providing support for OAuth 1 & 2) and the text-to-speech support in Qt Speech graduated from technology preview to being fully supported in 5.10.

For more details, have a look at the new features page on the wiki, our dedicated Qt 5.10 web page and our ChangeLog.

I hope you will enjoy the release, and I’d like to thank everybody who has contributed to making it happen. As always, you can get this release from your Qt Account page or our download section on the web.

The post Qt 5.10 released appeared first on Qt Blog.

The Qt Company Blog: Qbs 1.10 released

$
0
0

Qbs (pronounced “Cubes”) is The Qt Company’s latest build tool, which aims to be the replacement for qmake in the Qt build system. In addition to its use within Qt, for our customers Qbs will also provide faster build times coupled with a rich feature set in order to reduce build engineering complexity and decrease time to market.

Today I’m excited to introduce you to the latest release of Qbs – 1.10.

What’s New?

This release focuses on bug fixing and general enhancements, specifically to the Qbs language.

Language Improvements

Profiles can now be defined dynamically in a project using the new Profile language item. This is useful for when a project has specific, well-known requirements regarding the build environment and/or target platform.

Group nesting now works more naturally with respect to prefixes. If a Group does not define the prefix property, its value will be taken from the parent group (and so on until a prefix is found or the product level is reached).

Modules and file taggers may now set priority levels. This allows Qbs to disambiguate between multiple implementations of the same module whose conditions evaluate to true, or multiple file taggers that would tag the same files – essentially, a conflict resolution mechanism. Simply set the priority property of a Module or FileTagger to an integer value greater than zero. The instance with the highest value wins. For example, Qbs uses this to choose the cpp module implementation on different platforms. Because the Android implementation is a superset of the Linux implementation, both the Linux and Android implementations are available on Android, but because the latter has a higher priority level, that implementation gets chosen.

It is now possible to add file tags to generated artifacts by setting the new fileTags property in a group that has a fileTagsFilter. This allows you to “append” to the list of file tags assigned to artifacts created by a rule that is defined in a module which is outside your control.

Documentation

Another big focus of this release was enhancing the documentation (and even more significant changes in this area will come with Qbs 1.11).

To start with, we’ve added two new major pages. The first is a qmake porting guide, which contains an overview of various qmake variables and how to achieve the same functionality in Qbs. The second is a “how-to” page on how to create modules for third party libraries. We plan to have many more of these “how-to” style guides showing how to solve common build system problems with Qbs.

We also added in-depth descriptions of all command line tools and their respective options, and a man page for the qbs command line tool.

Platform Support

This release adds a few notable platform-specific features: initial support for the Universal Windows Platform, and the run command can now deploy and run Android apps on devices, and deploy and run iOS and tvOS apps on the simulator.

Qt Support

This release adds support for the Qt Quick compiler and for qmlcachegen.

Other New Features

  • The TextFile service can now append to existing files using the new TextFile.Append open mode.
  • Process and TextFile objects in rules, commands and configure scripts are now closed automatically after script execution.
  • Added the vcs module to provide VCS repository information. Git and Subversion are supported initially.
  • Added the cpufeatures module for abstracting compiler flags related to CPU features such as SSE.
  • Added property cpp.discardUnusedData abstracting linker options that strip unneeded symbols or sections.
  • Added property cpp.variantSuffix for making binary names unique when multiplexing products.
  • Added property cpp.compilerDefinesByLanguage providing the compiler’s pre-defined macros.
  • Added new command line sub-command list-products which lists the names of the products available in the project.

Try It!

The Open Source version is available on the download page, and you can find commercially licensed packages on the Qt Account Portal. Please post issues in our bug tracker. You can also find us on IRC in #qbs on chat.freenode.net, and on the mailing list. The documentation and wiki are also good places to get started.

Qbs is also available on a number of packaging systems (Chocolatey, MacPorts, Homebrew) and updated on each release by the Qbs development team. It can also be installed through the native package management system on a number of Linux distributions including but not limited to Debian, Ubuntu, and Arch Linux. An official Fedora package is in progress and should be available in a future release of Fedora.

Qbs 1.10 is also included in Qt Creator 4.5, which was also released this week.

The post Qbs 1.10 released appeared first on Qt Blog.

The Qt Company Blog: Towards an Improved Qt 3D Studio Runtime

$
0
0

Now that Qt 3D Studio 1.0 has been released, it is time to have a sneak peek at some of the upcoming developments. As outlined in the release announcement, there is work on-going to move the runtime, meaning the engine that renders and runs the scenes, on top of Qt 3D. Let’s take a closer look at this.

Overview

Scenes and Layers

Qt 3D Studio is a design tool that allows rapid development of 3D scenes, focused on, but not limited to, 3D user interfaces. Once assets like 3D models and texture maps are imported, designers create scenes by placing and transforming 3D models, applying materials, and setting up keyframe-based animations that target properties of the models, materials and layers. The concept of layers map naturally to what one may be familiar with from tools like Photoshop: each layer contains a 3D scene with its own camera. These are then composited together based on their position, size and blending settings, thus forming the final output of the rendering.

On the layer level there are multiple antialiasing techniques available, like multisampling, supersampling, progressive and temporal antialiasing. See the documentation for an overview of these.

Slides

All this is complemented by a slide system, not unlike presentation tools like Powerpoint. A slide could be thought of as a state: it defines the set of active (visible) objects, the property changes that get applied to the various scene objects, and the set of animations that start when entering the slide in question. This is complemented by the concept of the master slide, which allows defining a set of objects and animations that are present on all slides.

Materials

When the default material, that provides pixel-based lighting, directional, point and area lights, shadow mapping, screen space ambient occlusion, image-based lighting and a number of other features, is not sufficient, custom materials can be applied. These provide custom (fragment) shader code together with a set of properties that form the input to the shaders. Such properties are editable and animatable in the editor just like the built-in ones. While many custom materials will contain a single shader, they can also contain multiple ones, thus defining multiple passes that run in order, each of them further processing the results of the previous passes.

Effects

To apply effects on the content of a given layer, post-processing effects can be used. These are similar to custom materials, but take the output of the 3D rendering from a given layer as their input. Conceptually they map to the ShaderEffect items of Qt Quick but are somewhat more powerful.

Sub-presentations

While one presentation (a single .uip file) describes a single scene (albeit with multiple layers, hence it is more like a 2D composition of multiple 3D scenes), it is possible to have multiple presentations loaded and run in parallel. Here one presentation serves as the “main” one, which is the presentation that gets rendered to the screen. The others serve as sub-presentations that are first rendered offscreen, and then used as texture maps in the materials of the main scene. They can also be used as the source for one or more of the layers of the main presentation.

Building on this, Qt 3D Studio also offers interoperation with Qt Quick. This is achieved by the familiar QQuickRenderControl. This means that interactive Qt Quick scenes can be displayed inside the Qt 3D Studio scene.

This list, while already long enough, does not cover everything. See the documentation for more details.

Qt 3D Studio in action

Qt 3D Studio in action

The screenshot shows many of the facilities mentioned above:

  • The slide management pane on the left,
  • the pane on the right that displays either basic objects (that can be dragged into the scene) or the presentation and asset browser (where 3D models and texture maps are dragged and dropped in order to import assets, and then dragged into the scene or the scene browser below),
  • the bottom pane contains the scene browser (note how the example has two layers, each with its own camera, lights and models) and the timeline that is used to define and edit keyframes,
  • the bottom-right pane, showing the properties for the currently selected model, material or other object.

What’s in a Runtime?

The main editor application is complemented by the so-called runtime component, which consists of the C++ and OpenGL-based engine that renders and runs the presentations created with the editor both in the viewer application shipped with Qt 3D Studio and in any other Qt applications. The APIs provided allow integrating Qt 3D Studio scenes into Qt Quick, QWidget and QWindow-based applications, and also provide facilities for rendering completely offscreen in order to generate videos for example. The rendering APIs are complemented by a set of QML and C++ APIs that allow changing properties of the scene objects at runtime and controlling the slide and animation system. See the links to the documentation for more details.

Qt 3D Studio Viewer example

The same scene in the standalone Qt 3D Studio Viewer application

For an impression of what the APIs Qt application developers would use look like, let’s look at the source of two of the included examples. First, a straightforward pure QWindow-based application (can be found under example/studio3d/surfaceviewer):

#include 
#include 
#include 
#include 
#include 
...
int main(int argc, char *argv[])
{
    QGuiApplication app(argc, argv);

    QWindow window;

    QSize size(1200, 800);
    window.resize(size);
    window.setSurfaceType(QSurface::OpenGLSurface);
    window.setTitle(QStringLiteral("Qt 3D Studio surface viewer example"));
    window.create();

    QOpenGLContext context;
    context.setFormat(window.format());
    context.create();

    Q3DSSurfaceViewer viewer;
    viewer.presentation()->setSource(QUrl(QStringLiteral("qrc:/presentation/circling_cube.uip")));
    viewer.setUpdateInterval(0);
    viewer.settings()->setScaleMode(Q3DSViewerSettings::ScaleModeFill);
    viewer.settings()->setShowRenderStats(true);

    Q3DSSceneElement sceneElement(viewer.presentation(), QStringLiteral("Scene"));
    Q3DSElement counterElement(viewer.presentation(), QStringLiteral("Scene.Layer.Loopcounter"));

    viewer.initialize(&window, &context);

    window.show();

    int n = 0;
    QString loopCounter = QStringLiteral("Loop %1");
    QObject::connect(&sceneElement, &Q3DSSceneElement::currentSlideIndexChanged, [&]() {
        if (sceneElement.currentSlideIndex() == 1)
            n++;
        counterElement.setAttribute(QStringLiteral("textstring"), loopCounter.arg(n));
    });

    return app.exec();
}

In practice one will likely rather use the Qt Quick integration, at the core of which stands the Studio3D element. Under the hood this is built on QQuickFramebufferObject. (the snippet here is from examples/studio3d/qmldynamickeyframes).

import QtQuick 2.7
import QtStudio3D 1.0

Item {
    ...
    
    Studio3D {
        id: studio3D
        anchors.fill: parent

        // ViewerSettings item is used to specify presentation independent viewer settings.
        ViewerSettings {
            scaleMode: ViewerSettings.ScaleModeFill
            showRenderStats: false
        }

        // Presentation item is used to control the presentation.
        Presentation {
            source: "qrc:/presentation/dyn_key.uip"

            // SceneElement item is used to listen for slide changes of a scene in the presentation.
            // You can also change the slides via its properties.
            SceneElement {
                id: scene
                elementPath: "Scene"
                onCurrentSlideIndexChanged: {
                    console.log("Current slide : " + currentSlideIndex + " ("
                                + currentSlideName + ")");
                }
                onPreviousSlideIndexChanged: {
                    console.log("Previous slide: " + previousSlideIndex + " ("
                                + previousSlideName + ")");
                }
            }

            // Element item is used to change element attributes
            Element {
                id: materialElement
                elementPath: "Scene.Layer.Sphere.Material"
            }

            property int desiredSlideIndex: 1
            property int colorIndex: 0
            property var colorArray: [
                [1.0, 1.0, 1.0],
                [1.0, 0.0, 0.0],
                [0.0, 1.0, 0.0],
                [0.0, 0.0, 1.0],
                [0.0, 1.0, 1.0],
                [1.0, 0.0, 1.0],
                [1.0, 1.0, 0.0]
            ]

            function nextSlide() {
                // Separate desiredSlideIndex variable is used to keep track of the desired slide,
                // because SceneElement's currentSlideIndex property works asynchronously.
                // This way the button click always changes the slide even if you click
                // it twice during the same frame.
                desiredSlideIndex = desiredSlideIndex != 3 ? desiredSlideIndex + 1 : 1;
                scene.currentSlideIndex = desiredSlideIndex
                slideButtonText.text = "Change Slide (" + desiredSlideIndex + ")"
            }

            function resetTime() {
                scene.goToTime(0);
            }

            function changeColor() {
                colorIndex = colorIndex >= colorArray.length - 1 ? colorIndex = 0 : colorIndex + 1;
                materialElement.setAttribute("diffuse.r", colorArray[colorIndex][0]);
                materialElement.setAttribute("diffuse.g", colorArray[colorIndex][1]);
                materialElement.setAttribute("diffuse.b", colorArray[colorIndex][2]);
                changeColorButton.color = Qt.rgba(colorArray[colorIndex][0],
                                                  colorArray[colorIndex][1],
                                                  colorArray[colorIndex][2], 1.0);
            }
        }
        onRunningChanged: console.log("Presentation running")
    }
    ...

(Before anyone asks: The ability to embed the output of the various Qt UI frameworks into each other opens up the possibility for creative recursive solutions indeed. However, while the idea of embedding a Qt Quick scene into a Qt 3D Studio scene embedded again in Qt Quick which then perhaps gets embedded into a plain Qt 3D scene which in turn can be part of another Qt Quick scene, … may sound exciting at first, it is best not to overdo it.)

Of course, the editor application itself also needs to display, edit and have fine-grained control over the scene. In the current iteration (1.0) not everything is unified in this respect, meaning the way the editor renders under the hood is not necessarily based on the same code as in the viewer or in the external applications. Longer term we expect to have a more unified approach in place. For now, let’s focus on the runtime from the perspective of a typical Qt application.

Towards Qt 3D Studio 2.0

You said C++ and OpenGL. Good enough, no?

The 1.0 runtime is pretty portable already and it comes with the necessary Qt integration bits as shown above. However, as it is based on the code inherited from the original NVIDIA contribution with only certain parts Qt-ified, and with a strong dependency to OpenGL, there is room for improvement. Fortunately, it turns out we have a good way forward – while staying fully compatible with presentations created with the already released version 1.0.

Qt 3D 2.0 (not to be confused with the Qt 3D 1.0 project from Qt 4 times) has been introduced to Qt 5 by developers from KDAB. See this post for an introduction. Besides providing the necessary building blocks, like an entity-component system and the concept of framegraphs that turn out to be an excellent tool for describing how to render multi-pass 3D scenes in a data-driver manner, its abstractions become handy also when looking towards the future where graphics APIs other than OpenGL will play an increasingly important role.

Therefore, back in April we started a little experiment under the Dragon3 internal codename to see what it would take to load and run those .uip presentations on top of Qt 3D. The new code base is developed with the familiar Qt style and conventions, thus providing a better, more maintainable, and more future-proof component in the larger Qt ecosystem. This is the project now often referred to as the Qt 3D Studio Runtime 2.0, with a first release due around May 2018 together with Qt 3D Studio 2.0. Like Qt 3D Studio itself, the code is available in public already today, although it does come with a huge disclaimer of being heavily work in progress.

Should I wait then?

Not at all. As mentioned before, compatibility is a priority, so for all practical purposes the 1.0 release is the thing to use. Naturally those who feel like experimenting are welcome to check out the code from the qt3d-runtime repository as well (which needs the dev (eventually 5.11) branch of qtbase and qt3d to build).

Let’s continue in the next post. In the meantime those who cannot wait and are keen on diving into the juicy details can check out my presentation at the Qt World Summit earlier this year.

That’s all for now, happy 3D hacking!

The post Towards an Improved Qt 3D Studio Runtime appeared first on Qt Blog.

Viewing all 15410 articles
Browse latest View live