Quantcast
Channel: Planet Qt
Viewing all 15410 articles
Browse latest View live

The Qt Company Blog: Vulkan Support in Qt 5.10 – Part 2

$
0
0

In the previous instalment we looked at the background for Qt 5.10’s upcoming Vulkan support. Let’s now start digging out into the details.

Obtaining a Vulkan-Enabled Qt Build

When building Qt from sources on Windows, Linux or Android, Vulkan support is enabled automatically whenever a Vulkan header is detected in the build environment. Windows is handled specially in the sense that the environment variable VULKAN_SDK– set by the LunarG Vulkan SDK– is picked up automatically.

Check the output of configure (also available afterwards in config.summary):

Qt Gui:
  ...
  Vulkan ................................. yes
  ...

If it says no, go to qtbase/config.tests/qpa/vulkan, run make, and see why it did not compile.

As mentioned in part 1, neither the QtGui library nor the platform plugins link directly to libvulkan or similar. Same applies to Qt applications by default. This comes very handy here: a Vulkan-enabled Qt build is perfectly fine for deployment also to systems without any Vulkan libraries. No headache with missing DLLs and such. Naturally, once it turns out Vulkan is not available at runtime, QVulkanInstance::create() will fail and will return false always. It must also be noted that the applications themselves can choose to link to a Vulkan (loader) library, if they have a reason to do so: all it takes is adding LIBS+=-lvulkan or similar to the .pro file.

Getting a Vulkan Instance

In Vulkan all per-application state is stored in a VkInstance object, see the the specification for a detailed overview. In Qt, Vulkan instances are represented by QVulkanInstance. This is backed by a QPlatformVulkanInstance following the usual QPA patterns. The platform plugins, at least the ones that are interested in providing Vulkan support, are expected to provide an implementation for it under the hood. As described earlier, this currently covers windows, xcb and android.

Following the familiar pattern from QWindow and the QOpenGL* classes, QVulkanInstance performs no initialization until create() is called. The loading of the Vulkan library (or the loader library which in turn routes to a vendor implementation) happens only at this point. (with a few exceptions, see below)

The resulting VkInstance can be retrieved via vkInstance().

Quite unsurprisingly, QVulkanInstance allows specifying the usual instance configuration options, like the desired API version, and, most importantly, the list of layers and extensions to enable.

While the Qt APIs allow including unsupported layers and extensions too – since it filters them out automatically – it may still be necessary in some cases to examine the names and versions of all supported layers and extensions. This can be done at any time – even before calling create() – via supportedExtensions() and supportedLayers(). These will naturally trigger an early loading of the Vulkan implementation when needed.

It is worth knowing that the surface-related extensions that are required for basic operation, such as VK_KHR_surface or VK_KHR_win32_surface, are automatically added to the list by Qt, and applications do not have to worry about these.

Typical main() Patterns

In the end the main() function for a Qt application with a Vulkan-capable window (or a Vulkan-capable window embedded into a QWidget hierarchy) will typically look like the following:

int main(int argc, char **argv)
{
    QGuiApplication app(argc, argv); // or QApplication when widgets are involved

    const bool enableLogsAndValidation = ...

    QVulkanInstance inst;

    if (enableLogsAndValidation) {
        QLoggingCategory::setFilterRules(QStringLiteral("qt.vulkan=true"));

#ifndef Q_OS_ANDROID
        inst.setLayers(QByteArrayList() << "VK_LAYER_LUNARG_standard_validation");
#else // see Android-specifics at https://developer.android.com/ndk/guides/graphics/validation-layer.html
        inst.setLayers(QByteArrayList()
                       << "VK_LAYER_GOOGLE_threading"
                       << "VK_LAYER_LUNARG_parameter_validation"
                       << "VK_LAYER_LUNARG_object_tracker"
                       << "VK_LAYER_LUNARG_core_validation"
                       << "VK_LAYER_LUNARG_image"
                       << "VK_LAYER_LUNARG_swapchain"
                       << "VK_LAYER_GOOGLE_unique_objects");
#endif
    }

    if (!inst.create())
        qFatal("Failed to create Vulkan instance: %d", inst.errorCode());

    MyVulkanWindow w;
    w.setVulkanInstance(&inst);
    w.resize(1024, 768);
    w.show();

    return app.exec();
}

In most cases there will be a single QVulkanInstance. This can live on the stack, but has to be ready before creating the QWindow or QVulkanWindow-derived window objects since they will need to be associated with a QVulkanInstance. (more on this and other window-related topics in part 3)

The logging category qt.vulkan can be very helpful for troubleshooting. When enabled, both QVulkanInstance and, if used, QVulkanWindow will print a number of interesting things on the debug output, during initialization in particular. The hard-coded setFilerRules() call in the code snippet above is not necessarily the best approach always, but works well for platforms where environment variables (QT_LOGGING_RULES) are problematic. On Windows and Linux it is better to control this via the environment or configuration files.

When it comes to output from Vulkan and, first and foremost, the validation layers, QVulkanInstance offers the convenience of automatically redirecting these messages to qDebug. By default VK_EXT_debug_report gets enabled and redirection is active. If this is not desired, set the corresponding flag before calling create().

For example, the output from the hellovulkancubes example running on an NVIDIA Shield TV with Android 7.0 will look something like the following. If there were validation errors, they would show up too in a similar manner.

qt.vulkan: Supported Vulkan instance layers: QVector()
qt.vulkan: Supported Vulkan instance extensions: QVector(QVulkanExtension("VK_KHR_surface" 25), QVulkanExtension("VK_KHR_android_surface" 6), QVulkanExtension("VK_EXT_debug_report" 2))
qt.vulkan: Enabling Vulkan instance layers: ()
qt.vulkan: Enabling Vulkan instance extensions: ("VK_EXT_debug_report", "VK_KHR_surface", "VK_KHR_android_surface")
qt.vulkan: QVulkanWindow init
qt.vulkan: 1 physical devices
qt.vulkan: Physical device [0]: name 'NVIDIA Tegra X1' version 361.0.0
qt.vulkan: Using physical device [0]
Supported sample counts: QVector(1, 2, 4, 8)
Requesting 4x MSAA
qt.vulkan: queue family 0: flags=0xf count=16 supportsPresent=1
qt.vulkan: Using queue families: graphics = 0 present = 0
qt.vulkan: Supported device extensions: QVector(QVulkanExtension("VK_KHR_swapchain" 68), QVulkanExtension("VK_KHR_sampler_mirror_clamp_to_edge" 1), QVulkanExtension("VK_NV_dedicated_allocation" 1), QVulkanExtension("VK_NV_glsl_shader" 1))
qt.vulkan: Enabling device extensions: QVector(VK_KHR_swapchain)
qt.vulkan: memtype 0: flags=0x1
qt.vulkan: memtype 1: flags=0x1
qt.vulkan: memtype 2: flags=0x7
qt.vulkan: memtype 3: flags=0xb
qt.vulkan: Picked memtype 2 for host visible memory
qt.vulkan: Picked memtype 0 for device local memory
qt.vulkan: Color format: 37 Depth-stencil format: 129
Renderer init
qt.vulkan: Creating new swap chain of 2 buffers, size 1920x1080
qt.vulkan: Actual swap chain buffer count: 2 (supportsReadback=1)
qt.vulkan: Allocating 33423360 bytes for transient image (memtype 0)
qt.vulkan: Allocating 66846720 bytes for transient image (memtype 0)

Working with External Graphics Engines

Our final topic for this part is the question of integrating with existing, external engines.

During the lifetime of the Qt 5.x series, there has been a growing focus on making Qt Quick and the underlying OpenGL enablers more interoperable with foreign engines. This led to productizing QQuickRenderControl, the enhancements to QOpenGLContext for adopting existing native contexts, and similar improvements all over the stack.

In the same spirit QVulkanInstance allows adopting an existing VkInstance. All this takes is calling setVkInstance() before create(). This way every aspect of the VkInstance creation is up to the application or some other framework, and QVulkanInstance will merely wrap the provided VkInstance object instead of constructing a new one from scratch.

That’s all for now, stay tuned for part 3!

The post Vulkan Support in Qt 5.10 – Part 2 appeared first on Qt Blog.


KDAB on Qt: A tale of 2 curves

$
0
0

As my first subject for this animation blog series, we will be taking a look at Animation curves.

Curves, or better, easing curves, is one of the first concepts we are exposed to when dealing with the subject of animation in the QML space.

What are they?

Well, in simplistic terms, they are a description of an X position over a Time axis that starts in (0 , 0) and ends in (1 , 1). These curves are …

The post A tale of 2 curves appeared first on KDAB.

The Qt Company Blog: Digital Instrument Cluster with Qt Quick Designer and Qt Safe Renderer

$
0
0

The growth of reconfigurable digital instrument clusters in the automotive industry is exploding. This is driving a need for high performance graphics technologies, designer tooling and solutions for safety critical systems.

The highly optimized Qt Quick technology is a great fit for creating modern digital clusters. Its plug-able back-end technology supports various rendering methods from OpenGL down through OpenVG to software rendering. This flexibility means you can target a wide range of price/performance points such as the NXP i.MX6 family which ranges from quad core with GPU to single core and no GPU.

For the designer, the Qt Quick Designer allows you to design and prototype the cluster user experience without writing any code. If you do chose to edit the QML code the your changes are immediately reflected in the live preview feature of Qt Quick Designer.

Safety critical operation is a key requirement in digital clusters. To satisfy safety requirements the safety critical functionality is separated from the other parts. What the automotive industry calls tell-tales is the safety critical part, these are the warning lamps for things such as airbag, oil level, engine temperature and brakes. These need to be rendered in a separate software partition that has been certified as designed and implemented per the industry’s relevant standards. The Qt Safe Renderer is our implementation that meets these standards.

But UI designers don’t really want to be bothered by such details. They just want to design the UI as a whole, marking items as safety critical is about the extent of what they need to know. We have added this capability into the Qt Quick language and Qt Quick Designer and to make things even more convenient this is done automatically when using one of Qt’s comprehensive set of ISO 7000 standard icons for warning and other indicators. Qt’s drag-and-drop visual design tooling really simplifies this design flow for adding these icons.

Once the design is complete the build process separates the safety critical UI elements from the main UI.  We use the Qt safe Renderer component to render the safety critical items and also to monitor the operation of the main UI. It is critical that any error in operation of the main UI does not impact the correct rendering of the safety critical items. The Qt Safe Renderer will restart the main UI as appropriate should it detect an error. For more details on the Qt Safe Renderer check out this blog post.

To show how all this comes together we created a video. It shows how to design a digital instrument cluster, deploy it to a device and how the Qt Safe Renderer works in practice.

As you can see, Qt offers tools that make design and prototyping digital instrument clusters intuitive for people who prefer visual design tools over coding. As always with Qt, the full power of QML, the Qt framework and C++ are accessible to create even more complex system logic.

You can get going quickly by looking at the code for the digital instrument cluster example used in the video in the Qt examples repository. Some of the Qt Quick components of the example have backends written in C++ which means they need to be built in order to be available in Qt Quick Designer. To do this, build the project for your desktop platform and in Qt Creator go to Tools > Options > Qt Quick > Qt Quick Designer and enable Use QML emulation layer which is built by the selected. For more details on how to integrate custom QML modules have a look at the Qt documentation here.

Contact us to learn more and discuss your needs in more detail.

The post Digital Instrument Cluster with Qt Quick Designer and Qt Safe Renderer appeared first on Qt Blog.

The Qt Company Blog: Using Compiler Explorer with Qt

$
0
0

One of my preferred developer tools is a web called Compiler Explorer. The tool itself is excellent and useful when trying to optimize your code.
The author of the tool describes it in the Github repository as:

Compiler Explorer is an interactive compiler. The left-hand pane shows editable C/C++/Rust/Go/D/Haskell code. The right, the assembly output of having compiled the code with a given compiler and settings. Multiple compilers are supported, and the UI layout is configurable (the Golden Layout library is used for this). There is also an ispc compiler for a C variant with extensions for SPMD.

The main problem I found with the tool is, it does not allow to write Qt code. I need to remove all the Qt includes, modify and remove a lot of code…

So I decided to modify the tool to be able to find the Qt headers. To do that first of all, we need to clone the source code:

git clone git@github.com:mattgodbolt/compiler-explorer.git

The application is written using node.js, so make sure you have it installed before starting.

The next step is to modify the options line in etc/config/c++.defaults.properties:

-fPIC -std=c++14 -isystem /opt/qtbase_dev/include -isystem /opt/qtbase_dev/include/QtCore

you need to change /opt/qtbase_dev with your own Qt build path.

Then simply call make in the root folder, and the application starts running on port 10240 (by default).

And the mandatory screenshoots 🙂

screenshot_20170622_152005

screenshot_20170622_152744

The post Using Compiler Explorer with Qt appeared first on Qt Blog.

V-Play Game Engine: Release 2.12.0: Qt 5.9 & Qt Creator 4.3 Support

$
0
0

V-Play 2.12.0 adds support for Qt 5.9 and the latest Qt Creator 4.3. Qt 5.9 adds many great features like support for gamepads and 3D key frame animations. Qt Creator 4.3 adds a much improved design mode, which allows you to write QML code side-by-side with a visual representation of the code. This allows rapid prototyping of UIs.

V-Play 2.12.0 Improvements

V-Play is now compatible with Qt 5.9 and Qt Creator 4.3, which adds an improved QML Designer. The biggest benefit of the new QML Designer is the new live preview of your QML code. You can have your UI side-by-side with QML code, which allows to further accelerate the development process.

Qt Quick Designer Side by Side Visual and Code

Some of the V-Play components now also support the QML Designer and visual development. The supported components include GameWindow, App, Scene, Page, NavigationStack and also most of the other components are working. With this improvement, you can now adjust component properties with a nice visual editor.

Other improvements of this V-Play release:

  • You can use an improved icon-font handling within games and apps and use the latest FontAwesome version 4.7.0 with the IconType component.
  • The Friends View now has an improved UI. You can use the V-Play friends system within V-Play Multiplayer to allow users to send friend requests and then show the friends in a separate section of the leaderboard. You can also use this friend system to allow sending messages only between accepted friends to prevent spam in your in-app messages. This improvement is live in the released card game One Card! for iOS and Android.
    onecard-menuonecard-game
    Download One Card on iOSDownload One Card on Android
  • With the AppButton::textFont property, you can now access and modify all font properties of the text within AppButton.
  • The Component Showcase Demo App configuration for ios/Project-Info.plist now includes the NSContactsUsageDescription entry, which is required for NativeUtils::storeContacts() since iOS 10.
  • Use the new Dialog::autoSize property to decide whether the dialog uses a fixed height or a dynamic height based on the Items you add as dialog content.
  • Incorrect warning for publish builds about using DEPLOYMENTFOLDERS is no longer displayed when QRC is actually used instead. This is relevant when protecting your source code for published apps.

Qt 5.9 Improvements for Mobile App Development

Qt 5.9 added many improvements and was shipped on time. This indicates that the new CI system The Qt Company is now be using yields great results. These are our favorite Qt 5.9 improvements, with a focus for mobile app or game development:

Qt 3D: Animations, Physics Based Rendering (PBR), Level of Detail

Qt 3D got a lot better with the Qt 5.9 release. These are our highlights:

  • You can now use key frame animations! This is an important feature, as it allows you to animate your 3d objects in a dedicated animation tool like Blender or Autodesk Maya, and then import this animation with Qt 3D.
  • A Physics Based Rendering (PBR) material is now available in Qt3DExtras.
  • A new Level of Detail component allows loading different 3D models based on projected screen size or distance. This enables you to have better performance.
  • You can now render Qt Quick 2 scenes to a texture and interact with them in a 3D world.
  • 3D text is available in Qt3DExtras:

Improved QML Performance

Thanks to support for ahead-of-time generation of QML type caches and support for shader program binaries now being cached, the initial application startup time, QML loading time and also view initialization times got improved. Also, the rewritten JavaScript garbage collector yields better performance.

Qt Location and Positioning

  • You can now tilt and rotate maps, both through the APIs and through touch gestures.
  • If you want to overlay items to maps this is now easier too.
  • On iOS, you can now collect positioning data even when the application is in the background.
  • There’s also a new plugin that adds support for Mapbox and both raster and vector tiles, using their OpenGL based map rendering engine:

Mapbox OpenGL Plugin

GamePad Support and More

Qt now supports GamePads which is great for improving controls for games on PC, Android, iOS or tvOS devices. The GamePad support works nicely together with the V-Play TwoAxisController component, which is used in several of the sample games available like our Super Mario like platformer game.

Other improvements like Qt NFC support when running as an Android service or better Qt Charts makes this the best Qt release yet. For a list of all new features in Qt 5.9, see here.

Qt Creator 4.3 Support

The absolute highlight of Qt Creator 4.3 is the new live preview of your QML code in the Qt Quick Designer (alias QML Designer):

Qt Quick Designer - Mixed Design and Edit Mode


It allows editing the QML code side by side with the form editor as a preview. In addition to this preview, you can also use the property editor together with the text editor. Qt Quick Designer will always select the item that currently contains the cursor.

So if you just forgot the name of a property or enum, you can now use the property editor instead. With the improved designer, you can now create UIs seamlessly by mixing QML code and visual editing. This really combines the best of two worlds, because you can now stay in the design mode instead of switching between code and design modes.

Internally, we were using the Code editing mode most of the time. We have now changed our workflow and development process to use the designer more and have already experienced a faster development process. We’d highly recommend you to try out the new design mode, it will save you a lot of hours and makes development with QML even better. :)

See here for a detailed list of new Qt Creator 4.3 featuers, and here for a list of Qt Quick Designer improvements.

How to Update V-Play

Test out these new features by following these steps:

  • Open the V-Play SDK Maintenance Tool in your V-Play SDK directory.
  • Choose “Update components” and finish the update process to get V-Play 2.12.0 as described in the V-Play Update Guide.

V-Play Update in Maintenance Tool

  • After updating, remove Qt 5.8 from your installed components: Click on “Add or remove Components” and unselect Qt 5.8. Because V-Play is not compatible with Qt 5.8 anymore, it is best to remove these kits.
  • When you now start Qt Creator, it automatically detects the kits for Qt 5.9, which you can use to build your V-Play projects.
  • To enable one of the new Qt 5.9 kits, click “Projects” on the left side of Qt Creator and enable your desired kit in the section “Build and Run”.

If you haven’t installed V-Play yet, you can do so now with the latest installer from here. Now you can explore all of the new features included in V-Play 2.12.0!


For a complete list of the changes to V-Play with this update, please check out our change log!

More Posts Like This


How to Make Cross-Platform Mobile Apps with Qt – V-Play Apps

How to Make a Qt app

Release 2.11.0: All Monetization Plugins Now Free, Plugin Trial & Firebase Qt Plugin

Release 2_11

WeAreDevelopers Conference App – Open Source & Live Now!

WeAreDevelopers


The post Release 2.12.0: Qt 5.9 & Qt Creator 4.3 Support appeared first on V-Play Engine.

The Qt Company Blog: Qt Creator 4.3.1 released

$
0
0

We are happy to announce the release of Qt Creator 4.3.1. This release contains a range of bug fixes.

Most importantly we fixed a memory leak in code completion, which lead to out-of-memory crashes after a while, especially for users on 32-bit Windows. The new version also includes a multitude of improvements for the CMake integration, fixes running applications on iOS 10.3 devices, and mends some regressions related to the project tree.

For a more detailed overview of the included improvements, take a look at our change log.

Get Qt Creator 4.3.1

The opensource version is available on the Qt download page, and you find commercially licensed packages on the Qt Account Portal. Qt Creator 4.3.1 is also available through an update in the online installer. Please post issues in our bug tracker. You can also find us on IRC on #qt-creator on chat.freenode.net, and on the Qt Creator mailing list.

The post Qt Creator 4.3.1 released appeared first on Qt Blog.

The Qt Company Blog: Qt 5.9.1 Released

$
0
0

I am pleased to announce that Qt 5.9.1 is released today. It contains all the latest bug fixes and improvements from Qt 5.9 branch.

Qt Creator 4.3.1 is included in the Qt 5.9.1 offline installer packages and available via the online installer.

As a patch release Qt 5.9.1 does not add any new functionality, just bug fixes and other improvements. For details of the changes compared to Qt 5.9.0 release, please check the Change files of Qt 5.9.1.

Our intention is to make more frequent patch releases for Qt 5.9 LTS than before. So if your most desired fix is not included in Qt 5.9.1 there will be more patch releases in the coming months.

If you are using the online installer, Qt 5.9.1 and Qt Creator 4.3.1 can be updated using the maintenance tool. Offline packages are available for commercial users in the Qt Account portal and at the qt.io Download page for open-source users.

For users targeting iOS we have identified an issue which can be fixed with an additional iOS patch. We know this is unfortunate, but the alternative was to delay the entire release for over one month. In light of this we thought it would be better to release 5.9.1 today, with a hot patch for iOS.

The post Qt 5.9.1 Released appeared first on Qt Blog.

The Qt Company Blog: Vulkan Support in Qt 5.10 – Part 3

$
0
0

In the previous posts (part 1, part 2) we covered the introduction and basic Vulkan instance creation bits. It is time to show something on the screen!

QWindow or QVulkanWindow?

If everything goes well, the release of Qt 5.10 will come with at least 5 relevant examples. These are the following (with links to the doc snapshot pages), in increasing order of complexity:

hellovulkancubes_android
The hellovulkancubes example, this time running on an NVIDIA Shield TV with Android 7.0

Checking the sources for these examples reveals one common aspect: they all use QVulkanWindow, the convenience QWindow subclass that manages the swapchain and window-specifics for you. While it will not always be suitable, QVulkanWindow can significantly decrease the time needed to get started with Vulkan rendering in Qt applications.

Now, what if one has to go the advanced way and needs full control over the swapchain and the window? That is perfectly doable as well, but getting started may be less obvious than the well-documented QVulkanWindow-based approach. Let’s take a look.

Using a Plain QWindow + QVulkanInstance

There is currently no simple example for this since things tend to get fairly complicated quite quickly. The Qt sources do provide good references, though: besides the QVulkanWindow sources, there is also a manual test that demonstrates creating a Vulkan-enabled QWindow.

Looking at these revals the main rules for Vulkan-enabled QWindow subclasses:

  • There is a new surface type: VulkanSurface. Any Vulkan-based QWindow must call setSurfaceType(VulkanSurface).
  • Such windows must be associated with a QVulkanInstance. This can be achieved with the previously introduced setVulkanInstance() function.
  • Maintaining the swapchain is left completely to the application. However, a well-behaving implementation is expected to call presentQueued() on the QVulkanInstance right after queuing a present operation (vkQueuePresentKHR).
  • Getting a VkSurfaceKHR must happen through surfaceForWindow().
  • To query if a queue family with in a physical device supports presenting to the window, supportsPresent() can be used, if desired. (like with surfaces, this is very handy since there is no need to deal with vkGetPhysicalDeviceWin32PresentationSupportKHR and friends directly).
  • It is highly likely that any Vulkan-enabled window subclass will need to handle QPlatformSurfaceEvent, QPlatformSurfaceEvent::SurfaceAboutToBeDestroyed in particular. This is because the swapchain must be released before the surface, and with QWindow the surface goes away when the underlying native window is destroyed. This can happen unexpectedly early, depending on how the application is structured, so in order to get a chance to destroy the swapchain at the right time, listening to SurfaceAboutToBeDestroyed can become essential.
  • Understanding exposeEvent() is pretty important as well. While the exact semantics are platform specific, the correct behavior in an exposeEvent() implementation is not: simply check the status via isExposed(), and, if different than before, start or stop the rendering loop. This can, but on most platforms does not have to, include releasing the graphics resources.
  • Similarly, any real graphics initialization has to be tied to the first expose event. Do not kick off such things in the constructor of the QWindow subclass: it may not have a QVulkanInstance associated at that point, and there will definitely not be an underlying native window present at that stage.
  • To implement continous updates to the rendering (which may, depending on your logic, be locked to vsync of course), one of the simplest options is to trigger requestUpdate() on each frame, and then handle QEvent::UpdateRequest in a reimplementation of event(). Note however that on most platforms this is essentially a 5 ms timer, with no actual windowing system backing. Applications are also free to implement whatever update logic they like.

Core API Function Wrappers

What about accessing the Vulkan API? The options are well documented for QVulkanInstance. For most Qt-based applications the expectation is that the core Vulkan 1.0 API will be accessed through the wrapper objects returned from functions() and deviceFunctions(). When it comes to extensions, for instance in order to set up the swapchain when managing it manually, use getInstanceProcAddr().

This is the approach all examples and tests are using as well. This is not mandatory, the option of throwing in a LIBS+=-lvulkan, or using some other wrangler library is always there. Check also the Using C++ Bindings for Vulkan section in the QVulkanInstance docs.

That’s all for now, see you in part 4!

The post Vulkan Support in Qt 5.10 – Part 3 appeared first on Qt Blog.


The Qt Company Blog: Qt Quick Designer – The Coffee Machine

$
0
0

With Qt Creator 4.3 released a month ago, coming with cool new features for Qt Quick Designer, we decided it is time to create an example that shows the complete intended workflow for Qt Quick Designer and establishes good practices.

We implemented the UI of a Coffee Machine following the reference design of a professional designer. The designer also provided all graphical assets as PNG images. In the screenshot, you can see the Resource Browser containing all the provided graphical assets. You can use these graphical assets by drag and drop.

coffee-screenshot
The example is the UI of a coffee machine.

The emphasis for this example lies in a clean separation between imperative logic and the purely declarative visual design which improves the collaboration between designers and front-end developers. The separation between the declarative UI and the implementation allows us to create the visual UI using just Qt Quick Designer, while ensuring that the final result is matching the original design.

This way Qt Quick and Qt Quick Designer will maximize productivity and maintainability.

We created a video that gives an overview of the workflow and the structure of the example. Starting with a reference video from the original designer, we model the different screens using states and QML components. Each screen can be created directly in the Qt Quick Designer following the original reference design.

As seen in the video, in the property tabs you can bind properties to JavaScript expressions which allows to model behavior in a convenient way. For example we have the sliders which adjust the different coffee ingredients levels and then we bind the anchor margins of the graphical elements to JavaScript expressions.

We can define expressions controlling the active states, based on when conditions.

The animations and application logic are implemented in a single QML file. We use alias properties to define an interface between individual screens and components. Maintaining and integrating changes to the UI becomes a lot easier this way.

The source code of the example can be found in the Qt examples repository.

Contact us to learn more and discuss your needs in more detail.

The post Qt Quick Designer – The Coffee Machine appeared first on Qt Blog.

KDAB on Qt: hotspot – a GUI for the Linux perf profiler

$
0
0

After many months of work, I’m very pleased to finally announce KDAB’s latest R&D project to the public: hotspot – a GUI for the Linux perf profiler.

I have used Linux perf a lot over the past years. It is an extremely powerful and useful tool. But its complexity makes it very hard to use. You need to know and enable quite a few options of perf report before the results become understandable. To educate people, I started giving talks on the subject at various conferences. Additionally, KDAB now also offers a training about Debugging and Profiling tools, with a large section on Linux perf. Finally, I started contributing upstream to make perf more usable for my needs as a C++ application developer. continue reading

The post hotspot – a GUI for the Linux perf profiler appeared first on KDAB.

V-Play Game Engine: Release 2.12.1: Visual Editor & Qt Quick Designer Improvements

$
0
0

V-Play 2.12.1 adds many improvements to better support Qt Quick Designer with V-Play:

  • All V-Play Core Components are now available in the side bar of the designer, which allows to use Drag’n’Drop for adding V-Play components to your QML files with the designer.
  • When V-Play components are used, the designer now supports rendering all QML items in addition to the V-Play ones.
  • Many components now include dedicated designer styles, which allows to use the designer to create UI mock-ups using V-Play, especially for V-Play Apps components.
  • Along with the new side-by-side editing which uses the Form Editor and Text Editor in a single view, this allows to speed up UI creation with V-Play even more.

Improved Visual Editor & Qt Quick Designer

V-Play is the leading cross-platform tool for mobile development in terms of rapid UI development and easy-of-use. The main reason is that V-Play takes advantage of QML, the declarative language for creating UIs with Qt – and we love it!

While everything works like a charm when coding in QML, the visual editor of Qt Creator always seemed a bit lacking and troublesome in the past. However, the Qt Quick Designer of Qt Creator made some big improvements with the recent updates.

For example, it is now even possible to use the Form Editor and Text Editor side-by-side with Qt Creator 4.3, which allows to design and code at the same time:

Qt Quick Designer V-Play 2.12.1

For more information about Qt Creator 4.3, see here.

Needless to say, this feature is amazing to speed up UI creation with QML even more, which is why we decided to improve V-Play for better support of the Qt Quick Designer. This allows all V-Play users to utilize these new IDE features and take their development to a new level.

Drag’n’Drop and Improved Component Rendering

With this V-Play update, you can fully use the Qt Quick Designer in conjunction with V-Play components.

In addition, we made all V-Play core components available for Drag’n’Drop usage from the side bar of the Qt Quick Designer. To try it out, just import the V-Play module, e.g.

import VPlayApps 1.0

All available QML types then show up in the side bar:

Qt Quick Designer V-Play 2.12.1

For this update, we’ve also added dedicated designer styles for V-Play Components. For the first time, it is now possible to drop V-Play components into the designer view and see a mock-up design of what you are building at the moment.

The preview is based on the iOS look & feel that comes with V-Play, so you don’t even need to run your app to see how it will look like!

We especially focused on better support for V-Play Apps. Here’s a short Youtube tutorial for you to get a quick overview of what’s possible:

V-Play Visual Designer – Highlights Video

In the new video below we create a new V-Play Application from scratch to show what’s possible with the designer. It covers:

  • How to create a new V-Play Application with Qt Creator.
  • A short overview of the Qt Quick Designer and how to enable side-by-side editing.
  • Using the designer to add V-Play Components via Drag’n’Drop.
  • How to layout your items using anchoring.
  • Creating a cross-platform V-Play Application with a native-styled main navigation.
  • Binding properties of a control to the property value of another item.
  • Testing the look & feel of your app on Desktop by switching between themes.

More Fixes & Improvements

Besides the highlights mentioned above, there are many other fixes and improvements for the SDK, for example V-Play Multiplayer Improvements and a new Splash Screen. For a full list of improvements and fixes to V-Play in this update, please check out our change log!

How to Update V-Play

Test out these new features by following these steps:

  • Open the V-Play SDK Maintenance Tool in your V-Play SDK directory.
  • Choose “Update components” and finish the update process to get V-Play 2.12.1 as described in the V-Play Update Guide.

V-Play Update in Maintenance Tool

If you haven’t installed V-Play yet, you can do so now with the latest installer from here. Now you can explore all of the new features included in V-Play 2.12.1!


More Posts Like This


How to Make Cross-Platform Mobile Apps with Qt – V-Play Apps

How to Make a Qt app

Release 2.11.0: All Monetization Plugins Now Free, Plugin Trial & Firebase Qt Plugin

Release 2_11

WeAreDevelopers Conference App – Open Source & Live Now!

WeAreDevelopers


The post Release 2.12.1: Visual Editor & Qt Quick Designer Improvements appeared first on V-Play Engine.

The Qt Company Blog: Qt WebGL Streaming merged

$
0
0

Some time ago I published a couple of blog posts talking about Qt WebGL Streaming plugin. The time has come, and the plugin is finally merged into the Qt repository. In the meantime, I worked on stabilization, performance and reducing the calls sent over the network. It also changed a bit in the way the connections are handled.

New client approach

In the previous implementations, the client was accepting more than one concurrent connections. After the latest changes, the plugin is going to behave like a standard QPA plugin. Now, only one user per process is allowed. If another user tries to connect to the web server, it will see a fancy loading screen until the previous client disconnects.
The previous approach caused some problems with how the desktop applications and GUI frameworks are designed. Everyone can agree that desktop applications are not intended to work with concurrent physical users, even if the window instances were different for all users.

No more boilerplate code

Previously the application had to be modified to support this platform plugin. This code was needed to make the application work with the plugin:

class EventFilter : public QObject
{
public:
    virtual bool eventFilter(QObject *watched, QEvent *event) override
    {
        Q_UNUSED(watched);
        if (event->type() == QEvent::User + 100) {
            createWindow(true);
            return true;
        } else if (event->type() == QEvent::User + 101) {
            window->close();
            window->deleteLater();
            return true;
        }

        return false;
    }
};

And install the event filter into the QGuiApplication.

No more modifications in applications are needed anymore.

How to try

So, if you want to give it a try before Qt 5.10 is released (~November 2017) do the following:

Prerequisites

Since WebGL was modelled using OpenGLES2 as reference, first thing you will need is to have an OpenGLES2 version of Qt built. To do that, you need to pass the parameter -opengl es2 to the configure before building.
Example:

./configure -opensource -confirm-license -opengl es2

Depending on your system it is possible you will need some aditional headers and libraries to be able to use es2.

Testing the plugin

After building everything, you can try to run a Qt Quick example.

To try the photoviewer example we need to build it and run with the -platform webgl parameters:

./photoviewer -platform webgl

If you want to try the Qt Quick Controls 2 Text Editor:

./texteditor -platform webgl

Supported options

Currently, the plugin only supports an option to configure the port used by the embedded HTTP Server. If you want to listen in the default HTTP port you should write -platform webgl:port=80.

The future

The plugin will be part of Qt 5.10 release as a technology preview (TP), as it needs to be improved. Currently, the plugin contains an HTTP Server and a Web Sockets server to handle the browser connections. I’m planning to remove the servers from the plugin and start using a Lightweight QtHttpServer we are working on right now. Once it’s ready, you will be able to create an application server to launch different process inheriting the web socket to communicate with the browsers. This will allow for supporting more than one concurrent user instead of sharing applications among users.

The post Qt WebGL Streaming merged appeared first on Qt Blog.

The Qt Company Blog: Let There Be Shapes!

$
0
0

One of the new features of the upcoming Qt 5.10 is the introduction of the shapes plugin to Qt Quick. This allows adding stroked and filled paths composed of lines, quadratic curves, cubic curves, and arcs into Qt Quick scenes. While this has always been possible to achieve via QQuickPaintedItem or the Canvas type, the Shape type provides a genuine first-class Qt Quick item that from the scene graph’s perspective is backed by either actual geometry or a vendor-specific GPU accelerated path rendering approach (namely, GL_NV_path_rendering).

shape_tiger
The shapes example, running on an Android tablet

Why is This Great?

  • There is no rasterization involved (no QImage, no OpenGL framebuffer object), which is excellent news for those who are looking for shapes spanning a larger area of a possibly high resolution screen, or want to apply potentially animated transformations to the shapes in the scene.
  • The API is fully declarative and every property, including stroke and fill parameters, path element coordinates, control points, etc., can be bound to in QML expressions and can be animated using the usual tools of Qt Quick. Being declarative also means that changing a property leads to recalculating only the affected sets of the underlying data, something that has been traditionally problematic with imperative painting approaches (e.g. QPainter).
  • There are multiple implementations under the hood, with the front Qt Quick item API staying the same. The default, generic solution is to reuse the triangulator from QPainter’s OpenGL backend in QtGui. For NVIDIA GPUs there is an alternative path using the GL_NV_path_rendering OpenGL extension. When using the software renderer of Qt Quick, a simple backend falling back to QPainter will be used. This also leaves the door open to seamlessly adding other path rendering approaches in the future.

Status and Documentation

Right now the feature is merged to the dev branch of qtdeclarative and will be part of 5.10 onces it branches off. The documentation snapshots are online as well:

(due to some minor issues with the documentation system some types in Particles get cross-linked in the Inherited By section and some other places, just ignore this for now)

The canonical example is called shapes and it lives under qtdeclarative/examples/quick as expected.

Let’s See Some Code

Without further ado, let’s look at some code snippets. The path specification reuses existing types from PathView, and should present no surprises. The rest is expected to be fairly self-explanatory. (check the docs above)

1. A simple triangle with animated stroke width and fill color.

shape1

Shape {
    id: tri
    anchors.fill: parent

    ShapePath {
        id: tri_sp
        strokeColor: "red"
        strokeWidth: 4
        SequentialAnimation on strokeWidth {
            running: tri.visible
            NumberAnimation { from: 1; to: 20; duration: 2000 }
            NumberAnimation { from: 20; to: 1; duration: 2000 }
        }
        ColorAnimation on fillColor {
            from: "blue"; to: "cyan"; duration: 2000; running: tri.visible
        }

        startX: 10; startY: 10
        PathLine { x: tri.width - 10; y: tri.height - 10 }
        PathLine { x: 10; y: tri.height - 10 }
        PathLine { x: 10; y: 10 }
    }
}

2. Let’s switch over to dash strokes and disable fill. Unlike with image-backed approaches, applying transformations to shapes are no problem.

shape2

Shape {
    id: tri2
    anchors.fill: parent

    ShapePath {
        strokeColor: "red"
        strokeWidth: 4
        strokeStyle: ShapePath.DashLine
        dashPattern: [ 1, 4 ]
        fillColor: "transparent"

        startX: 10; startY: 10
        PathLine { x: tri2.width - 10; y: tri2.height - 10 }
        PathLine { x: 10; y: tri2.height - 10 }
        PathLine { x: 10; y: 10 }
    }

    SequentialAnimation on scale {
        running: tri2.visible
        NumberAnimation { from: 1; to: 4; duration: 2000; easing.type: Easing.InOutBounce }
        NumberAnimation { from: 4; to: 1; duration: 2000; easing.type: Easing.OutBack }
    }
}

3. Shape comes with full linear gradient support. This works exactly like QLinearGradient in the QPainter world.

shape3-png

Shape {
    id: tri3
    anchors.fill: parent

    ShapePath {
        strokeColor: "transparent"

        fillGradient: LinearGradient {
            x1: 20; y1: 20
            x2: 180; y2: 130
            GradientStop { position: 0; color: "blue" }
            GradientStop { position: 0.2; color: "green" }
            GradientStop { position: 0.4; color: "red" }
            GradientStop { position: 0.6; color: "yellow" }
            GradientStop { position: 1; color: "cyan" }
        }

        startX: 10; startY: 10
        PathLine { x: tri3.width - 10; y: tri3.height - 10 }
        PathLine { x: 10; y: tri3.height - 10 }
        PathLine { x: 10; y: 10 }
    }

    NumberAnimation on rotation {
        from: 0; to: 360; duration: 2000
        running: tri3.visible
    }
}

4. What about circles and ellipses? Just use two arcs. (note: one ShapePath with two PathArcs is sufficient for a typical circle or ellipse, here there are two ShapePath due to the different fill parameters)

shape4

Shape {
    id: circle
    anchors.fill: parent
    property real r: 60

    ShapePath {
        strokeColor: "transparent"
        fillColor: "green"

        startX: circle.width / 2 - circle.r
        startY: circle.height / 2 - circle.r
        PathArc {
            x: circle.width / 2 + circle.r
            y: circle.height / 2 + circle.r
            radiusX: circle.r; radiusY: circle.r
            useLargeArc: true
        }
    }
    ShapePath {
        strokeColor: "transparent"
        fillColor: "red"

        startX: circle.width / 2 + circle.r
        startY: circle.height / 2 + circle.r
        PathArc {
            x: circle.width / 2 - circle.r
            y: circle.height / 2 - circle.r
            radiusX: circle.r; radiusY: circle.r
            useLargeArc: true
        }
    }
}

5. Speaking of arcs, PathArc is modeled after SVG elliptical arcs. Qt 5.10 introduces one missing property, xAxisRotation.

shape5

Repeater {
    model: 2
    Shape {
        anchors.fill: parent

        ShapePath {
            fillColor: "transparent"
            strokeColor: model.index === 0 ? "red" : "blue"
            strokeStyle: ShapePath.DashLine
            strokeWidth: 4

            startX: 50; startY: 100
            PathArc {
                x: 150; y: 100
                radiusX: 50; radiusY: 20
                xAxisRotation: model.index === 0 ? 0 : 45
            }
        }
    }
}

Repeater {
    model: 2
    Shape {
        anchors.fill: parent

        ShapePath {
            fillColor: "transparent"
            strokeColor: model.index === 0 ? "red" : "blue"

            startX: 50; startY: 100
            PathArc {
                x: 150; y: 100
                radiusX: 50; radiusY: 20
                xAxisRotation: model.index === 0 ? 0 : 45
                direction: PathArc.Counterclockwise
            }
        }
    }
}

6. Quadratic and cubic Bezier curves work as expected. Below is a quadratic curve with its control point animated.

shape6

Shape {
    id: quadCurve
    anchors.fill: parent

    ShapePath {
        strokeWidth: 4
        strokeColor: "black"
        fillGradient: LinearGradient {
            x1: 0; y1: 0; x2: 200; y2: 200
            GradientStop { position: 0; color: "blue" }
            GradientStop { position: 1; color: "green" }
        }

        startX: 50
        startY: 150
        PathQuad {
            x: 150; y: 150
            controlX: quadCurveControlPoint.x; controlY: quadCurveControlPoint.y
        }
    }
}

Rectangle {
    id: quadCurveControlPoint
    color: "red"
    width: 10
    height: 10
    y: 20
    SequentialAnimation on x {
        loops: Animation.Infinite
        NumberAnimation {
            from: 0
            to: quadCurve.width - quadCurveControlPoint.width
            duration: 5000
        }
        NumberAnimation {
            from: quadCurve.width - quadCurveControlPoint.width
            to: 0
            duration: 5000
        }
    }
}

7. The usual join and cap styles, that are probably familiar from QPainter and QPen, are available.

shape7

Shape {
    anchors.fill: parent

    ShapePath {
        strokeColor: "red"
        strokeWidth: 20
        fillColor: "transparent"
        joinStyle: ShapePath.RoundJoin

        startX: 20; startY: 20
        PathLine { x: 100; y: 100 }
        PathLine { x: 20; y: 150 }
        PathLine { x: 20; y: 20 }
    }

    ShapePath {
        strokeColor: "black"
        strokeWidth: 20
        capStyle: ShapePath.RoundCap

        startX: 150; startY: 20
        PathCubic {
            x: 150; y: 150; control1X: 120; control1Y: 50; control2X: 200
            SequentialAnimation on control2Y {
                loops: Animation.Infinite
                NumberAnimation { from: 0; to: 200; duration: 5000 }
                NumberAnimation { from: 200; to: 0; duration: 5000 }
            }
        }
    }
}

Any Downsides?

Does this mean the time has finally come to add hundreds of lines and curves and arcs to every Qt Quick scene out there?

Not necessarily.

Please do consider the potential performance implications before designing in a large number of shapes in a user interface. See the notes in the Shape documentation page.

In short, the most obvious gotchas are the following:

  • [generic backend] Shapes with a lot of ShapePath child objects will take longer to generate the geometry. The good news is that this can be mitigated by setting the asynchronous property to true which, as the name suggests, leads to spawning off worker threads without blocking the main UI. This comes at the cost of the shape appearing only after the non-asynchronous UI elements.
  • [GL_NV_path_rendering backend] Geometry generation is a non-issue here, however due to the way the “foreign” rendering commands are integrated with the Qt Quick scene graph, having a large number of Shape items in a scene may not scale very well since, unlike plain geometry-based scenegraph nodes, these involve a larger amount of logic and OpenGL state changes. Note that one Shape with several ShapePath children is not an issue here since that is really just one node in the scenegraph.
  • Antialiasing is currently covered only through multi or super sampling, either for the entire scene or for layers. Note that Qt 5.10 introduces a very handy property here: layer.samples can now be used to enable using multisample renderbuffers, when supported.
  • Shape is not a replacement for rectangles and rounded rectangles provided by Rectangle. Rectangle will always perform better and can provide some level of smoothing even without multisampling enabled.

Nevertheless we expect Shape to be highly useful to a large number of Qt Quick applications. The Qt 5.10 release is due H2 this year, so…stay tuned!

The post Let There Be Shapes! appeared first on Qt Blog.

Swift IM Blog: Swift 4.0 RC2: Now Available

$
0
0

A Release Candiate for Swift 4.0 is now available for download. Read on for more information and download instructions.

Swift 4.0 RC2 is now available from our releases page. This release includes:

  • Support for message carbons (XEP-0280)
  • Trellis mode enabled as a default feature, allowing several tiled chats windows to be shown at once
  • New chat theme including a new font
  • Redesigned keyword highlighting
  • Improved spell checker support on Linux
  • Support for automatic software updates on macOS
  • Support for unicode emojis on macOS
  • And assorted smaller features and usability enhancements

Please email (swift@swift.im) or tweet (@swift_im) any feedback you have to help us further improve Swift.

KDAB on Qt: hotspot – a GUI for the Linux perf profiler

$
0
0

After many months of work, I’m very pleased to finally announce KDAB’s latest R&D project to the public: hotspot – a GUI for the Linux perf profiler.

I have used Linux perf a lot over the past years. It is an extremely powerful and useful tool. But its complexity makes it very hard to use. You need to know and enable quite a few options of perf report before the results become understandable. To educate people, I started giving talks on the subject at various conferences. Additionally, KDAB now also offers a training about Debugging and Profiling tools, with a large section on Linux perf. Finally, I started contributing upstream to make perf more usable for my needs as a C++ application developer. continue reading

The post hotspot – a GUI for the Linux perf profiler appeared first on KDAB.


Swift IM Blog: Swift 4.0 RC2: Now Available

$
0
0

A Release Candiate for Swift 4.0 is now available for download. Read on for more information and download instructions.

Swift 4.0 RC2 is now available from our releases page. This release includes:

  • Support for message carbons (XEP-0280)
  • Trellis mode enabled as a default feature, allowing several tiled chats windows to be shown at once
  • New chat theme including a new font
  • Redesigned keyword highlighting
  • Improved spell checker support on Linux
  • Support for automatic software updates on macOS
  • Support for unicode emojis on macOS
  • And assorted smaller features and usability enhancements

Please email (swift@swift.im) or tweet (@swift_im) any feedback you have to help us further improve Swift.

The Qt Company Blog: Qt WebGL Streaming merged

$
0
0

Some time ago I published a couple of blog posts talking about Qt WebGL Streaming plugin. The time has come, and the plugin is finally merged into the Qt repository. In the meantime, I worked on stabilization, performance and reducing the calls sent over the network. It also changed a bit in the way the connections are handled.

New client approach

In the previous implementations, the client was accepting more than one concurrent connections. After the latest changes, the plugin is going to behave like a standard QPA plugin. Now, only one user per process is allowed. If another user tries to connect to the web server, it will see a fancy loading screen until the previous client disconnects.
The previous approach caused some problems with how the desktop applications and GUI frameworks are designed. Everyone can agree that desktop applications are not intended to work with concurrent physical users, even if the window instances were different for all users.

No more boilerplate code

Previously the application had to be modified to support this platform plugin. This code was needed to make the application work with the plugin:

class EventFilter : public QObject
{
public:
    virtual bool eventFilter(QObject *watched, QEvent *event) override
    {
        Q_UNUSED(watched);
        if (event->type() == QEvent::User + 100) {
            createWindow(true);
            return true;
        } else if (event->type() == QEvent::User + 101) {
            window->close();
            window->deleteLater();
            return true;
        }

        return false;
    }
};

And install the event filter into the QGuiApplication.

No more modifications in applications are needed anymore.

How to try

So, if you want to give it a try before Qt 5.10 is released (~November 2017) do the following:

Prerequisites

Since WebGL was modelled using OpenGLES2 as reference, first thing you will need is to have an OpenGLES2 version of Qt built. To do that, you need to pass the parameter -opengl es2 to the configure before building.
Example:

./configure -opensource -confirm-license -opengl es2

Depending on your system it is possible you will need some aditional headers and libraries to be able to use es2.

Testing the plugin

After building everything, you can try to run a Qt Quick example.

To try the photoviewer example we need to build it and run with the -platform webgl parameters:

./photoviewer -platform webgl

If you want to try the Qt Quick Controls 2 Text Editor:

./texteditor -platform webgl

Supported options

Currently, the plugin only supports an option to configure the port used by the embedded HTTP Server. If you want to listen in the default HTTP port you should write -platform webgl:port=80.

The future

The plugin will be part of Qt 5.10 release as a technology preview (TP), as it needs to be improved. Currently, the plugin contains an HTTP Server and a Web Sockets server to handle the browser connections. I’m planning to remove the servers from the plugin and start using a Lightweight QtHttpServer we are working on right now. Once it’s ready, you will be able to create an application server to launch different process inheriting the web socket to communicate with the browsers. This will allow for supporting more than one concurrent user instead of sharing applications among users.

Note: The plugin only works using the Threaded Render Loop. If you use Windows or a platform using a different render loop ensure you set QSG_RENDER_LOOP environment variable to threaded

The post Qt WebGL Streaming merged appeared first on Qt Blog.

KDAB on Qt: hotspot – a GUI for the Linux perf profiler

Swift IM Blog: Swift 4.0 RC2: Now Available

$
0
0

A Release Candiate for Swift 4.0 is now available for download. Read on for more information and download instructions.

Swift 4.0 RC2 is now available from our releases page. This release includes:

  • Support for message carbons (XEP-0280)
  • Trellis mode enabled as a default feature, allowing several tiled chats windows to be shown at once
  • New chat theme including a new font
  • Redesigned keyword highlighting
  • Improved spell checker support on Linux
  • Support for automatic software updates on macOS
  • Support for unicode emojis on macOS
  • And assorted smaller features and usability enhancements

Please email (swift@swift.im) or tweet (@swift_im) any feedback you have to help us further improve Swift.

Woboq: QML vs. C++ for application startup time

$
0
0

After 5.8 reduced startup times with its QML compilation caching, object creation remains one of the largest startup time consumer for Qt Quick applications. One can use Loaders to avoid loading parts of the application that are not currently visible, but some scenes with higher complexity can still be taking quite some time to initialize when they urgently need to be displayed, especially on embedded systems.

At QtCon 2016 Andrew Knight presented a few benchmarks showing a situations where C++ can improve Qt Quick object creation times over QML. A conclusion of the session was that those benchmark results would need to be taken with a grain of salt since the specific benefits could be smaller in a real application relatively to everything else happening around.

What we’re presenting today are results of converting parts of a well-known QML example to C++ using public and private APIs, measuring the improvements on loading and execution times to have a better estimate of the opportunity for real world applications.

Preparation

We’re going to use the samegame QML example as reference. This gives us a complete application handling events and producing visual outputs. Like many QML applications reaching initial maturity, focus hasn’t been put on performance optimizations in samegame yet.

Let's start by profiling the application in order to fix the low hanging fruits first. This involves the QML Profiler, but also a regular C++ profiler (like macOS Instruments or Linux perf) together with a "-release -force-debug-info" configured Qt (don't pass -developer-build since it changes the way QML caching behaves). This leads us to remove Qt Quick Particles, QQmlFileSelector, and we’ll also convert property behaviors and states into imperative animations. These changes already considerably improve the performances by reducing the number of QObjects in the scene and by preventing the use of a few less scalable features of Qt Quick.

Most importantly for now, this allows us to focus performance measurements on application code, making sure that both our QML and C++ implementations use the same Qt Quick code paths and total number of QObjects.

Benchmarks

Samegame will be launched in fullscreen when using the eglfs platform plugin, this means that the game area will fill the screen, and on a 1080p display will give us a grid of 60x31 game blocks. We use a Nitrogen6X quad core i.MX6 for this project, running Yocto 2.2 and a standard cross-compiled build of Qt 5.9.1. Running those benchmarks on desktop gave us times around 20x faster, but the relative improvements were similar so we'll focus on i.MX6 results.

Two actions in the application will be uses as reference for our benchmarks:

  • Starting a new game, which uses a thin JavaScript loop to fill the game area with created Block objects.
  • Clicking at a fixed position inside the game area, which is a heavier JavaScript loop that updates the position of all blocks on the right of the clicked column (since the game has been hardcoded to fill each column with the same color, clicking removes one column and move following columns to the left)

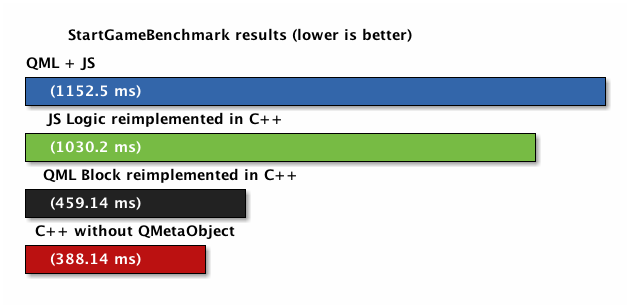
The StartGameBenchmark measures creating this scene, the HandleClickBenchmark measures clicking on the left-most row and iterating over all blocks to move them left.
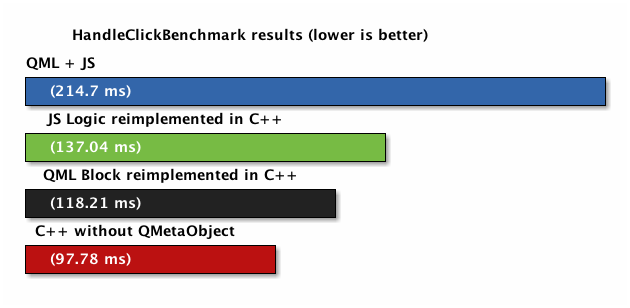
A benchmark has been written inside main() to wrap those functions and execute them multiple times to be able to provide more precise measurements. At multiple stages of the conversion from QML to C++ we will run those two benchmarks and gather results:

  1. The reference QML implementation (with Qt Quick Particles, QQmlFileSelector and declarative animations removed) without any C++:

    // QML
    Block { function fadeIn() { /*...*/ } }
    
    // JavaScript
    block.fadeIn();
    
  2. Only the samegame.js JavaScript Logic code that is run through our benchmarks has been converted to C++:

    // QML
    Block { function fadeIn() { /*...*/ } }
    
    // C++
    QMetaObject::invokeMethod(block, "fadeIn");
    
  3. Block.qml is also implemented in C++ as a QQuickItem subclass. Everything is still connected together using Qt meta-object properties and methods:

    // C++
    class Block : public QQuickItem { Q_INVOKABLE void fadeIn() { /*...*/ } };
    
    // C++
    QMetaObject::invokeMethod(block, "fadeIn");
    
  4. As above, but doing direct C++ method calls rather than going through meta-objects:

    // C++
    class Block : public QQuickItem { void fadeIn() { /*...*/ } };
    
    // C++
    block->fadeIn();
    

Benchmark 1: Starting a new game

Our implementation is using 5 QObjects per block, 2 of which are QQuickItems, for a total of 9300 QObjects. Creating a screen full of blocks for a new game takes 1.153 seconds on our i.MX6 (definitely user-noticeable), but we can reduce it to 0.388 seconds if we create the same item and object structure in C++ (197% faster). The largest gain comes from reimplementing Block.qml in C++ which alone gives us a speed improvement of 124%, mostly because we avoid the evaluation of QML properties and the creation of property bindings during instantiation.

Benchmark 2: Handling a click

This benchmark iterates over the blocks that need to be moved, starts an animation on the x and y property of each block’s root item, and update the blocks board position in the index array. Our C++ implementation is 120% faster but since this action doesn’t create any new QML object, the largest gain comes from reimplementing the JavaScript for-loop in C++, which alone is 57% faster.

The QML JIT implementation usually competes acceptably well with C++ and one thing to note is that the total time for handling this click in our case also has a considerably smaller performance footprint on our application than creation times covered by the Start Game benchmark. So while relatively put this is faster, the user will not notice the 117 ms reduction for Handle Click as much as the 764 ms reduction of the Start Game case.

Why is C++ faster?

Qt Quick and QML are very efficient when it comes to update a scene frame after frame to produce a smooth animation. Properties are consistently and efficiently updated according to animations by property bindings, layout will involve only the necessary elements and the scene graph will reuse as many OpenGL objects as possible to render the new frame, most of the time, with optimal state changes in system and graphics memory.

However, having this structure in place requires some runtime initialization to be done at creation time, and a mostly-dynamically-typed language like QML can’t really compete in this sport with a language like C++, whose design makes performance and compile-time optimizations a top-priority over its other language characteristics.
On top of having to create the same backing C++ QObject and QQuickItem, QML must resolve dynamic types, create data-structures to represent property bindings and go through the Qt meta-object type system to access any native member. Almost all of which C++ performs equivalently at compile time.

One of the reasons why QML can choose to offer conciseness and development speed at the cost of some performance is because it’s also designed to interface well with C++ code. This is an opportunity that, for example, Qt Quick Controls 2 has taken to reduce compilation and creation times with gains comparable to what is presented here. Qt Quick Controls 2 has an advantage over applications though: it’s part of Qt and it has access to private symbols like QQuickText, QQuickRectangle, QQuickFlickable, and even QQuickItemPrivate.

While our C++ implementation is tailored for measuring the potential performance gain of those two specific benchmarks, an ideal method would be if applications could do layout in QML, but handle events and state changes from C++ where the performance gain would be valuable. This could take advantage of strengths of both languages while reducing the number of dynamically-typed property bindings and JavaScript blocks to perform at runtime.
There is still some work to be done in Qt Quick to be able to conveniently harness C++ in UI code. We've already been able to mix the two languages using some hacks for this exercise, but the real blocker at the moment is that we need to be able to create Qt Quick visual primitives like animations, images and rectangles from C++ just like from QML.

Give up binary compatibility?

For this experiment, we had to expose private API that isn’t dynamically exported (i.e. QQuickSpringAnimation). qmake makes it relatively easy to access exported private symbols. This comes at a hefty price: those APIs are not supported and source and binary compatibility are not guaranteed.
An application could theoretically use private APIs without major problems if they are recompiled for any update of Qt. Changes to Qt private API would otherwise likely result in application crashes.

The question is then: should more of the Qt Quick API be publically exposed to C++ application code?

Conclusion

While we demonstrate how using some C++ private Qt Quick APIs can allow you to improve the creation times today, this is unsupported it’s not something that we recommend.

This blog post puts emphasis on creation times, but note that for general performance optimizations we recommend profiling and following the excellent Qt Quick Performance Considerations And Suggestions before considering any unsupported solution.

It should be clear that even though C++ is faster in this case, declarative QML will usually remain a better choice for core UI code because of its flexibility and conciseness. QML is also getting faster every release, this gap will continue shrinking up to a point. As for non-UI business logic, C++ can already be used comfortably without requiring using private Qt Quick APIs.

Long creation times are also not a problem if it can happen while the user is not waiting, this can be accomplished with asynchronous Loaders or by pre-loading components.

To conclude we are asking the community: Are those loading time improvements a great enough opportunity to justify improving the C++ brigde for UI code and extending the public Qt Quick API to classes like animations, QQuickRectangle and QQuickImage? A set of base classes that would give applications a freedom similar to what Qt Quick Controls 2 has.

Contribute to the discussion by letting us know in social medias or comments below if you have experience using C++ for Qt Quick UI code, and/or could benefit from having those functionalities publicly available.

Viewing all 15410 articles
Browse latest View live