Quantcast
Channel: Planet Qt
Viewing all 15410 articles
Browse latest View live

KDAB on Qt: Kuesa 3D 1.2 release!

$
0
0

Today, KDAB is releasing version 1.2 of the 3D integration workflow Kuesa 3D, built on top of Qt 3D.

Kuesa™ 3D is a complete design-to-code workflow solution for 3D in real-time applications, centered around the open glTF™ 2 format, supported by Blender, Maya and 3ds Max.

Read the Press Release…

In short, Kuesa provides a workflow that simplifies work for both designers and developers. It is centered around the glTF 2 format. The idea behind Kuesa 3D is that changes made on 3D models shouldn’t require much, if any, work on the developer’s side. As a consequence, you can iterate more frequently, get feedback more often and release on time.

In this blog post, we will highlight some of the new features we have introduced. You can get the full details here.

What’s new since 1.1?

The Iro Material library

The glTF 2 format currently only supports a Metallic Roughness physically-based material. As a result, it looks great but can be very expensive to render and requires lots of assets. For many use cases, simpler materials can be used instead: this is what the Iro Material library offers.

The library provides several materials that simulate reflections, clear coats of paint or simple transparent surfaces. The benefits of Iro materials are twofold:

  • they significantly reduce your GPU usage (compared with PBR materials), making them ideal for embedded or mobile applications;
  • they offer a real WYSIWYG integration with your 3D authoring tool: Kuesa is going to render your 3D models exactly like they appear in your artists’ editing suite.

This video by my colleague Timo Buske shows Iro Materials in action:

Improved Blender Support

Despite a steep learning curve, Blender is a fantastic tool and the latest version brings lots of interesting features to the table. For that reason, we have added support for Blender 2.8.

We can therefore now rely on the official glTF 2.0 export bundled with Blender. Furthermore, to make the best use of it, we’ve contributed patches that allow extending the exporter through custom extensions.

Then, we’ve added an extension to allow exporting of Iro Materials to glTF 2.0 files. In addition, we’ve also updated the Kuesa Blender addon to show a real time preview of the Iro Materials in Blender. What you see in Blender is what you’ll get with Kuesa 3D.

Improved animation support

Currently, glTF 2.0 only supports animating transformation properties (translation, scale, rotation) of objects. Incidentally, there is a draft of an extension EXT_property_animation to add support to animate any property.

Since that was a really important feature for us, we’ve decided to implement it for Kuesa 3D. In that sense, we’ve added a custom EXT_property_animation to the exporter. Next, we’ve updated the glTF 2 importer in the Kuesa 3D Runtime library to parse it properly.

Hence, we can now animate material, lights or camera properties in Blender, export the scene as a glTF file (with the extensions) and load it with Kuesa 3D Runtime.

An updated offering

With this new release, we changed the offering of the product to satisfy different use-cases.

Kuesa 3D Studio

Kuesa 3D Studio is the complete solution a team can use in production, with everything needed to satisfy both designers and developers:

  • Kuesa 3D Design Plugins:
    • Blender addons supporting:
      • Kuesa 3D extensions for Layers and Iro materials
      • The EXT_property_animation extension
      • Real time preview of the Iro materials in the Eevee viewport
  • Kuesa 3D Tools:
    • glTF editor application allowing preview and introspection of glTF 2 scenes
    • collection of command line tools to check and optimize assets
  • Kuesa 3D Runtime: Qt module library on top of Qt 3D
    •  glTF 2.0 fully compliant loader
    • support of Kuesa 3D and EXT_property_animation extensions
    • retrieve the various resources held in the scene
    • playback animations
    • add post processing effects such as Bloom, Depth of Field …
    • use a premade Qt 3D FrameGraph

The Kuesa 3D Tools and Runtime also support any glTF 2.0 files coming from other application like Maya, 3DS Max or others, as long as they can export to glTF 2.0.

You can find out more about Kuesa 3D Studio here.

Kuesa 3D Runtime

Kuesa 3D Runtime is also available as a separate product, full support from us. The product is available on the Qt marketplace or directly from us. This is perfect if you want to try out Kuesa and see what you can do with it.

Like previous releases, it is freely available under the AGPL 3 license.

Since it is built on top of Qt 3D, you can use the full Qt 3D API to further customize your application. For the most part, you can leverage things like Picking, Camera handling and a lot more for free.

As for actual Qt requirements, Kuesa 3D Runtime requires either the latest Qt 5.12 or the new Qt 5.15 release.

Find out more about Kuesa 3D Runtime.

Additional Contributions

Lastly, Kuesa 3D is also a way for us to justify contributions to open source projects. In that sense, we’ve made a few contributions targeting:

  • Support for registering and creating user defined extension in Blender’s glTF exporter
  • Fixes for animations on the official Blender glTF exporter
  • Qt 3D bug fixes and performance improvements

Try it out!

You can download Kuesa 3D Runtime from our GitHub repository.

Download the latest Kuesa 3D Studio brochure.

Join our live webinars and ask questions:

Watch our Realtime Music Box short video where I explain all this running on one of our demos:

About KDAB

If you like this blog and want to read similar articles, consider subscribing via our RSS feed.

Subscribe to KDAB TV for similar informative short video content.

KDAB provides market leading software consulting and development services and training in Qt, C++ and 3D/OpenGL. Contact us.

The post Kuesa 3D 1.2 release! appeared first on KDAB.


KDAB on Qt: Kuesa 3D Studio 1.2 – Press Release

$
0
0

KUESA™ 3D Studio 1.2 released

A Complete Design-to-Code Workflow Solution for 3D Assets in Real-time Applications

  • version 1.2 released
  • makes 3D design and development workflows easy, fast and reliable
  • offers support for Maya, Autodesk 3ds Max, and Blender as well as any other glTF-compatible digital content creation tools
  • New: Iro materials library can simulate common surface properties with less designer and GPU overhead
  • free live webinar June 4th, 6pm CEST

Berlin, June 2nd 2020

Building software that is dependent on real-time 3D models – like for example an automotive dashboard, MRI machine, factory control system or furniture design tool – requires not only 3D designers and 3D programmers. It also demands the ability to bring these very different skill sets together into a smoothly operating workflow.

In conventional workflows, a massive problem is that the assets created by 3D artists can rarely be used by programmers directly, forcing the development team to hand-tweak models and hand-code animations to make things work. It also forces designers to move their designs to target hardware to see how they’ll actually appear. This manual work extends product release timelines, and the artificial wall it creates between 3D artists and software engineers is a bottleneck that prohibits rapid iteration and the fine-tuning required to develop fast and high-quality results.

To eliminate this problem KDAB created KUESA 3D Studio. It makes the collaboration of designers and developers much more manageable by offering a seamless, integrated workflow. Designers can realize their vision using their favorite tools, developers can focus on their strengths without having to deal with design issues, and management can rely on getting better products to market faster.

How does KUESA 3D Studio work?

KUESA 3D Studio is comprised of three main components.

The KUESA 3D Design Plugins augment a designer’s preferred digital content creation tools, allowing them to create and export fully accessible 3D scenes and to display content that visually matches the run-time environment.

Many additional utilities are integrated in KUESA 3D Tools for fine-tuning, conditioning, investigating, debugging, and optimizing 3D assets, usable by either designers or developers.

Libraries built on top of Qt and Qt 3D allow developers to integrate 3D scenes directly into applications. This module is called KUESA 3D Runtime.

What’s new in version 1.2?

One of the most significant improvements is the Iro Materials Library. Physically-based rendering (PBR) can generate amazing images, but not all embedded systems have enough processing power to handle it. Also, without knowing the actual physics, PBR isn’t easily tweakable to simulate materials such as a pre-defined bitmap that needs to appear glossy. For these cases, or any other where PBR may be overkill, KUESA 3D Studio supports the Iro Material Library. This library provides a catalog of materials that can simulate common surface properties (such as reflections, clear-coated paint, and transparency) and gives great looking results with less designer and GPU overhead.

By default, glTF™ only allows you to animate transformation properties like translation, rotation, scale. In lots of cases, it would be useful to animate other properties like material properties, camera properties etc. This has now been added through the use of a custom glTF extension.

An additional benefit is brought in by Qt 3D, which KUESA 3D Studio is based on and which is maintained by KDAB. With Qt 3D on Qt 5.15.0 very potent profiling capabilities have been added.

More features:

  • Support for Maya, Autodesk 3ds Max, and Blender, as well as any other glTF-compatible digital content creation tools
  • Ability to build 3D scenes with PBR, non-PBR, and node-based materials
  • Real-time performance on desktop and embedded systems
  • Integration of both 3D and 2D assets
  • Compressed textures, meshes, and images for faster load times, reduced application size, and optimal use of GPU resources
  • Full programmatic access to scene items with APIs in C++ and QML
  • Photo-realistic results consistent across design tools and applications
  • Special effects like bloom and depth-of-field
  • Up to date with Qt 3D performance improvements in Qt 5.15
  • Ability to incorporate tools into a continuous integration system resulting in consistent 3D asset verification and conditioning
  • Availability of AGPL 3 license for KUESA 3D Runtime

———————————————————————————————————————————

More information on www.kuesa.com

Live demo webinars are scheduled for:

June 4th 2020… (6pm Central European Time)

June 18th 2020... (8am Central European Time)

Video footage

About the KDAB Group

The KDAB Group is the world’s leading software consultancy for architecture, development and design of Qt, C++ and OpenGL applications across desktop, embedded and mobile platforms and is one of the biggest independent contributors to Qt. Our experts build run-times, mix native and web technologies, and solve hardware stack performance issues and porting problems for hundreds of customers, many among the Fortune 500. KDAB’s tools and extensive experience in creating, debugging, profiling and porting complex applications help developers worldwide to deliver successful projects. KDAB’s trainers, all full-time developers, provide market leading, hands-on, training for Qt, OpenGL and modern C++ in multiple languages. Founded in 1999, KDAB has offices throughout North America and Europe.

More Information on www.kdab.com Press Contact: press@kdab.com

Download this report

The post Kuesa 3D Studio 1.2 – Press Release appeared first on KDAB.

KDAB on Qt: QStringView Diaries: Zero-Allocation String Splitting

$
0
0

After four months of intensive development work, I am happy to announce that the first QStringTokenizer commits have landed in what will eventually become Qt 6.0. The docs should show up, soon.

While the version in Qt will be Qt 6-only, KDAB will release this tool for Qt 5 as part of its KDToolBox productivity suite. Yes, that means the code doesn’t require C++17 and works perfectly fine in pure C++11.

This is a good time to recapitulate what QStringTokenizer is all about.

QStringTokenizer: The Zero-Allocation String Splitter

Three years ago, when QStringView was first merged for Qt 5.10, I already wrote that we wouldn’t want to have a method like QString::split() on QStringView. QStringView is all about zero memory allocations, and split() returns an owning container of parts, say QVector, allocating memory.

So how do you return the result of string splitting, if not in a container? You take a cue from C++20’s std::ranges and implement a Lazy Sequence. A Lazy Sequence is like a container, except that it’s elements aren’t stored in memory, but calculated on the fly. That, in C++20 coroutine terms, is called a Generator.

So, QStringTokenizer is a Generator of tokens, and, apart from its inputs, holds only constant memory.

Here’s the example from 2017, now in executable form:

const QString s = ~~~;
for (QStringView line : QStringTokenizer{s, u'\n'})
    use(line);

Except, we beefed it up some:

const std::u16string s = ~~~;
for (QStringView line : QStringTokenizer{s, u'\n'})
    use(line);

Oh, and this also works now:

const QLatin1String s = ~~~;
for (QLatin1String line : QStringTokenizer{s, u'\n'})
    use(line);

QStringTokenizer: The Universal String Splitter

When I initially conceived QStringTokenizer in 2017, I thought it would just work on QStringView and that’d be it. But the last example clearly shows that it also supports splitting QLatin1String. How is that possible?

This is where C++17 comes in, on which Qt 6.0 will depend. C++17 brought us Class Template Argument Deduction (CTAD):

std::mutex m;
std::unique_lock lock(m); // not "std::unique_lock lock(m);"

And that’s what we used in the examples above. In reality, QStringTokenizer is a template, but the template arguments are deduced for you.

So, this is how QStringTokenizer splits QStrings as well as QLatin1Strings: in the first case, it’s QStringTokenizer, in the second, QStringTokenizer. But be warned: you should never, ever, explicitly specify the template arguments yourself, as you will likely get it wrong, because they’re subtle and non-intuitive. Just let the compiler do its job. Or, if you can’t rely on C++17, yet, you can use the factory function qTokenize():

const QLatin1String s = ~~~;
for (QLatin1String line : qTokenize(s, u'\n'))
    use(line);

QStringTokenizer: The Safe String Splitter

One thing I definitely wanted to avoid is dangling references a la QStringBuilder:

auto expr = QString::number(42) % " is the answer"; // decltype(expr) is QStringBuilder<~~~, ~~~>
QString s = expr; // oops, accessing the temporary return value of QString::number(), since deleted

The following must work:

for (QStringView line : QStringTokenizer{widget->text(), u'\n'})
    use(line);

But since the ranged for loop there is equivalent to

{
   auto&& __range = QStringTokenizer{widget->text(), u'\n'};
   auto __b = __range.begin(); // I know, this is not the full truth
   auto __e = __range.end();   // it's what happens for QStringTokenizer, though!
   for ( ; __b != __e; ++__b) {
     QStringView line = *__b;
     use(line);
   }
}

if QStringTokenizer simply operated on QStringView or QLatin1String, the following would happen: The __range variable keeps the QStringTokenizer object alive throughout the for loop (ok!), but the temporary returned from widget->text() would have been destroyed in line 3, even before we enter the for loop (oops).

This is not desirable, but what can we do against it? The solution is as simple as it is complex: detect temporaries and store them inside the tokenizer.

Yes, you heard that right: if you pass a temporary (“rvalue”) owning container to QStringTokenizer, the object will contain a copy (moved from the argument if possible) to extend the string’s lifetime to that of the QStringTokenizer itself.

Future

Now that we have developed the technique, we very strongly expect it to be used in Qt 6.0 for QStringBuilder, too.

By Qt 6.0, we expect QStringTokenizer to also handle the then-available QUtf8StringView as haystack and needle, as well as QRegularExpression and std::boyer_moore_searcher and std::boyer_moore_horspool_searcher as needles. We might also re-implement it as a C++20 coroutine on compilers that support them, depending on how much more performance we’ll get out of it.

Conclusion

QStringTokenizer splits strings, with zero memory allocations, universally, and safely. Get it for free right now from KDToolBox, and you can future-proof your code with an eye towards Qt 6.

About KDAB

If you like this blog and want to read similar articles, consider subscribing via our RSS feed.

Subscribe to KDAB TV for similar informative short video content.

KDAB provides market leading software consulting and development services and training in Qt, C++ and 3D/OpenGL. Contact us.

The post QStringView Diaries: Zero-Allocation String Splitting appeared first on KDAB.

pat26 MARGINALIA blog: Qt & Android: Setting wallpaper

$
0
0

Is your Android app written using Qt? Would you like to change the wallpaper on your Android device programmatically? Then join me in creating an Android app that generates and saves the image as wallpaper.


Using Qt Creator, create a new 'Qt Quick Application - Empty' naming it WallpaperExample.


Select both Desktop and Android Kits.  It is usually convenient to have a Desktop app to test non-Android features of the app.


Next, verify the WallpaperExample Desktop builds and runs.


Update main.qml so that it can used to set the wallpaper.


Create the AndroidManifest.xml. Additional changes to the XML will be neccessary later.
Select all the Android supported ABI's.


Now, verify the WallpaperExample Android builds and runs.


An effective  approach  for a Qt/QML/C++ app to perform Android specific tasks is to use Android's Java API. Android Java classes are accessible to a Qt application using the JNI convenience APIs in the Qt Android Extras module, such as QAndroidJniObject::callStaticObjectMethod.


Java classes in a Qt Android project need to maintain the Java naming conventions and the directory package structure.
The package name is the same package name assigned in the Android-Mainfest.xml.
Because this Java class, WallpaperGenerator,  requires access to application-specific resources, the Android Context must be passed in from QAndroidJniObject::callStaticMethod call in the Qt class.


The QAndroidJniObject::callStaticMethod calls the static method WallpaperGenerator.generateWallpaper which generates and sets the Android wallpaper on a seperate thread to prevent UI delay.


The method WallpaperGenerator.getWallpaper calls an image generating service and reads the response using common Java API. 
The method WallpaperGenerator.setWallpaper creates and sets the bitmap image using Android  specific API. 
An alternative to calling the methods getWallpaper and setWallpaper, the method generateWallpaper can be called.


AndroidManifest.xml requires a few changes before the app can run. Android requires the manifest.permission.SET_WALLPAPER permission. Starting with Android 9, API level 28, cleartext support is disabled by default and this app communicates with the wallpaper generating server using http, so usesCleartextTraffic must be enabled.


That's all it takes. Run the app and set wallpaper.


The Qt Company Blog: Qt Creator 4.12.2 released

$
0
0

We are happy to announce the release of Qt Creator 4.12.2!

Qt – Life of a Developer: The Cost of no Architecture

$
0
0

Like many others, I enjoy various reverse engineering and tear-down stories. Personally, I mean things like iFixit tear-downs and Ken Shirriff’s blog, so I started following this tweet thread by foone.

This continues with another tweet sequence about getting software running on the remote control. Having enjoyed these tweets, I started thinking.

The Harmony remotes are quite expensive in my mind. I can’t find any exact numbers for the number of sold devices, but I found this 2018 Q4 earnings report. Looking at the net sales, I guess the remotes are either “Tablets & Other Accessories” or “Smart Home”. They represent sales net sales of ~107 and ~89 MUSD over 12 months. Let’s pick the lower number and just look at magnitudes. The Harmony 900 seems to have retailed for ~350 USD back when it was new. So, if all the Smart Home stuff was harmonies, we’re looking at 250k units over a year. So I’m guessing the magnitude is around 10k – 100k units annually – but the Harmony 900 is from 2013, so I assume that it sold closer to the lower number, if not below. The market was new and so on.

Then we look at the tweets again. What have we got? Let’s put aside security issues, unencrypted communications, and other clear mistakes and just look at how the device is built.

Flash to drive the UI, double web servers on-board, Lua, QNX and what not. A 233 MHz CPU and ~64MB of FLASH – for a remote control. From an engineering perspective, this sounds like a fun system to work on – from an architecture perspective, it looks like a ball of mud.

Back in 2013, QNX might have been a good choice compared to Linux. Today, with Yocto and similar tools for developing embedded Linux systems, it feels like an odd choice to add a license cost to such a device. But no biggie. Back in the day this was not an unreasonable choice (and still isn’t for certain applications).

The Flash stuff. There were alternatives back in 2013, but sure, there were plenty of developers at hand and things like Qt QML was still probably a bit clunky (I can’t recall the state of it back then – it required OpenGL ES, which I guess was a big ask back then).

But the mix of techniques and tools. The on-board web servers. The complexity of a small system and the costs it brings to maintenance and testability. If this is the foundation for Harmony remotes and a platform that has been used for the better past of the past decade, I wonder if the added engineering costs for architecture the platform to be more optimized early on would not have paid off in lower maintenance costs, as well as lower hardware costs.

I know how it is when you’re in a project. The deadline is there in big writing on one of the walls. You can get something working by stringing what you have together with duktape and glue. The question I’m asking myself is more along the lines of how do we run embedded systems engineering projects? Where did we go wrong? Why don’t we prioritize the thinking and refactoring over the just-get-this-thing-out-of-the-door?

The answer is time to market and such, but over a decade of building on a ball of mud, the economical numbers start adding up in favour for the better engineered product. For continuous improvement. For spending time thinking about how to improve the system as a whole.

Felgo: Release 3.5.0: Run your Qt and Felgo Apps in the Browser with WebAssembly (WASM)

$
0
0

Felgo 3.5.0 adds support for WebAssembly (WASM). This allows you to use Felgo and Qt to build applications that also run in the browser. With this update you get access to a new target platform, with the same source code and skills you already used to develop mobile, desktop and embedded apps with Felgo and Qt.

Felgo for WebAssembly helps you to streamline your development process, and maintain a single universal code-base for all your deployment targets, including the web.

With Felgo for WebAssembly you can put production-ready Felgo and Qt apps to the web! The official Qt for WebAssembly port still suffers from several issues that we fixed for you, you can find more details further below.

What is WebAssembly?

WebAssembly is a new type of code that can be run in modern web browsers — it is a low-level assembly-like language with a compact binary format that runs with near-native performance and provides languages such as C++ the ability to run on the web. It is also designed to run alongside JavaScript, allowing both to work together.

WebAssembly support in browsers is evolving rapidly. It is being developed as a web standard via the W3C.

Qt for WebAssembly (WASM) is a platform plugin that allows execution of Qt apps on any compatible browser. The most common Qt and QML components are available and apps require little or no changes to the source code to be able to run in the browser.

With Felgo for WebAssembly, you get an improved version of the Qt WASM port, with several fixes and additional features. You can find a detailed list of the improvements later in this post. You can also use Felgo for WebAssembly with plain Qt applications, that do not include any Felgo components, to benefit from the improvements.

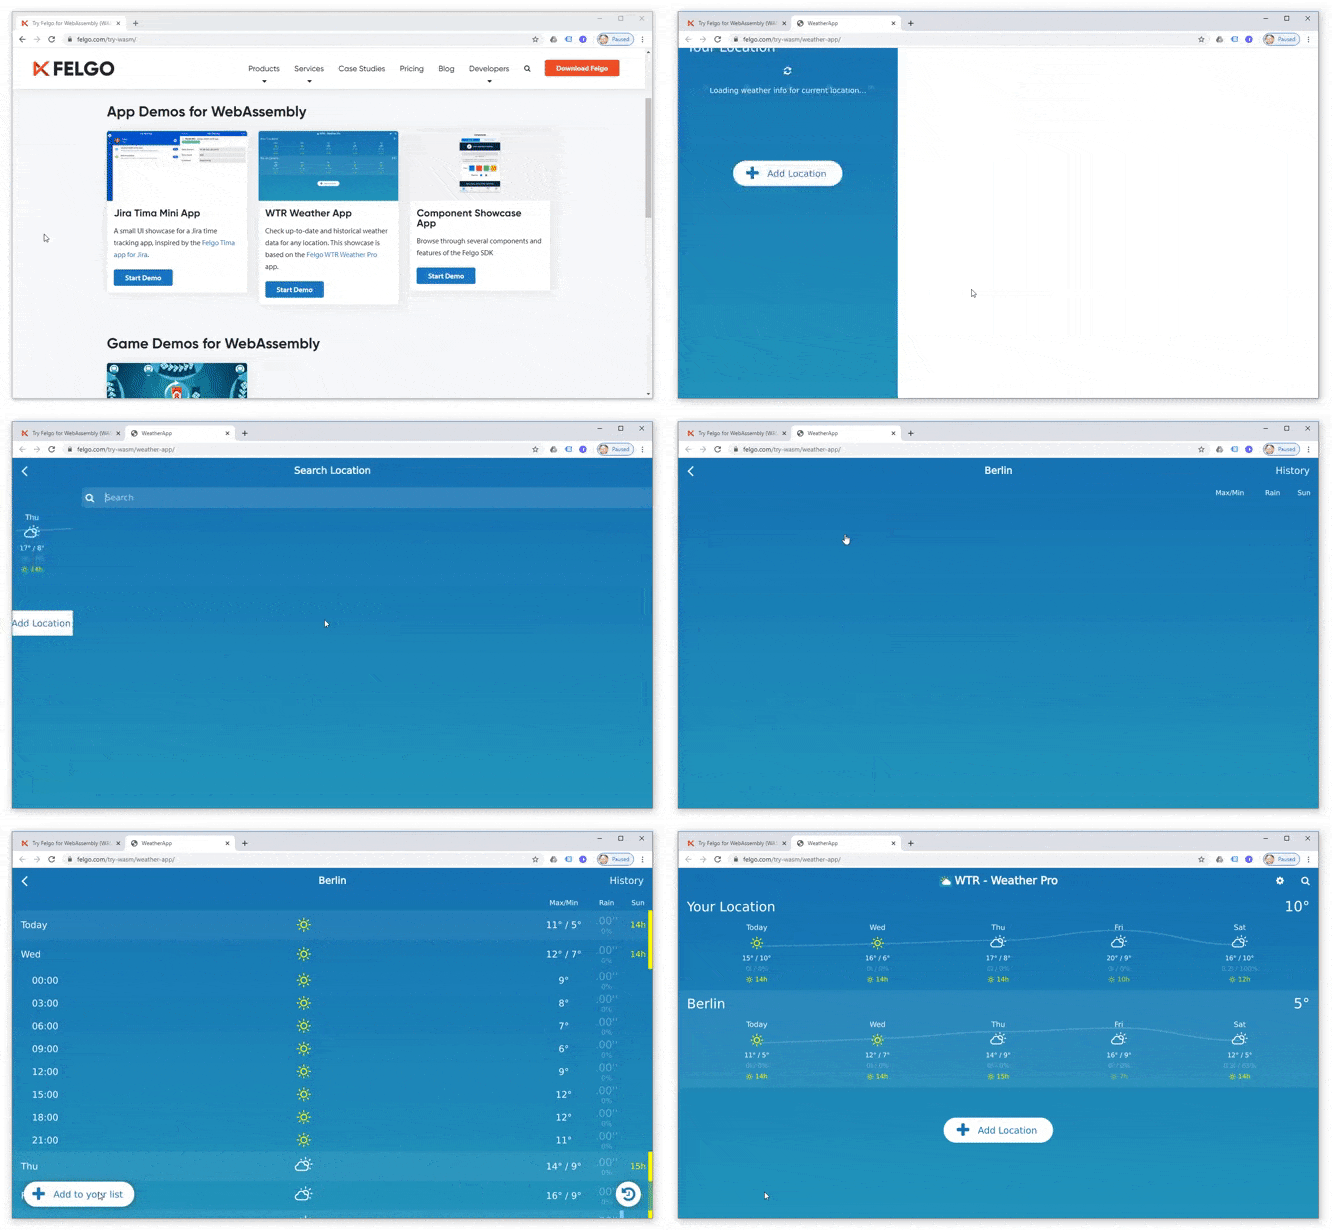
Wonder how Felgo for WebAssembly looks like? Here is an example:


Use Cases for Web Apps using WebAssembly

Port Existing Applications to the Web

You can provide your existing Qt and Felgo applications also on the web, inside a browser, to reach a wider audience. With WebAssembly, this is possible without additional development effort. With Felgo you can share the same code-base for your mobile, desktop or embedded app as well. The UI/UX will automatically adapt to the platform.

Zero-Installation Experience

Getting people to install an app is actually a pretty significant obstacle to adoption. Now you can provide a zero-installation experience for your application, by serving it via the browser. Nothing is easier than just visiting a website with your browser.

Reuse Your Existing Skills

Now you can develop web applications with beautiful animated UIs, with your existing Felgo, Qt and QML knowledge.

Graphically Demanding or Computationally Heavy Applications

WebAssembly is also a perfect fit for applications that demand a lot of resources or performance. WASM is faster than JS for computationally or graphically demanding applications.

Integrate WASM Into Existing Websites

WebAssembly is rendered to a HTML element. You can freely integrate it into any existing website or other web applications. WASM apps can also communicate with JS in both directions. Examples for this will follow soon.

Benefits of using WebAssembly to Develop Web Apps

Code Reuse & Portability

With the same code-base, you are now able to deploy your applications to mobile, desktop, embedded and the web. This can save tremendous amounts of time for developing and maintaining an additional platform.

Reduced Time to Market

There are several factors that lower the time to market using WebAssembly. Obviously reusing a universal code-base for all platforms is one of them. This also leads to heavily reduced testing times, as most bugs will be shared across all platforms and only need to be fixed once for all of them.

Compared to e.g. mobile applications, with store reviews taking several days and tight store guidelines that have to be met, a web app also allows shorter release cycles. You can quickly test and publish new features of your application.

Rights Protection

WebAssembly UI is rendered in a Canvas HTML element, users/extensions can not modify the content of the resulting UI, as well as protecting the assets and application logic.

Web crawlers/scrapers can not parse the UI rendered in the canvas, further protecting the information provided using WebAssembly.

Improvements of Felgo WASM compared to Qt WASM

Since Qt announced support for WebAssembly to enable Qt applications to run on the Web, we were closely following the progress. There are a couple of crucial fixes and additions that needed to be performed to use WebAssembly with Qt in production. Here is a quick overview of the most important improvements available with Felgo for WebAssembly:

Test more WebAssembly Examples

You can check out a couple of Felgo examples using WebAssembly right in your browser.

Test more Examples

How to Use Felgo for WebAssembly

Use QML Hot Reload with WebAssembly during Development

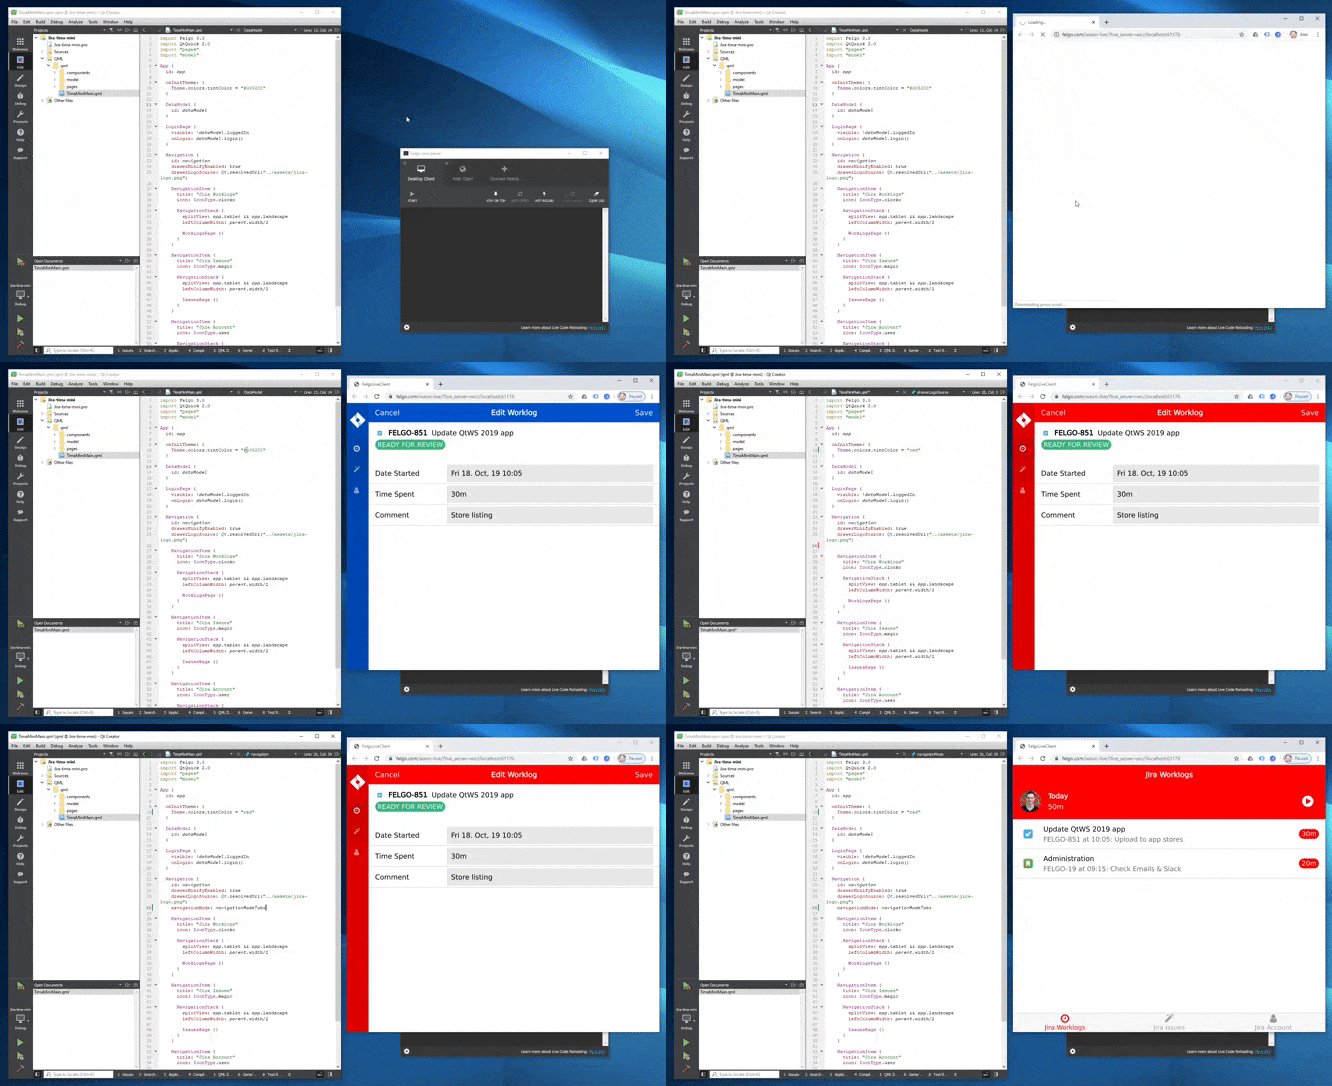
During development, you can use QML Hot Reloading also with WebAssembly. You can start the pre-built Web Live Client hosted by Felgo right from your Felgo Live Server.

The WASM Live Client will open in your browser and immediately connect to your Live Server using a localhost connection. Your source code will not leave your local network, not even your computer actually.

Build and Deploy your App with WebAssembly

You can find a detailed step-by-step guide on how you can build and deploy your application with Felgo for WebAssembly in the documentation.

Here are the most important steps as a quick overview.

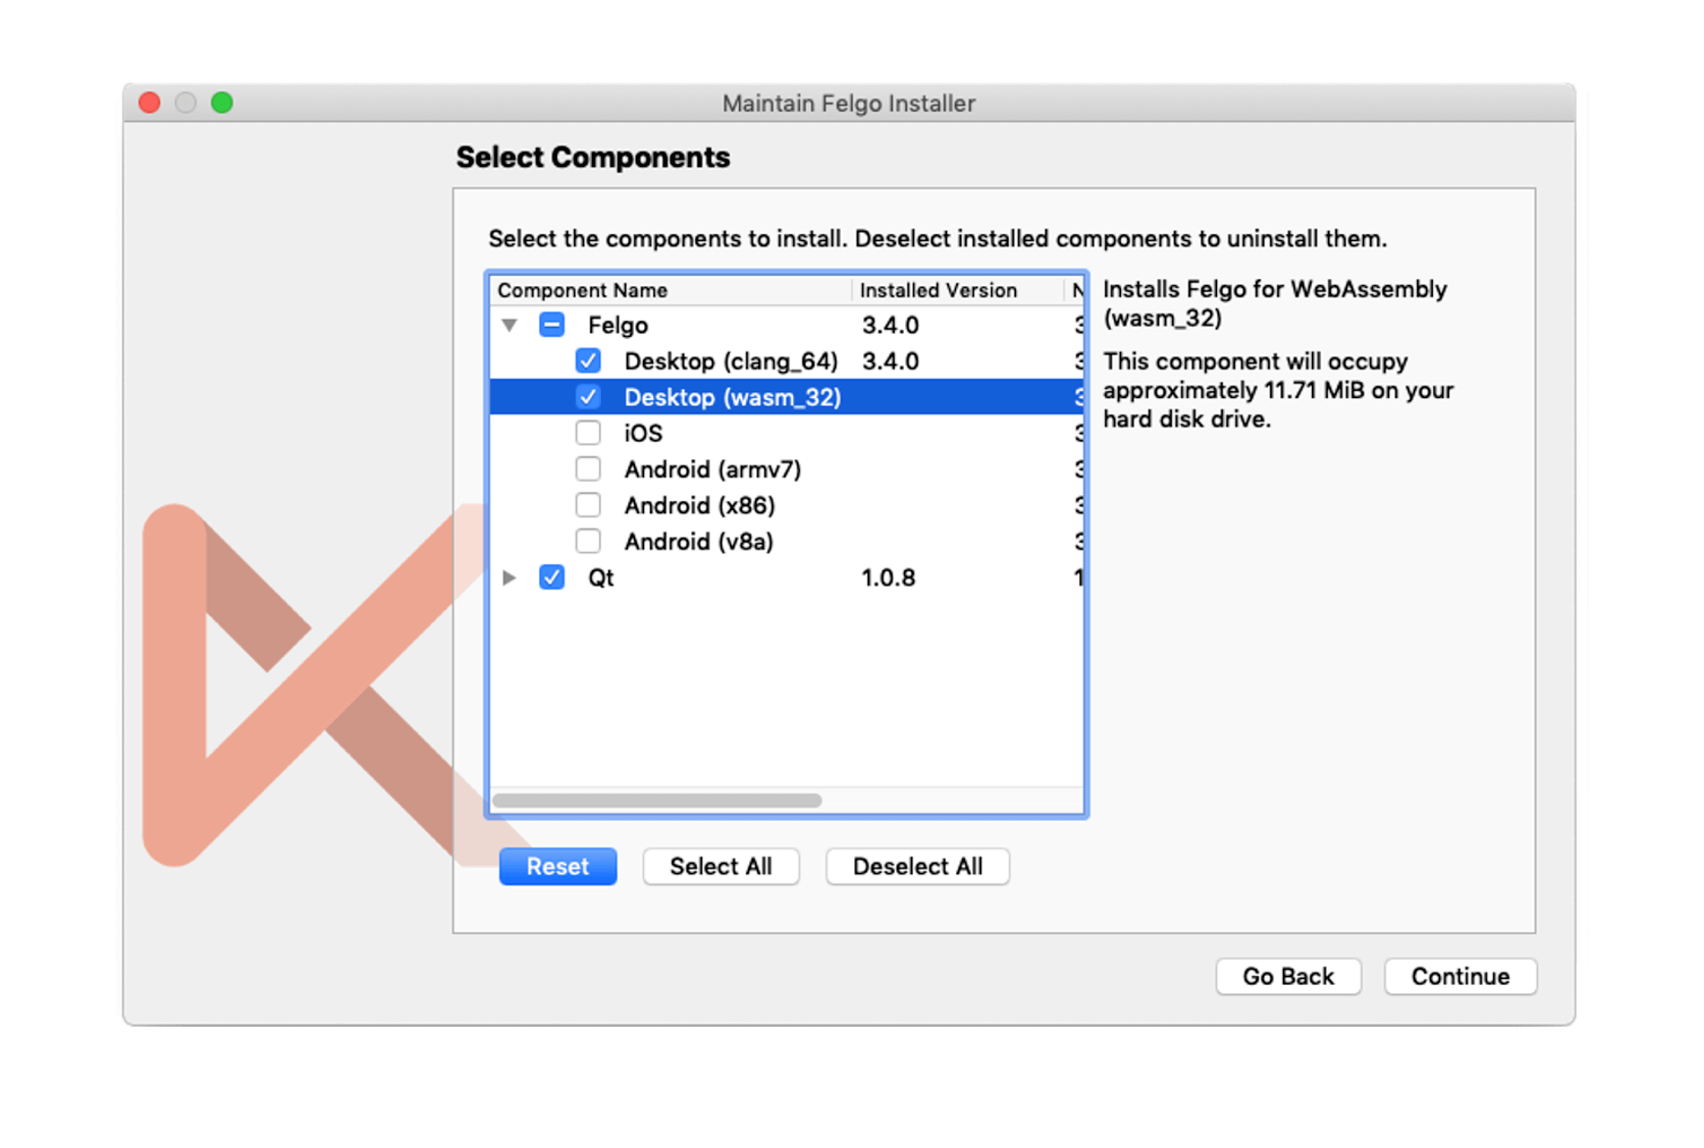
1. Install the WebAssembly Package using the Maintenance Tool

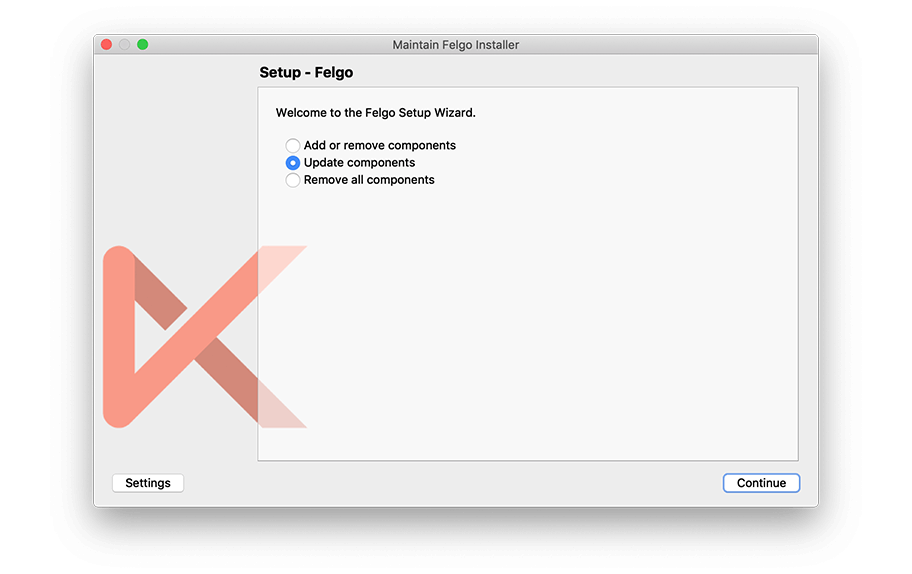
Installing the necessary package for WebAssembly is as easy as for any other target platform. Just open the Maintenance Tool located in your installation directory, select “Add or remove components” and add the WASM package.

2. Prepare and Build your Application using WebAssembly

Felgo for WebAssembly uses the Emscripten compiler to build C++ portable applications to target browsers with WebAssembly support.

All files of your project, including assets, need to be added to the Qt Resource System (qrc) to be available with WebAssembly. If you are not familiar with this, you can find more info here.

Since the Qt Creator plugin for WASM is still in an experimental phase, we recommend using the command line to perform the actual build. You can find all the necessary commands in the documentation: Felgo for WASM – Build your Project

3. Test your Application in the Browser

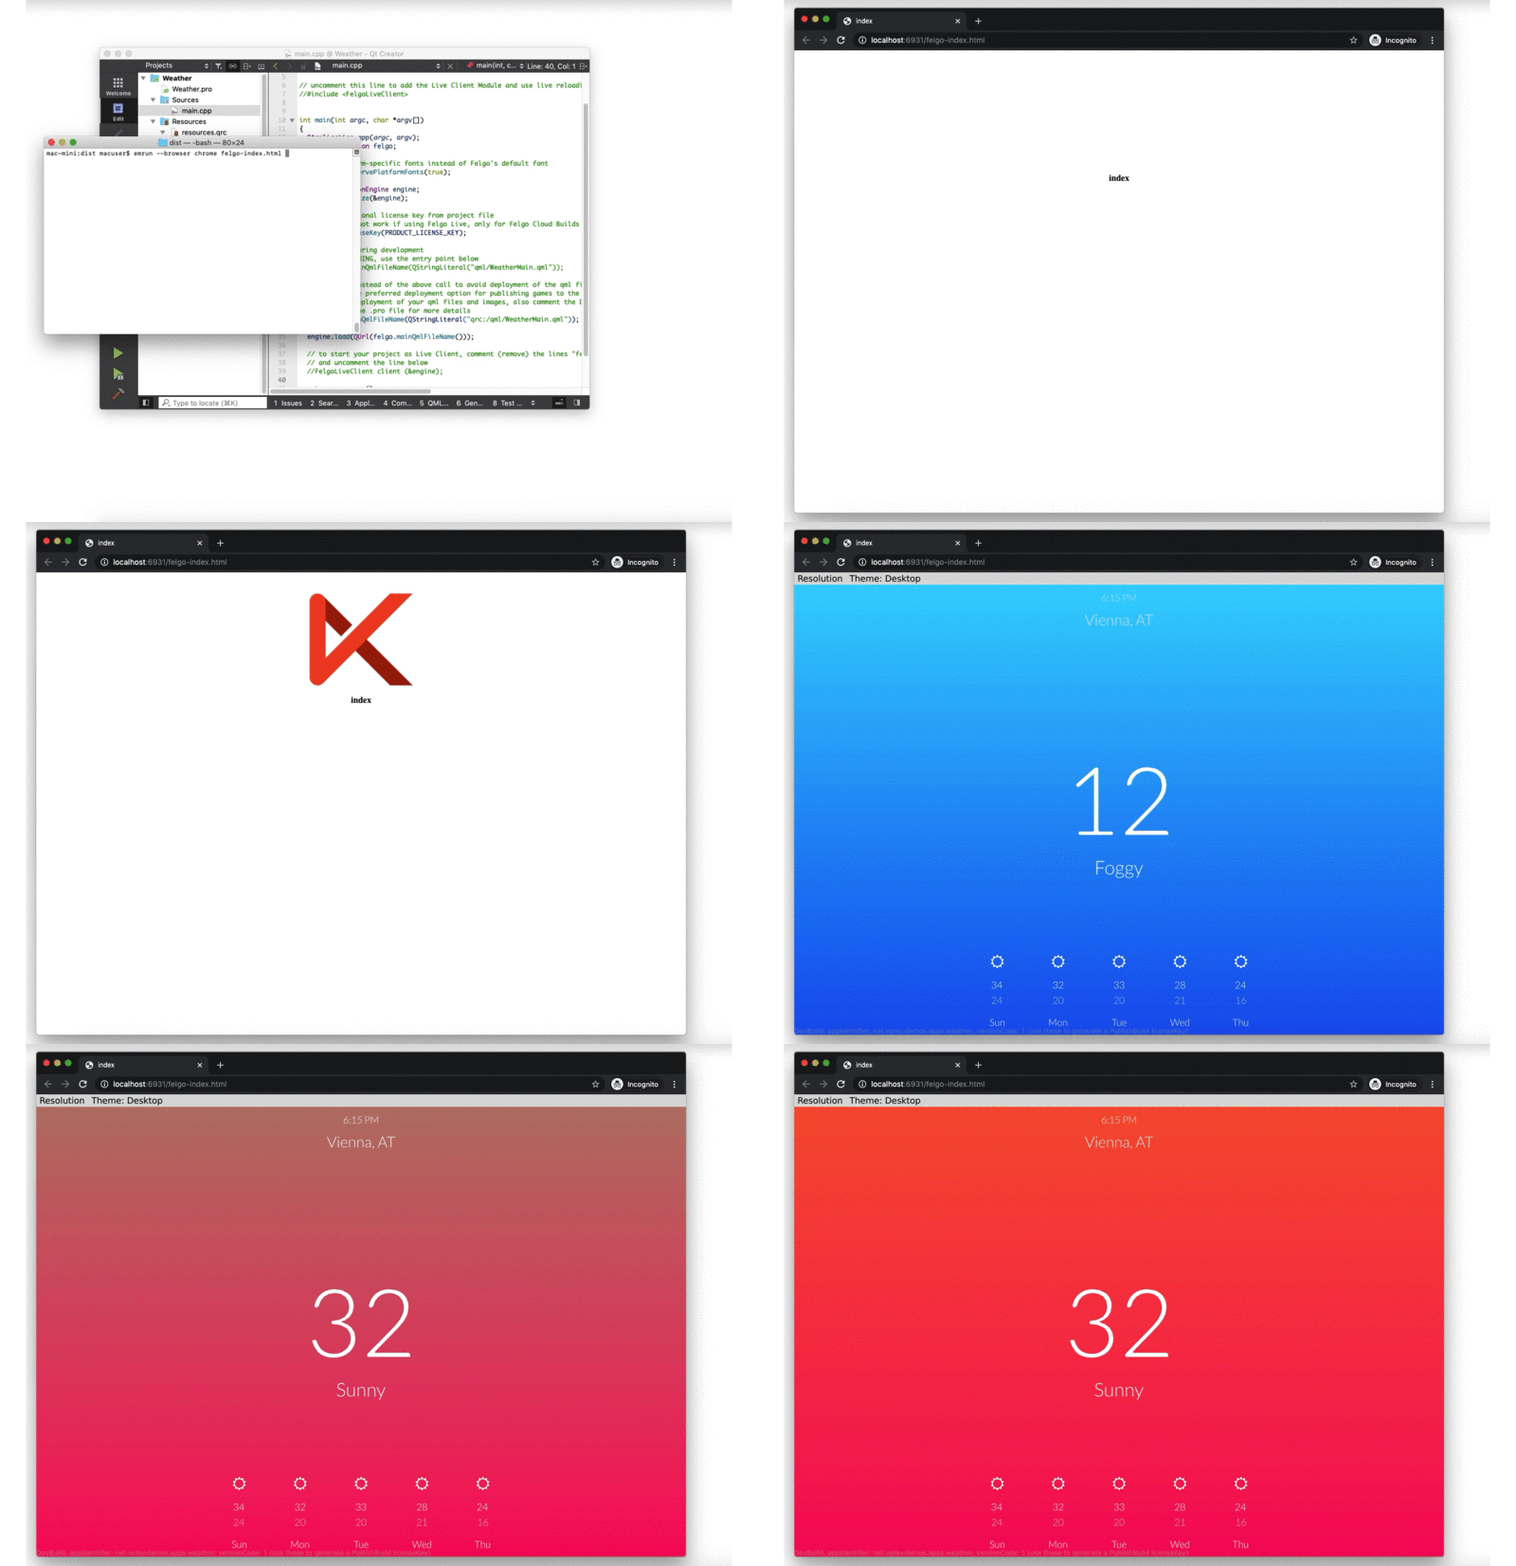
WASM modules can only be served using a web server. Simply opening the resulting .html file with your browser will not work. But it is easy to run it using a local web server for testing.

After you built your app, go to the build folder, enter the dist folder and run the following command to launch the application with the included local web server:

emrun --browser chrome index.html

You can find more info and alternative ways to launch your App here.

Use WebAssembly with Felgo Cloud Builds

Soon you will also be able to build your application using Felgo Cloud Builds, the CI/CD for Felgo and Qt projects. This allows you to easily build and distribute your application in the cloud, without installing the local toolchain for WebAssembly or any other target platform.

More Additions of Felgo 3.5.0

Update to Qt Creator 4.11.2

With Felgo 3.5.0, you get access to a newer Qt Creator version, with many improvements and better stability, for a better development experience.

Use Amplitude Analytics Plugin on Desktop & Embedded

This update adds support for the Amplitude analytics plugin on desktop and Embedded Linux platforms. You can now easily track sessions and events in your application like this:

import Felgo 3.0

Amplitude {
  id: amplitude
  
  // From Amplitude Settings
  apiKey: ""
  
  onPluginLoaded: {
    amplitude.logEvent("App started");
  }
}

Note that the Amplitude plugin will now also send events during development on desktop by default. If that is not desired, make sure to remove the apiKey during development, or e.g. check if system.publishBuild is set.

Spot Performance Issues with the FpsMeter

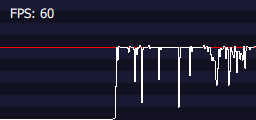
The new FpsMeter component allows you to quickly spot drops in the framerate of your app or game across all platforms or test devices. This serves as a quick mini-profiler to spot potential performance issues in your application.

import Felgo 3.0
import QtQuick 2.0

App {
  id: app
  
  Page {
    // ... UI items go here ...
  }
  
  // Simply place the FpsMeter on top of other UI elements, no additional
  // configuration is required as all properties are set to sensible defaults.
  FpsMeter {
  }
  
}

More Features, Improvements and Fixes

Felgo 3.5.0 includes many more features, for example:

  • QML Hot Reloading now supports the QML on-syntax. You can add property value sources like PropertyAnimation on x and property value interceptors like Behavior on x at runtime using Hot Reloading.
  • Several stability improvements for QML Hot Reload with Felgo Live.
  • Fixes a potential crash on Android with the Soomla Plugin for in-app purchases.
  • The new method NativeUtils::deviceManufacturer() provides information about the mobile device manufacturer.

For all relevant changes, features and fixes of recent Felgo updates, please check out the changelog.

How to Update Felgo

Test out these new features by following these steps:

  • Open the Felgo SDK Maintenance Tool in your Felgo SDK directory.
  • Choose “Update components” and finish the update process to get this release as described in the Felgo Update Guide.

Update Felgo

If you haven’t installed Felgo yet, you can do so now with the latest installer from here. Now you can explore all of the new features included in this release!

For a full list of improvements and fixes to Felgo in this update, please check out the change log!


More Posts Like This


QML Hot Reload with Felgo Live for Qt


Release 3.4.0: QML Hot Reload with Felgo Live


Release 3.3.0: Update to Qt 5.13.2 and Qt Creator 4.10.2, Jira Tima App Demo

The post Release 3.5.0: Run your Qt and Felgo Apps in the Browser with WebAssembly (WASM) appeared first on Felgo.

tHeBloG: Qt Quick 3D DynamicMeters demo

$
0
0

Lately we have been working to perfect the Qt Quick 3D for the 5.15 release. There are still some tweaking to do, but things are looking pretty nice already!


In order to prove (to ourselves and to others) that Quick 3D is ready for the prime time, we have also been implementing some demos with it. Tomi already made a blog post about Quick 3D Benchmarking demo here, go check it out if you haven't already. This benchmarking application can be used to test many features of Quick 3D and to evaluate how different hardware can handle the load when the model count, complexity, texture sizes etc. are increased.

Another demo we have prepared is called DynamicMeters. The main targets of this demo were:
  • Demonstrate how Quick 3D and Qt Quick (2D) can easily be combined into single UX. While 3D is great, most applications want to combine also traditional 2D elements in different ways.
  • Test how Quick 3D works together with 3rd party OpenGL libraries. Make sure that the performance is good and there are no barriers for this approach.
  • Implement Qt Quick components as mostly dynamically painted. Usually these kinds of user interfaces use images, but painting them instead allows for more customization and possibilities for nice transition animations. Also it keeps storage requirements low: Currently the whole demo requires under 5MB space, a big part of it going for QNanoPainter built-in Roboto fonts. Not all of them are even used so this could be lightened even more if desired.
Here is a brief video showing the main features of the demo:


For those who want to know a bit more, here are few implementation details:
  • Running the demo requires very latest Qt Quick 3D 5.15 branch. Beta4 doesn't yet contain all the latest fixes, so either build Quick 3D from sources or wait for the release candidate / final 5.15 packages.
  • The demo has been tested on Windows, macOS, and embedded Linux. If you have trouble building it for some embedded device, make sure the correct QNanoPainter backend get selected in libqnanopainter/include.pri
  • To combine 2D Qt Quick items into Quick 3D scene we use this kind of approach:

  • Model{
    source:"#Rectangle"
    scale:Qt.vector3d(4,4,1)
    materials:DefaultMaterial{
    diffuseMap:Texture{
    sourceItem:Item{
    // Any Qt Quick content here..
    }
    }
    }
    }

    This allows plenty of customization possibilities with the DefaultMaterial properties. Alternatively, if you want to embed 2D elements so that they are rendered in 3D space but are not affected by Quick 3D lights etc. that can be done even easier like this:

    Node{
    position:Qt.vector3d(10,20,30)
    Item{
    // Any Qt Quick content here..
    }
    }

  • To keep the painting inside the meter circles, demo uses masking ShaderEffect with a fragment shader like this:

  • varyinghighpvec2qt_TexCoord0;
    uniformsampler2Dsrc;
    uniformlowpfloatqt_Opacity;
    voidmain(){
    lowpvec2c=vec2(0.5,0.5);
    if(distance(c,qt_TexCoord0)<0.5){
    gl_FragColor=texture2D(src,qt_TexCoord0)*qt_Opacity;
    }else{
    gl_FragColor=vec4(0.0,0.0,0.0,0.0);
    }
    }

    Now you may be askig that shouldn't we use smoothstep to not get annoying aliased outlines? Excellent question, yes we should if our application wouldn't contain 3D ring meshes which hide these outlines. For the optimal performance, remember to avoid all extra work ;-)
  • For painting the components demo uses mostly the QNanoPainter library. QNanoPainter performs well with both OpenGL and OpenGL ES, and offers smooth vertex antialiasing which makes it a good match for the dynamic meters. The default settings can be reseted by long pressing the view and this UI overlay is implemented using Qt Quick Shape element. Shape is perfect for this kind of painting, no C++ is required and all painting & animating can be done within QML.
The DynamicMeters demo source codes can be downloaded from https://git.qt.io/public-demos/qtquick3d/ so please check it out and give Qt Quick 3D a spin!

Felgo: Qt & QML Tutorials for Beginners | The 16 Best Qt, QML and Felgo Resources in 2020

$
0
0

If you’re new toFelgoor coding, then you’re most likely new toQtandQMLtoo. Qt and QML go hand in hand along with Felgo to help you make cross-platform apps and 2D games in just a few days. Although it’s theeasiest way to make your app or game, if you’re just starting your coding journey, you might be struggling to get to grips with all the new info you need to take in.

Thankfully, there is lots of information online, QML and Qt tutorials, to help you out. Learn more about the differences betweenFelgo, QML, and Qt and take advantage of these tutorials and resources to boost your coding power.

GetQt and QML consulting and training servicesfrom Felgo’s team if you need help with that. You can also outsource yourQt app development with Felgo.

The Differences between Qt, QML and Felgo

As a newcomer, you might have a lot of questions about the differences between these three terms. Qt, QML and Felgo are all separate entities but they all interact when you create your app or game with theFelgo SDK.

Qtis a cross-platform application framework. An application framework is the software that developers use to implement the standard structure of an application. Cross-platform refers to the fact that an application only needs to be written once but works on different systems. Therefore, your apps created with Qt can run on iOS, Android, Windows, and other systems, all without having to write separate codes for them! 

QMLis a user interface markup language. A user interface markup language renders and describes graphical user interfaces and controls. QML is a part of the Qt framework. However, as QML was created initially for the rapid creation of UIs and animations, you can now use it for writing your app or game logic with a component-based approach. Also, you can mix JavaScript with QML easily and make any app or game you like with it.

Like Qt,Felgois also a cross-platform application framework. The difference, however, is that Felgo adds a large number of components, elements, and other features to the existing Qt framework to make it even easier for developers to make their mobile apps and games. So we recommend using this slightly modified framework, as itspeeds up developmentand reduces the amount of coding involved.

Looking for Qt Training, Consulting or Software Development?

The Best Qt Tutorials

1.     Getting Started with Felgo and Qt Creator

Getting started tutorial

Now that you know the differences between the 3 terms, it’s time to get hands-on with them using a short QML tutorial. To start learning about Qt and Felgo, you’ll need to open up Qt Creator. This is a powerful IDE (Integrated Development Environment), available on all operating systems that will allow you to create cross-platform apps and games.

Qt Creator is included in your Felgo installation and you can learn how to set up your projects using an essential tutorial calledGetting Started with Felgo and Qt Creator. This will guide you through the process of creating a new project and teach you a few simple rules of QML. This quick Qt tutorial is an absolute must for anyone learning Qt for the first time.

Download Felgo Now and Try These Helpful Qt & QML Tutorials Out For Yourself!

2. Introduction to Qt – Qt Creator IDE Overview Tutorial

After you have completed the first Qt tutorial, thisvideowill show you some more examples of just how powerful Qt Creator is. You will see the functionality of different parts of the framework and get more acquainted with the interface itself. Make sure to check out theExamplessection on theWelcometab within Qt Creator after you havedownloaded Felgo. You will find a repertoire of amazing demos and possibilities with Qt, QML, and the Felgo SDK.

3.   Creating QML Objects

Once you know Qt Creator, you can start making your own app or game. The basic elements of any project made with Qt or Felgo are QML objects. QML objects include things like buttons, switches, etc. Learning how to implement these objects will help you throughout your coding career, so it’s important to understand them before going any further.Creating QML Objectsis a great starting point for beginners, so make sure to check it out. This QML tutorial will teach you the absolute basics of coding with Qt and Felgo.

4.   Communication between QML Objects

For your app or game to have a level of functionality, your QML objects must be able to communicate with each other.Communication between QML Objectsis a very user-friendly introduction to this subject and will teach you enough to start doing the really enjoyable stuff with your code. This is an essential part of coding both for apps and games, so definitely go through this Qt/QML tutorial.

5.   First Steps with QML

After completing the 3 previous tutorials, there are still a few more concepts to cover in order to gain a comprehensive understanding of Qt, QML and Felgo. The next tutorial to check out will go back over some of the same material covered in the previous tutorials but it will also expose you to some more essential Qt concepts.First Steps with QMLis The Qt Company’s own essential getting started tutorial and isn’t to be missed. It brings you through setting up controls within apps and handling user input.

6.Entity Based Game Design

This is a fun tutorial that shows you how to make your first simple game.Entity Based Game Designteaches you to make a game by introducing you to entities and physics, two essential concepts to understand if you’d like to make mobile games. Once these are covered, you’ll also learn about particle effects, AI and how to use sounds in your games. This is a great tutorial if you’ve never made a game before because it only takes a quarter of an hour to complete.

qt_entityconcept-finalgame

7.C++ and Qt tutorial

This long playlist of YouTube videos might look dated, but is still one of the best Qt tutorials out there if you are looking to learn C++ and the Qt framework. Note, that these videos show you the workings of Qt 4, which has been replaced by Qt 5. Most of the code in these videos is still going to work however, but you might run into a few small problems. If you look on the bright side though, finding solutions to these issues will be a great development training for you. This is a good Qt tutorial for anyone wanting to develop in the Qt core framework, without any extra features and a simplified workflow.

8.   Felgo Tutorials forAppsandGames

qt_felgo-tutorials

Although they’re not strictly Qt tutorials, the Felgo tutorials teach you a lot about Qt for both game and app development. Compared to the previously mentioned videos, these tutorials use the Felgo framework, adding useful features and shortening development time. You’ll need todownloadFelgo oradd it to your existing Qt installationto be able to follow these tutorials. TheFelgo tutorialswill teach you everything from making a simple Flappy Bird game to making your first functional app. And they also explain the most important Qt and QML features in an application-oriented way.

9.   Writing a Widget-Based Application with Qt 5

After you have completed some easier tutorials, you might want to jump straight into deeper waters. Thislong sessionon YouTube is a great resource to follow along, with detailed explanations of the processes under the hood in a Qt application. This is a Qt tutorial, which does not use any Felgo components. It’s definitely a good way to get an overview on Qt, before starting to use the extras Felgo has to offer.

Step-by-step guide to your first Android / iOS App

The Best Qt Resources

10.   Books

Not surprisingly, there are a bunch of books published on the subject of learning Qt. Although some of the books listed on the Qt Wiki have become a little outdated,Qt 5 Cadaques(alias theQML Book)by Juergen Bocklage-Ryannel and Johan Thelin is an excellent read for anyone learning Qt. It’s free to read online and has a great index so you can jump exactly to what you want to know. Juergen and Johan are passionate about coding with Qt so they’re a great influence for any newcomers out there. You can find many more books listed on The Qt Company’swebsite.

11.   Whitepapers

Even if you’re a beginner, the two whitepapers The Qt Company has published should be of interest to you.Beyond the CodeandDriving the User Interfaceare free to download and cover two very diverse areas.

Beyond the Codeis a great piece on how designers and programmers can work together to deliver successful Graphical User Interfaces for embedded systems.Driving the Automotive User Interfaceis a little different as it’s a review of the current trend of adding graphical center-consoles to cars. Check them out to get an idea of the range of projects that can be created with Qt, QML and Felgo.

12.   Demos and Examples

felgo-sample-launcher-qt-tutorials

Demos and examples are a great way to learn how to make apps and games. Being able to look through other projects gives you insight into how different elements of a project are made and you can then copy them into your own applications. Look through theFelgo demos and examplesto get a feel for what a finished game or mobile app project looks like. You can also have a look at theQt demos.

You can also view all of the Felgo game examples and demos in theFelgo Sample Launcher. The Sample Launcher is a stand-alone desktop application that allows you to test all of the open-source demos and examples from Felgo quickly.

13.   Webinars

The Qt Company has released some great webinars over the years to help developers get to grips with certain topics. First and foremost, make sure to check outGet started with Qt. The other webinar that should be particularly useful to new developers isIntroduction to Qt Creator.This webinar is targeted at beginners and could be just the resource you need to get started. You can also download both of these and watch them later offline. Once you’ve watched them, you can move ontoDeep Dive – Qt Quick & Qt Quick Controlsor one of the other more in-depth webinars.

14.   Qt World Summit Talks

The Qt World Summit is an international event that takes place every year. Qt experts from around the world gather to share and discuss what they’ve learned about Qt in the previous 12 months and what they expect to learn in the coming years. Some of the videos are great for new learners as they include sample code that you can follow along with. These videos, in particular, are useful for newcomers:

Introduction to Qt Creator by Tobias Hunger

Getting Started with Qt on Android by BogDan Vatra

Qt on IOS A to Z by Mike Krus

The 8 Mistakes of QtQuick Newcomers by Luca Ottaviano, Develer


15.   Qt Quick Best Practices

Best Practices are basically a set of Do’s and Don’ts for developers to ensure that there is a certain quality to written code. The Best Practices are open to discussion and are usually decided on a group basis. You should always try to follow Best Practices if you’re releasing an app or game, or going to be working with others on a project. It’s a good thing to learn about these Best Practices when you start coding to avoid developing any bad habits which can be problematic down the road. This one is definitely for those that are serious about learning Qt.

16.   Qt Wiki Learning Portal

The Qt Wiki Learning Portal is the place to go to find even more learning resources. It’s a great collection of examples, demos, and resources for improving your Qt coding skills. Although a lot of the listings here are international language versions of other tutorials, there’s still something here for everyone.

Learn to Code with Qt and Felgo!

So now that you’ve got all of the tutorials and resources you need, go and learn to make something great with Qt. And if you find any other cool tutorials or resources, let us know and send us a direct messagehere.

More Posts like This

16 Great Sites Featuring Free Game Graphics for Developers

game graphics

21 Tips That Will Improve Your User Acquisition Strategy

User Acquisition

How to Download the Best Free Fonts for Mobile Development

best free fonts screen capture

16 Great Websites Featuring Free Game Sounds for Developers

game sounds


References

The post Qt & QML Tutorials for Beginners | The 16 Best Qt, QML and Felgo Resources in 2020 appeared first on Felgo.

ICS Insights: Qt and QML: ICS Works with Non-Profits to Develop Low-Cost Ventilators

$
0
0

NEW! We're now working on a second ventilator to fight COVID-19 globally.

qutebrowser development blog: Paving the road towards qutebrowser v2.0

$
0
0

Today, it's been exactly 6 months since I launched the GitHub Sponsors campaign - time flies!

I wanted to use this opportunity to update everyone on what has been going on, on my plans for qutebrowser's future, and on various other bits and bytes - I have a lot of things I …

pat26 MARGINALIA blog: Qt & Android: Setting wallpaper

$
0
0

Is your Android app written using Qt? Would you like to change the wallpaper on your Android device programmatically? Then join me in creating an Android app that generates and saves the image as wallpaper.


Using Qt Creator, create a new 'Qt Quick Application - Empty' naming it WallpaperExample.


Select both Desktop and Android Kits.  It is usually convenient to have a Desktop app to test non-Android features of the app.


Next, verify the WallpaperExample Desktop builds and runs.


Update main.qml so that it can used to set the wallpaper.


Create the AndroidManifest.xml. Additional changes to the XML will be neccessary later.
Select all the Android supported ABI's.


Now, verify the WallpaperExample Android builds and runs.


An effective  approach  for a Qt/QML/C++ app to perform Android specific tasks is to use Android's Java API. Android Java classes are accessible to a Qt application using the JNI convenience APIs in the Qt Android Extras module, such as QAndroidJniObject::callStaticObjectMethod.


Java classes in a Qt Android project need to maintain the Java naming conventions and the directory package structure.
The package name is the same package name assigned in the Android-Mainfest.xml.
Because this Java class, WallpaperGenerator,  requires access to application-specific resources, the Android Context must be passed in from QAndroidJniObject::callStaticMethod call in the Qt class.


The QAndroidJniObject::callStaticMethod calls the static method WallpaperGenerator.generateWallpaper which generates and sets the Android wallpaper on a seperate thread to prevent UI delay.


The method WallpaperGenerator.getWallpaper calls an image generating service and reads the response using common Java API. 
The method WallpaperGenerator.setWallpaper creates and sets the bitmap image using Android  specific API. 
An alternative to calling the methods getWallpaper and setWallpaper, the method generateWallpaper can be called.


AndroidManifest.xml requires a few changes before the app can run. Android requires the manifest.permission.SET_WALLPAPER permission. Starting with Android 9, API level 28, cleartext support is disabled by default and this app communicates with the wallpaper generating server using http, so usesCleartextTraffic must be enabled.


That's all it takes. Run the app and set wallpaper.


KDAB on Qt: Why is my screen still black

$
0
0

Part 2

If you are here from Part 1, welcome back. If you are wondering why we started at Part 2, go to Part 1.

Black Screen

Uncanny Valley!

So, you tried everything from the first part (that was relative to you), and your screen is still a backlighting test? No problem. (Well.. I mean, clearly there is but you know what I mean) We’ve gathered another five reasons this could be happening and how to go about fixing them.

Issue 6: Directional light is pointing in the wrong direction.

There are a few choices when it comes to choosing a light source for your scene. You can even add more than one. So we have Point lights, Directional lights, Spot lights and Area lights. You can then also have emissive textures that will act as a light source. Some of these get tricky… say, if you have a Spot or Directional light, you have to make sure they are pointing at something. For testing, you can always have a point light in the scene but even with these, you have to make sure they won’t be ‘inside’ an object, aren’t black and have a decent brightness.

Issue 7: It’s so dark in here. Did you not turn any lights on?

If using a lighting model, ensure the lights are actually enabled. A good test here is to set a temporary glClearColor (eg pink) – this will usually show un-lit geometry as black. Another solution is to set an ambient colour term and/or changing the background colour to something lighter.

Issue 8: Are you supplying enough power to your Raspberry Pi 4?

The Raspberry Pi 4 has dual HDMI outputs. Using the Qt EGLFS backend, these are available as different displays – so can run two different Qt applications, one full-screen on each. But if your system is near the limits of its power supply (and the onboard power monitor is quite picky, on the Pi) – the second display might fail to initialise. When debugging this problem, we initially tested different OpenGL backends and QPA plugins, but none of these made any difference. Very occasionally both displays would work, but mostly the second one would fail to initialise with an EGL error. A beefier power supply fixed the problem immediately. (Sometimes, it’s really not a software problem)

Issue 9: The GL context won’t create.

This can happen for instance if you upgrade your drivers (especially common with Linux and NVidia cards) and don’t reboot, there’s a high chance that your system won’t be able to create a GL context anymore. To make sure that this is the issue, start a simple 3D program such as glxgears. If it does not work, only one solution : reach for that restart button.

For more info, see: Checkliste Allgemein (German)

Issue 10: Return of the mac. – You’re using the wrong profile

OpenGL has been around for a while and has many version. Maybe you are using something that requires a more recent version of OpenGL? One thing that is more subtle, especially when updating old code to more modern practices, is the concept of profile. As of 3.2, contexts can be created with a Core profile or a Compatibility profile. The latter preserves compatibility with older fixed function pipeline code and settings. However, it is optional for drivers to implement that profile. Apple, in its wisdom, has decided not to do so. So if you ask for a Compatibility profile, it will create a 2.1 context, and you will not be able to use 3.0 or later features.

So, make sure Core profile is enabled, on the default QSurfaceFormat instance.

Other cross-platform issues are quite common. For example, NVIDIA drivers tend to be forgiving and accept using texture2D() in shaders even though it should not be allowed in a Core profile. So test on as many platforms and driver setups you can lay your hands on.

Once you’ve double checked the camera settings, shaders and your model settings, 6, 7, 8, 9, and 10, you should be good to go! If not, why not comment your issue below and we’ll try to get it in the next part.

About KDAB

If you like this blog and want to read similar articles, consider subscribing via our RSS feed.

Subscribe to KDAB TV for similar informative short video content.

KDAB provides market leading software consulting and development services and training in Qt, C++ and 3D/OpenGL. Contact us.

The post Why is my screen still black appeared first on KDAB.

KDAB on Qt: Automating tasks in Qt Creator

KDAB on Qt: Using Modern CMake with Qt

$
0
0

KDAB’s Kevin Funk presented Using Modern CMake with Qt at Qt Virtual Tech Con last month.

He reported that the Qt Company did a great job moderating the sessions at this event, and there was a lively Q&A at the end – Kevin had to pick from about 60 questions, so this is a hot topic.

Now the event is over you can access Kevin’s talk here, including the answers he had time for, and also his slides, below the abstract.

Using Modern CMake with Qt with Kevin Funk

Prerequisite: No prior CMake experience required

CMake is a cross-platform build system, with powerful APIs for finding dependencies of various or specific versions, and with many abstractions for platforms, compilers, other build systems, and dependencies.

The next major Qt version, Qt6, will be using CMake internally as its build system, so the CMake integration with Qt will likely get tighter and more versatile in the long-term.

In this talk, we’ll be introducing Qt specific CMake functionalities, in order to find and use Qt5 inside your personal CMake-based project, using modern CMake capabilities. We are going to discuss how to find Qt installs using CMake’s find_package function and how to find specific Qt versions when multiple versions are installed.

Further than that, useful CMake variables such as CMAKE_INCLUDE_CURRENT_DIR, CMAKE_AUTOMOC, CMAKE_AUTORCC, and CMAKE_AUTOUIC will be explained in detail and how the use of the CMake integrations can speed up the build drastically.

Last but not least some of the additional supplied Qt related CMake functions, such as for big resources or translation support will be discussed.

Target audience: Build Engineers or Software Engineers who would like to know more about using Qt under CMake.

Download Kevin’s slides:QTVTC20 – Using Modern CMake – Kevin Funk

About Kevin Funk

Kevin has actively developed with Qt/C++ since 2006 and has a special interest in tooling and profiling. He’s an active contributor to KDAB’s GammaRay analyzer (a high-level Qt application debugger) and has a strong emphasis on state machine tooling. He is a co-maintainer of the KDevelop IDE, a powerful C/C++ development environment backed by Clang, and is pushing for cross-platform success inside KDE. Kevin holds a Masters Degree in Computer Science.

Download Kevin’s whitepaper on CMake and Qt…

The post Using Modern CMake with Qt appeared first on KDAB.


KDAB on Qt: Using Visual Studio Code for Qt Applications – Part Two

$
0
0

In the last blog post we saw an essential, C++ oriented, Visual Studio Code setup. That was enough to get going right away, but we can still definitely do more and better. Here I’ll show you how to get a complete setup for your qmake and CMake projects, all this while also wearing a Qt hat (on top of my C++ hat) and having a deeper look at the Qt side.

Build qmake Qt projects

Qmake is not integrated with Visual Studio Code the way CMake is, so setting up a qmake project for build is slightly more convoluted than doing the same with CMake. This means we’ll have to define our own build tasks. We’re going to do this in two stages: build steps definition and build steps combination, leveraging the fact that Visual Studio Code implements task dependencies and ordered sequential execution of dependencies.

Create build steps

As far as build steps are concerned, the following are, in a nutshell, the ones that will cover most cases:

  • Create the build directory (in a way that doesn’t fail if the directory already exists)
    {
      "label": "Create build dir",
      "type": "shell",
      "command": "mkdir -Force path/to/build/dir"
    }
    

    Here, -Force is a powershell parameter that will prevent the command to fail if the directory already exists. On Unix based systems, you can use mkdir -p instead.

  • Run qmake
    {
      "label": "Run qmake",
      "type": "shell",
      "command": "qmake",
      "arg": [ ... add your qmake arguments here ... ],
      "options": {
        "cwd": "path/to/build/dir"
      }
    }
    
  • Run make/nmake/jom, depending on the platform
    {
      "label": "Run make",
      "type": "shell",
      "command": "jom",
      "options": {
        "cwd": "path/to/build/dir"
      }
    }
    
  • Clear build folder This can mean different things depending on how the build file is configured. It could be a simple make clean, or a more thorough removal of the whole content of the build folder.
    {
      "label": "Clear build folder",
      "type": "shell",
      "command": "jom clean",
      "options": {
        "cwd": "path/to/build/dir"
      }
    }
    
Combine build steps

Now that our steps are defined, we can go on and define the actual build tasks. We’ll prepare two for this example, one for running a build, and one for running a clean build. Let’s see the task for a regular build:

{
  "label": "Build",
  "dependsOn": [
    "Create build dir",
    "Run qmake",
    "Run make"
  ],
  "dependsOrder": "sequence"
}

There are two new properties here: "dependsOn" is a list of task labels, and it means that those tasks need to be executed before the current task is built, while "dependsOrder", when set to "sequence", will tell Visual Studio Code to run all dependent tasks sequentially and in the given order.

The task for a clean build is very similar and will only have an extra step where the project is cleaned before being built again:

{
  "label": "Clean build",
  "dependsOn": [
    "Clear build folder",
    "Create build dir",
    "Run qmake",
    "Run make"
  ],
  "dependsOrder": "sequence"
}

And that’s it, now it’s just a matter to open the command palette (Ctrl+Shift+P), select “Task: Run Task” and then “Build”.

Use a default task

As an alternative (or better, an addition) to selecting manually the build task from a list every time, Visual Studio Code also allows to run a default task with a key combination (Ctrl+Shift+B). To mark a task as default, you need to add a few extra lines to the task configuration:

{
  // ... task configuration
  "group": {
    "kind": "build",
    "isDefault": true
  }
}
Use your own Qt

If Qt is not configured at a system level, or you want to use a Qt version other than the default one installed and configured in your system, you need to explicitly configure the environment so that every task is run with the right Qt version in the path. Visual Studio Code allows you to do this every time a terminal is launched for running a task, so our environment customizations are set before running the task command.

This is done in the settings file (or in the workspace settings if you’re working with a workspace), and the property name for this setting is system dependent: either "terminal.integrated.env.windows", "terminal.integrated.env.linux", or "terminal.integrated.env.osx". The property requires an object, where each property is the name of an environment variable, and the associated value is the value for the variable. Below is an example configuration for Windows:

{
  // All other settings...
  "terminal.integrated.env.windows": {
    "PATH": "C:/Qt/5.12.4/msvc2017_64/bin;${env:PATH}"
  }
}

Build CMake Qt projects

Setting up a CMake based project using the CMake extension doesn’t require any settings manipulation if Qt is already configured on your system. What you will need is to select a CMake kit (the CMake extension finds them automatically), a build variant, and launch the build with F7.

Short video showing how to launch a CMake build with Visual Studio Code

However, you may want to use extra arguments in the configuration step or specify your build directory so for instance it doesn’t end up being inside the source directory. You can customize CMake configuration arguments by setting the property "cmake.configureSettings" in your settings file. This property expects a list of string arguments that will be passed to CMake during the configuration step:

"cmake.configureSettings": {
  "CMAKE_PREFIX_PATH": "my/prefix/path",
  "ENABLE_FEATURE": "1",
  "ENABLE_OTHER_FEATURE": "0"
}

To customize the build directory, just set "cmake.buildDirectory" to the desired path. This value may contain variables, so it can be configured, for instance, to point a path relative to the project folder:

"cmake.buildDirectory": "${workspaceFolder}/../build-cmake-project"

If you want to use a custom Qt version, or Qt is not configured system-wide (as is the case on Windows) it’s enough to set CMAKE_PREFIX_PATH properly in the "cmake.configureSettings" property in the settings file. For example:

"cmake.configureSettings": {
  "CMAKE_PREFIX_PATH": "otherprefixpath;C:/Qt/5.12.4/msvc2017_64"
  // ... other args
]

You can find a complete documentation for the CMake Tools extension here, featuring a guide on how to use CMake Tools from the UI, and a documentation for all available settings.

Running and debugging our Qt application

Now that your application has been built, let’s see how we can launch it and, most importantly, debug it.

Running qmake projects

For projects built with qmake, we don’t have any help from extensions and the only option we have is to bake our own launch configurations in the way we’ve seen in the last blog post. This is done in the launch configurations file (launch.json) or in the workspace file, and this is how a launch configuration looks:

{
  "name": "My application",
  "type": "cppvsdbg",
  "request": "launch",
  "program": "path/to/application",
  "stopAtEntry": false,
  "cwd": "${workspaceFolder}",
  "environment": [],
  "externalConsole": false
}

You can run launch configurations both with or without debugger, using “Debug: Start Debugging” (F5) or “Run: Start Without Debugging” (Ctrl+F5) respectively. If Qt is not configured at a system level, or you want to use a custom Qt version, the corresponding launch configuration will need to be explicitly configured to include Qt in its path.

You can do this by updating the "environment" property in the launch configuration. Below is an example for Windows, setting only the "PATH" environment variable. Configurations for other systems need to be adjusted but are essentially similar.

"environment": [
  {
    "name": "PATH",
    "value": "C:/Qt/5.12.4/msvc2017_64/bin;${env:PATH}"
  }
]

Side note: here ${env:PATH} means whaterever value the environment variable PATH has before the launch configuration is run. In general, the syntax ${env:VARNAME} can be used to get an environment variable in a task or a launch configuration.

Running CMake projects

Working with CMake is easier in principle, as the CMake extension provides the commands “CMake: Run Without Debugging” and “CMake: Debug”, allowing you to respectively launch and debug CMake targets.

However, this approach has a number of shortcomings:

  • It’s not possible to specify per-target run arguments for debug runs.
  • It’s not possible at all to specify run arguments for non-debug runs.
  • Some debugging options such as source mapping or custom views with natvis are not configurable using cmake settings.

So in conclusion using the CMake extension for running targets is not really convenient if you want a comprehensive debugging experience, and the best way to go is still to create your own launch configurations.

The CMake extension provides a few convenient variables for launch configurations:

  • ${command:cmake.launchTargetPath}: resolves to the full path of the executable for the target selected from the launch target menu.
  • ${command:cmake.launchTargetDirectory}: resolves to the directory containing the executable for the target selected from the launch target menu.

Qt aware debugging

What we’ve seen until now will let you build and run your Qt applications, using either your system provided Qt or your own. Debugging will work out of the box already, as long as the application code is involved. But wouldn’t it be great to also be able to peek inside Qt’s source code while debugging? Or if we had a better visualization for Qt specific types?

Turns out we can do both with little manipulation on launch configurations. Let’s see how.

Configure debug symbols

Usually Qt debug symbols are distributed alongside libraries, so there’s no real need to explicitly configure debug symbols paths. If that’s not the case, you can configure the debug symbols path by setting the "symbolSearchPath" property on a launch configuration. This property is a string and contains a list of paths separated by a semicolon.

"symbolSearchPath": "otherSearchPath;C:/Qt/5.12.4/msvc2017_64/bin"

This of course can be useful for adding debug symbols for other libraries too.

Source mapping

If the source directory for your Qt differs from the actual source directory (or directories) used while building it, you can configure the debugger to resolve those paths correctly. This happens for instance with binary Qt releases on Windows. You can enable source mapping in launch configurations by adding the "sourceFileMap" property. This property requires an object where each key is the source folder as it’s provided by the debug symbols, and the corresponding value is the path where the source code is in your system. This is how it can be configured for a binary Qt release on Windows:

"sourceFileMap": {
    "C:/work/build/qt5_workdir/w/s": "C:/Qt/5.12.4/Src",
    "Q:/qt5_workdir/w/s": "C:/Qt/5.12.4/Src",
    "C:/Users/qt/work/install": "C:/Qt/5.12.4/Src",
    "C:/Users/qt/work/qt": "C:/Qt/5.12.4/Src"
}
Using Natvis for Qt aware objects visualization

Natvis is a Visual Studio framework that allows you to customize how native C++ objects are visualized in the debugger. Natvis visualization rules are specified through xml files with a specific schema. A natvis file lists visualization rules for each C++ type, and every visualization rule consists in a series of properties. Such properties are meant to be user friendly and will be displayed on the debug window when visualizing objects of the corresponding type.

To name a few examples, a QString is visualized as the string it contains and has a size property and a number of items corresponding to its characters, and QRect will have a width and a height property instead of just the bare (and less intuitive) internal representation of the top left and bottom right points (x1, y1, x2, y2).

If you want to enable natvis in a debug run, just set the "visualizerFile" property in your launch configuration so that it points to the natvis file.

"visualizerFile": "path/to/qt5.natvis"

Debug pane before and after configuring natvis

You can find a ready to use natvis file for Qt 5 at this link.

Updating the code model

In order to be able to navigate Qt headers and enable IntelliSense for the Qt API, it’s enough to adjust the C++ settings for our project (c_cpp_properties.json) by adding the Qt include folder (and all its subfolders):

{
  // ...
  "includePath": [
    // ...
    "C:/Qt/5.12.4/msvc2017_64/include/**"
  ]
}

If you’re working on a CMake project, it’s also possible to use the CMake plugin as a configuration provider. Doing so, include paths and defines will be bound to the currently configured CMake build, and won’t need to be specified manually. This simplifies the C++ properties file considerably, as it’s shown in the example below:

{
  "configurations": [
    {
      "name": "Win32",
      "intelliSenseMode": "msvc-x64",
      "configurationProvider": "vector-of-bool.cmake-tools"
    }
  ],
  "version": 4
}

A note about using Visual Studio compilers on Windows

Visual Studio provides batch files that automate the environment setup necessary to use their C++ compiler and linker. In the last post we saw how it’s possible to configure a task so that it sets up the environment through the vcvars.bat script before running a command.

However, if you need to configure the environment with vcvars.bat for most of your build steps, it is also possible to configure Visual Studio Code so that it runs the batch file for every task. To do so, you need to tweak the configured shell (which is powershell by default on windows) and pass a few args. The setting name for doing this is “terminal.integrated.shellArgs.windows” and it’s set as follows:

"terminal.integrated.shellArgs.windows": [
  "Invoke-BatchFile 'C:/Program Files (x86)/Microsoft Visual Studio/2017/Professional/VC/Auxiliary/Build/vcvars64.bat' amd64",
  "; powershell"
]

What’s going on here is this: Visual Studio Code will launch by default every shell task by calling this command:

powershell  -Command 

So, if you set “terminal.integrated.shellArgs.windows” this way, the final command will look like this:

powershell Invoke-BatchFile 'path/to/vcvars' ; powershell -Command 

As a result, task commands will be effectively run in a powershell with the right environment set.

And that’s it for now. Many new things on the table, and some advanced features too. Hopefully this will help you with your workflow.

But there is still more to say, so make sure you don’t miss the next post!

About KDAB

If you like this blog and want to read similar articles, consider subscribing via our RSS feed.

Subscribe to KDAB TV for similar informative short video content.

KDAB provides market leading software consulting and development services and training in Qt, C++ and 3D/OpenGL. Contact us.

The post Using Visual Studio Code for Qt Applications – Part Two appeared first on KDAB.

KDAB on Qt: Kuesa 3D 1.2 release!

$
0
0

Today, KDAB is releasing version 1.2 of the 3D integration workflow Kuesa 3D, built on top of Qt 3D.

Kuesa™ 3D is a complete design-to-code workflow solution for 3D in real-time applications, centered around the open glTF™ 2 format, supported by Blender, Maya and 3ds Max.

Read the Press Release…

In short, Kuesa provides a workflow that simplifies work for both designers and developers. It is centered around the glTF 2 format. The idea behind Kuesa 3D is that changes made on 3D models shouldn’t require much, if any, work on the developer’s side. As a consequence, you can iterate more frequently, get feedback more often and release on time.

In this blog post, we will highlight some of the new features we have introduced. You can get the full details here.

What’s new since 1.1?

The Iro Material library

The glTF 2 format currently only supports a Metallic Roughness physically-based material. As a result, it looks great but can be very expensive to render and requires lots of assets. For many use cases, simpler materials can be used instead: this is what the Iro Material library offers.

The library provides several materials that simulate reflections, clear coats of paint or simple transparent surfaces. The benefits of Iro materials are twofold:

  • they significantly reduce your GPU usage (compared with PBR materials), making them ideal for embedded or mobile applications;
  • they offer a real WYSIWYG integration with your 3D authoring tool: Kuesa is going to render your 3D models exactly like they appear in your artists’ editing suite.

This video by my colleague Timo Buske shows Iro Materials in action:

Improved Blender Support

Despite a steep learning curve, Blender is a fantastic tool and the latest version brings lots of interesting features to the table. For that reason, we have added support for Blender 2.8.

We can therefore now rely on the official glTF 2.0 export bundled with Blender. Furthermore, to make the best use of it, we’ve contributed patches that allow extending the exporter through custom extensions.

Then, we’ve added an extension to allow exporting of Iro Materials to glTF 2.0 files. In addition, we’ve also updated the Kuesa Blender addon to show a real time preview of the Iro Materials in Blender. What you see in Blender is what you’ll get with Kuesa 3D.

Improved animation support

Currently, glTF 2.0 only supports animating transformation properties (translation, scale, rotation) of objects. Incidentally, there is a draft of an extension EXT_property_animation to add support to animate any property.

Since that was a really important feature for us, we’ve decided to implement it for Kuesa 3D. In that sense, we’ve added a custom EXT_property_animation to the exporter. Next, we’ve updated the glTF 2 importer in the Kuesa 3D Runtime library to parse it properly.

Hence, we can now animate material, lights or camera properties in Blender, export the scene as a glTF file (with the extensions) and load it with Kuesa 3D Runtime.

An updated offering

With this new release, we changed the offering of the product to satisfy different use-cases.

Kuesa 3D Studio

Kuesa 3D Studio is the complete solution a team can use in production, with everything needed to satisfy both designers and developers:

  • Kuesa 3D Design Plugins:
    • Blender addons supporting:
      • Kuesa 3D extensions for Layers and Iro materials
      • The EXT_property_animation extension
      • Real time preview of the Iro materials in the Eevee viewport
  • Kuesa 3D Tools:
    • glTF editor application allowing preview and introspection of glTF 2 scenes
    • collection of command line tools to check and optimize assets
  • Kuesa 3D Runtime: Qt module library on top of Qt 3D
    •  glTF 2.0 fully compliant loader
    • support of Kuesa 3D and EXT_property_animation extensions
    • retrieve the various resources held in the scene
    • playback animations
    • add post processing effects such as Bloom, Depth of Field …
    • use a premade Qt 3D FrameGraph

The Kuesa 3D Tools and Runtime also support any glTF 2.0 files coming from other application like Maya, 3DS Max or others, as long as they can export to glTF 2.0.

You can find out more about Kuesa 3D Studio here.

Kuesa 3D Runtime

Kuesa 3D Runtime is also available as a separate product, full support from us. The product is available on the Qt marketplace or directly from us. This is perfect if you want to try out Kuesa and see what you can do with it.

Like previous releases, it is freely available under the AGPL 3 license.

Since it is built on top of Qt 3D, you can use the full Qt 3D API to further customize your application. For the most part, you can leverage things like Picking, Camera handling and a lot more for free.

As for actual Qt requirements, Kuesa 3D Runtime requires either the latest Qt 5.12 or the new Qt 5.15 release.

Find out more about Kuesa 3D Runtime.

Additional Contributions

Lastly, Kuesa 3D is also a way for us to justify contributions to open source projects. In that sense, we’ve made a few contributions targeting:

  • Support for registering and creating user defined extension in Blender’s glTF exporter
  • Fixes for animations on the official Blender glTF exporter
  • Qt 3D bug fixes and performance improvements

Try it out!

You can download Kuesa 3D Runtime from our GitHub repository.

Download the latest Kuesa 3D Studio brochure.

Join our live webinars and ask questions:

Watch our Realtime Music Box short video where I explain all this running on one of our demos:

About KDAB

If you like this blog and want to read similar articles, consider subscribing via our RSS feed.

Subscribe to KDAB TV for similar informative short video content.

KDAB provides market leading software consulting and development services and training in Qt, C++ and 3D/OpenGL. Contact us.

The post Kuesa 3D 1.2 release! appeared first on KDAB.

KDAB on Qt: Kuesa 3D Studio 1.2 – Press Release

$
0
0

KUESA™ 3D Studio 1.2 released

A Complete Design-to-Code Workflow Solution for 3D Assets in Real-time Applications

  • version 1.2 released
  • makes 3D design and development workflows easy, fast and reliable
  • offers support for Maya, Autodesk 3ds Max, and Blender as well as any other glTF-compatible digital content creation tools
  • New: Iro materials library can simulate common surface properties with less designer and GPU overhead
  • free live webinar June 4th, 6pm CEST

Berlin, June 2nd 2020

Building software that is dependent on real-time 3D models – like for example an automotive dashboard, MRI machine, factory control system or furniture design tool – requires not only 3D designers and 3D programmers. It also demands the ability to bring these very different skill sets together into a smoothly operating workflow.

In conventional workflows, a massive problem is that the assets created by 3D artists can rarely be used by programmers directly, forcing the development team to hand-tweak models and hand-code animations to make things work. It also forces designers to move their designs to target hardware to see how they’ll actually appear. This manual work extends product release timelines, and the artificial wall it creates between 3D artists and software engineers is a bottleneck that prohibits rapid iteration and the fine-tuning required to develop fast and high-quality results.

To eliminate this problem KDAB created KUESA 3D Studio. It makes the collaboration of designers and developers much more manageable by offering a seamless, integrated workflow. Designers can realize their vision using their favorite tools, developers can focus on their strengths without having to deal with design issues, and management can rely on getting better products to market faster.

How does KUESA 3D Studio work?

KUESA 3D Studio is comprised of three main components.

The KUESA 3D Design Plugins augment a designer’s preferred digital content creation tools, allowing them to create and export fully accessible 3D scenes and to display content that visually matches the run-time environment.

Many additional utilities are integrated in KUESA 3D Tools for fine-tuning, conditioning, investigating, debugging, and optimizing 3D assets, usable by either designers or developers.

Libraries built on top of Qt and Qt 3D allow developers to integrate 3D scenes directly into applications. This module is called KUESA 3D Runtime.

What’s new in version 1.2?

One of the most significant improvements is the Iro Materials Library. Physically-based rendering (PBR) can generate amazing images, but not all embedded systems have enough processing power to handle it. Also, without knowing the actual physics, PBR isn’t easily tweakable to simulate materials such as a pre-defined bitmap that needs to appear glossy. For these cases, or any other where PBR may be overkill, KUESA 3D Studio supports the Iro Material Library. This library provides a catalog of materials that can simulate common surface properties (such as reflections, clear-coated paint, and transparency) and gives great looking results with less designer and GPU overhead.

By default, glTF™ only allows you to animate transformation properties like translation, rotation, scale. In lots of cases, it would be useful to animate other properties like material properties, camera properties etc. This has now been added through the use of a custom glTF extension.

An additional benefit is brought in by Qt 3D, which KUESA 3D Studio is based on and which is maintained by KDAB. With Qt 3D on Qt 5.15.0 very potent profiling capabilities have been added.

More features:

  • Support for Maya, Autodesk 3ds Max, and Blender, as well as any other glTF-compatible digital content creation tools
  • Ability to build 3D scenes with PBR, non-PBR, and node-based materials
  • Real-time performance on desktop and embedded systems
  • Integration of both 3D and 2D assets
  • Compressed textures, meshes, and images for faster load times, reduced application size, and optimal use of GPU resources
  • Full programmatic access to scene items with APIs in C++ and QML
  • Photo-realistic results consistent across design tools and applications
  • Special effects like bloom and depth-of-field
  • Up to date with Qt 3D performance improvements in Qt 5.15
  • Ability to incorporate tools into a continuous integration system resulting in consistent 3D asset verification and conditioning
  • Availability of AGPL 3 license for KUESA 3D Runtime

———————————————————————————————————————————

More information on www.kuesa.com

Live demo webinars are scheduled for:

June 4th 2020… (6pm Central European Time)

June 18th 2020... (8am Central European Time)

Video footage

About the KDAB Group

The KDAB Group is the world’s leading software consultancy for architecture, development and design of Qt, C++ and OpenGL applications across desktop, embedded and mobile platforms and is one of the biggest independent contributors to Qt. Our experts build run-times, mix native and web technologies, and solve hardware stack performance issues and porting problems for hundreds of customers, many among the Fortune 500. KDAB’s tools and extensive experience in creating, debugging, profiling and porting complex applications help developers worldwide to deliver successful projects. KDAB’s trainers, all full-time developers, provide market leading, hands-on, training for Qt, OpenGL and modern C++ in multiple languages. Founded in 1999, KDAB has offices throughout North America and Europe.

More Information on www.kdab.com Press Contact: press@kdab.com

Download this report

The post Kuesa 3D Studio 1.2 – Press Release appeared first on KDAB.

KDAB on Qt: QStringView Diaries: Zero-Allocation String Splitting

$
0
0

After four months of intensive development work, I am happy to announce that the first QStringTokenizer commits have landed in what will eventually become Qt 6.0. The docs should show up, soon.

While the version in Qt will be Qt 6-only, KDAB will release this tool for Qt 5 as part of its KDToolBox productivity suite. Yes, that means the code doesn’t require C++17 and works perfectly fine in pure C++11.

This is a good time to recapitulate what QStringTokenizer is all about.

QStringTokenizer: The Zero-Allocation String Splitter

Three years ago, when QStringView was first merged for Qt 5.10, I already wrote that we wouldn’t want to have a method like QString::split() on QStringView. QStringView is all about zero memory allocations, and split() returns an owning container of parts, say QVector, allocating memory.

So how do you return the result of string splitting, if not in a container? You take a cue from C++20’s std::ranges and implement a Lazy Sequence. A Lazy Sequence is like a container, except that it’s elements aren’t stored in memory, but calculated on the fly. That, in C++20 coroutine terms, is called a Generator.

So, QStringTokenizer is a Generator of tokens, and, apart from its inputs, holds only constant memory.

Here’s the example from 2017, now in executable form:

const QString s = ~~~;
for (QStringView line : QStringTokenizer{s, u'\n'})
    use(line);

Except, we beefed it up some:

const std::u16string s = ~~~;
for (QStringView line : QStringTokenizer{s, u'\n'})
    use(line);

Oh, and this also works now:

const QLatin1String s = ~~~;
for (QLatin1String line : QStringTokenizer{s, u'\n'})
    use(line);

QStringTokenizer: The Universal String Splitter

When I initially conceived QStringTokenizer in 2017, I thought it would just work on QStringView and that’d be it. But the last example clearly shows that it also supports splitting QLatin1String. How is that possible?

This is where C++17 comes in, on which Qt 6.0 will depend. C++17 brought us Class Template Argument Deduction (CTAD):

std::mutex m;
std::unique_lock lock(m); // not "std::unique_lock lock(m);"

And that’s what we used in the examples above. In reality, QStringTokenizer is a template, but the template arguments are deduced for you.

So, this is how QStringTokenizer splits QStrings as well as QLatin1Strings: in the first case, it’s QStringTokenizer, in the second, QStringTokenizer. But be warned: you should never, ever, explicitly specify the template arguments yourself, as you will likely get it wrong, because they’re subtle and non-intuitive. Just let the compiler do its job. Or, if you can’t rely on C++17, yet, you can use the factory function qTokenize():

const QLatin1String s = ~~~;
for (QLatin1String line : qTokenize(s, u'\n'))
    use(line);

QStringTokenizer: The Safe String Splitter

One thing I definitely wanted to avoid is dangling references a la QStringBuilder:

auto expr = QString::number(42) % " is the answer"; // decltype(expr) is QStringBuilder<~~~, ~~~>
QString s = expr; // oops, accessing the temporary return value of QString::number(), since deleted

The following must work:

for (QStringView line : QStringTokenizer{widget->text(), u'\n'})
    use(line);

But since the ranged for loop there is equivalent to

{
   auto&& __range = QStringTokenizer{widget->text(), u'\n'};
   auto __b = __range.begin(); // I know, this is not the full truth
   auto __e = __range.end();   // it's what happens for QStringTokenizer, though!
   for ( ; __b != __e; ++__b) {
     QStringView line = *__b;
     use(line);
   }
}

if QStringTokenizer simply operated on QStringView or QLatin1String, the following would happen: The __range variable keeps the QStringTokenizer object alive throughout the for loop (ok!), but the temporary returned from widget->text() would have been destroyed in line 3, even before we enter the for loop (oops).

This is not desirable, but what can we do against it? The solution is as simple as it is complex: detect temporaries and store them inside the tokenizer.

Yes, you heard that right: if you pass a temporary (“rvalue”) owning container to QStringTokenizer, the object will contain a copy (moved from the argument if possible) to extend the string’s lifetime to that of the QStringTokenizer itself.

Future

Now that we have developed the technique, we very strongly expect it to be used in Qt 6.0 for QStringBuilder, too.

By Qt 6.0, we expect QStringTokenizer to also handle the then-available QUtf8StringView as haystack and needle, as well as QRegularExpression and std::boyer_moore_searcher and std::boyer_moore_horspool_searcher as needles. We might also re-implement it as a C++20 coroutine on compilers that support them, depending on how much more performance we’ll get out of it.

Conclusion

QStringTokenizer splits strings, with zero memory allocations, universally, and safely. Get it for free right now from KDToolBox, and you can future-proof your code with an eye towards Qt 6.

About KDAB

If you like this blog and want to read similar articles, consider subscribing via our RSS feed.

Subscribe to KDAB TV for similar informative short video content.

KDAB provides market leading software consulting and development services and training in Qt, C++ and 3D/OpenGL. Contact us.

The post QStringView Diaries: Zero-Allocation String Splitting appeared first on KDAB.

Qt – Life of a Developer: The Cost of no Architecture

$
0
0

Like many others, I enjoy various reverse engineering and tear-down stories. Personally, I mean things like iFixit tear-downs and Ken Shirriff’s blog, so I started following this tweet thread by foone.

This continues with another tweet sequence about getting software running on the remote control. Having enjoyed these tweets, I started thinking.

The Harmony remotes are quite expensive in my mind. I can’t find any exact numbers for the number of sold devices, but I found this 2018 Q4 earnings report. Looking at the net sales, I guess the remotes are either “Tablets & Other Accessories” or “Smart Home”. They represent sales net sales of ~107 and ~89 MUSD over 12 months. Let’s pick the lower number and just look at magnitudes. The Harmony 900 seems to have retailed for ~350 USD back when it was new. So, if all the Smart Home stuff was harmonies, we’re looking at 250k units over a year. So I’m guessing the magnitude is around 10k – 100k units annually – but the Harmony 900 is from 2013, so I assume that it sold closer to the lower number, if not below. The market was new and so on.

Then we look at the tweets again. What have we got? Let’s put aside security issues, unencrypted communications, and other clear mistakes and just look at how the device is built.

Flash to drive the UI, double web servers on-board, Lua, QNX and what not. A 233 MHz CPU and ~64MB of FLASH – for a remote control. From an engineering perspective, this sounds like a fun system to work on – from an architecture perspective, it looks like a ball of mud.

Back in 2013, QNX might have been a good choice compared to Linux. Today, with Yocto and similar tools for developing embedded Linux systems, it feels like an odd choice to add a license cost to such a device. But no biggie. Back in the day this was not an unreasonable choice (and still isn’t for certain applications).

The Flash stuff. There were alternatives back in 2013, but sure, there were plenty of developers at hand and things like Qt QML was still probably a bit clunky (I can’t recall the state of it back then – it required OpenGL ES, which I guess was a big ask back then).

But the mix of techniques and tools. The on-board web servers. The complexity of a small system and the costs it brings to maintenance and testability. If this is the foundation for Harmony remotes and a platform that has been used for the better past of the past decade, I wonder if the added engineering costs for architecture the platform to be more optimized early on would not have paid off in lower maintenance costs, as well as lower hardware costs.

I know how it is when you’re in a project. The deadline is there in big writing on one of the walls. You can get something working by stringing what you have together with duktape and glue. The question I’m asking myself is more along the lines of how do we run embedded systems engineering projects? Where did we go wrong? Why don’t we prioritize the thinking and refactoring over the just-get-this-thing-out-of-the-door?

The answer is time to market and such, but over a decade of building on a ball of mud, the economical numbers start adding up in favour for the better engineered product. For continuous improvement. For spending time thinking about how to improve the system as a whole.

Viewing all 15410 articles
Browse latest View live